This Spring we started tomato seeds inside to try and get a head start on yummy produce. We’ve done seedlings inside before with mixed results. Last year we took them outside too early and the cold weather stunted them. This year they seem to be off to a much better start.
We started by using an old egg carton filled with dirt from our garden to start a dozen seeds. Nine germinated in our chilly house and we repotted those to pint sized plastic containers. Each time that you repot tomatoes, you want to set them deeper into the soil. The little hairs/fuzz along the stem will turn into new roots and make the plant stronger and more drought resistant. Yesterday, I repotted the plants a second time from pint containers to quart containers.
I like to wet the soil of the smaller container first to help the dirt stick together. You want to be especially careful of the tomato plant stem. If it breaks, the plant is a write off. Clip or pinch off any low leaves on the stem and bury the plant up to the first true leaves.
The rule of thumb is to repot whenever the tomato is 3 times taller than the diameter of the pot. By doing multiple repotting, you can develop a large and strong root system that will keep the tomatoes from splitting during hot summer days.
Starting seeds inside is a great way to be frugal. You can reuse plastic pots almost indefinitely. I looked up quart sized cherry tomato plants at one of our nearby big box stores and they were selling for $4/plant. We currently have seven plants at that size, so the seeds pay for themselves. In a few more months we should have an abundant crop of delicious cherry tomatoes!
Shae and I are an odd couple, so it stands to reason that we’d have odd dates. Yesterday’s date was to Menards to take advantage of some great rebate sale deals that they have going on.
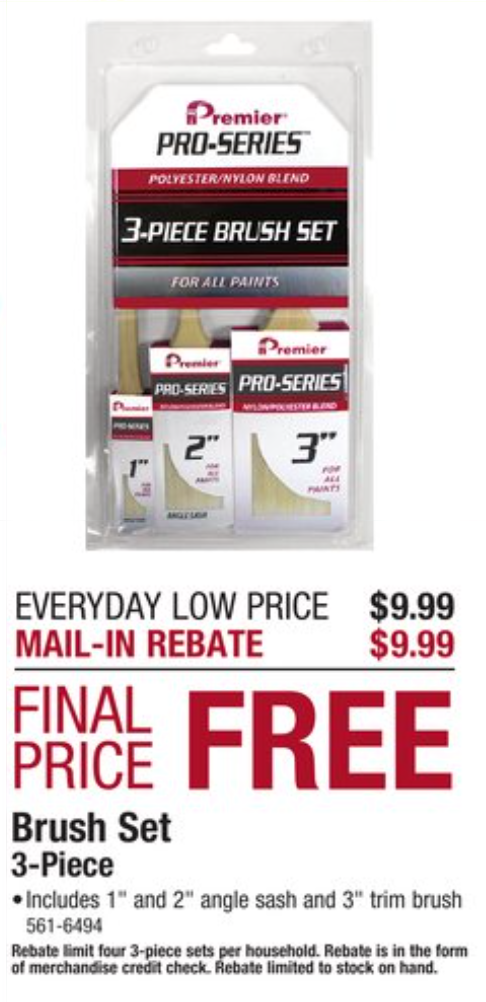
The best deal was for paint brushes. We picked up 8 packs, 4 for us and 4 for the business. We just finished using up the brushes from the last deal.
They were sold out of the Blow Gun Kits. I may have to check back later to see if they have restocked.
We picked up four 75 watt replacement LEDs. I might pick up another four for the business. The extra light is nice on long winter nights.
There are some other freebies that I couldn’t justify a postage stamp for like matches, microfiber clothes, and deck cleaner. I try to only get things that we actually use.
You can see the Menards sales flyers online here. Happy hunting.
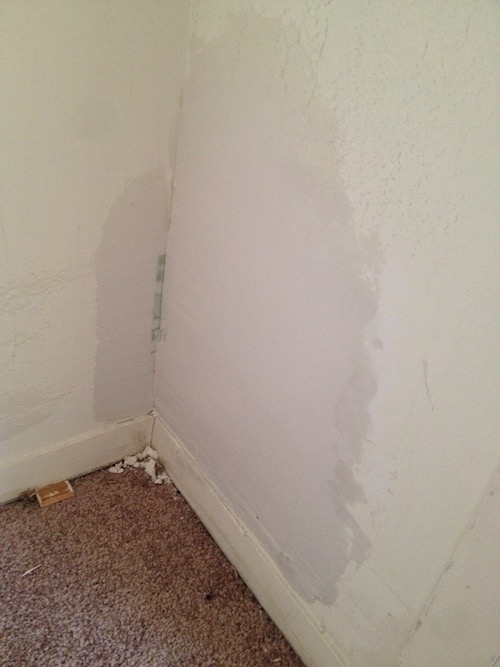
If you own a house chances are good that at some point you’ll be looking at a hole in the drywall where there shouldn’t be a hole. If you own an apartment building, you’ll be looking at lots of holes in the drywall. Thankfully with a few simple tools and a little confidence those holes are easy to patch up.
The Tools
There are probably 3 ‘specialty’ tools that you absolutely need to do drywall work.
A drywall jab saw. It looks like a big steak knife and makes short work of cutting drywall.
A 5-6″ mudding knife (see picture below). It doesn’t really look like a knife, but that’s what it is called. It’s main job is to spread drywall mud around.
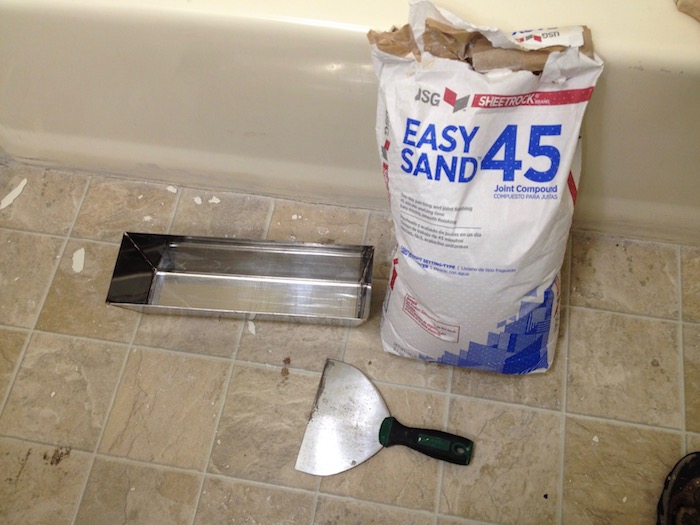
A mud pan. Usually these are stainless steel and come in a small size (what I have below) and bigger professional sizes.
Raw materials that you’ll likely need would be drywall screws, a dry mix joint compound. Get something like Easy Sand 45. The number is an approximate amount of work time that you have before it stiffens up and you have a mud pan full of rock. The pros will use 5-20 minute, but I like to use 45. You may also want to pick up a 5 gallon tub of premixed compound. Get something with a blue top. Those are easier to sand.
While it might be tempting to skip the dry powder stuff, hot mud, and just use the premixed, try not to. The premixed mud is much weaker and will be more likely to crack if hot mud isn’t used first. Premixed is the frosting, it’s just there to make it look pretty.
Finally you’ll need some drywall scrap sheets. Every big box home improvement store that I have visited has had 2’x2′ or 2’x4′ panels of scrap drywall for $1-3 a piece.
Here are a few different holes and associated techniques that you may encounter or find useful.
The Emperor’s New Clothes
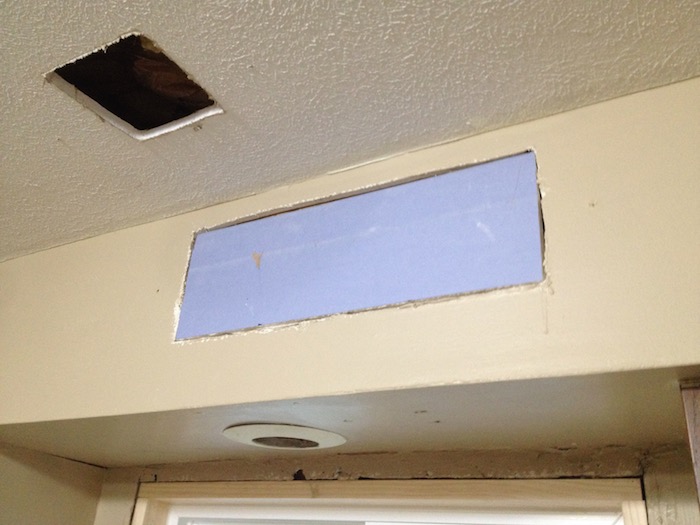
Do you see the holes?
What about now?
Yes. Somebody decided that it would be easier and or look better to cover up these two gaping holes with ductwork vents. Spoiler alert, there are no ducts in either of those cavities.
The correct fix probably costs less money. For the big hole, add in some scrap wood to act as a backing.
Then cut your replacement to size using a utility knife to score and snap and/or use the drywall saw.
Then add screws straight into the backing material. It’s important not to do the screws at an angle, and also not to break past the paper facing of the drywall. With the screws in, use a fiber tape to bridge the gap between old and new material. Try not to overlap the tape on top of itself.
For the ceiling patch, I chose to do the blocking a bit differently. I cut two pieces of scrap wood that were longer than the hole.
Then screwed through the existing drywall to hold them in place.
Then the patch gets screwed and taped in place.
Now you’ll need to mix up your hot mud (dry powder) in your mud pan. Add water to the pan first! If you do powder then water it is going to be a PITA. You only need a quarter inch of water. Now add powder and mix until you get the consistency of soft serve ice cream. It is important to have it well mixed and no ‘boogers’ in there. Boogers, or technically clumps of dry powder, will smear across the work surface and make it really ugly.
Use the mud pan and the taping knife to spread the mixture across your patches. The goal is to completely cover your tape so it isn’t poking through, while trying to avoid any huge humps, bumps, or ridges. Experiment using different amounts of pressure and try feathering out the edges. Don’t overthink it, this is just something that takes practice. Your first patch won’t be a work of art.
This first rough coat will take a few hours to set up and harden. Go watch some tv or take a nap while you wait.
We’re almost done. Yay! Now that the first rough coat has hardened, knock down any high ridges with your taping knife. Ideally, you’ll go up a size or two in knives with each successive coat. With the mud coat on, it’s time to break out the pre-mixed icing. Slather it on just like the first round.
For the ceiling texture, I found that an old paint roller gave a pretty good result.
GOOAALL!!
The soccer hole is when you get really excited and kick a hole through the drywall.
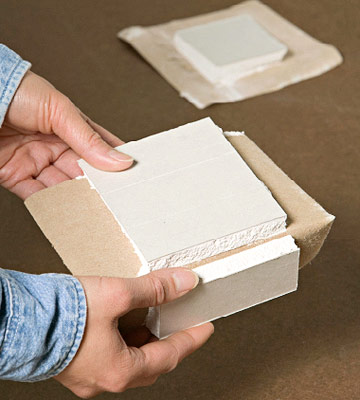
Another common variation is the doorknob punch where you throw open the door and the knob punches through the drywall. For these types of holes, I like to use a ‘California Patch’. What is nice about the California patch is that it requires zero screws or tape. Use a drywall saw to square up the hole. Yes, make the hole bigger. Once you have a rectangular hole, use a utility knife to score a piece of replacement drywall that is 2 inches wider and longer than your hole. You may also need to use the drywall saw to cut your replacement piece. Now, carefully score the back side of the replacement piece with 1″ margins. Then carefully peel away the margins.
photo credit DIYAdvice.com
With your patch with paper margins ready, smear up the backside of the margins with mud and place it into the hole. Use your drywall knife like a squeegee and squeeze out all the excess mud from behind the paper. Then use a bigger knife to apply a finish coat of ready mix mud to cover up the patch. Wait for it to dry (24-48 hours) then sand smooth.
The Mouse Hole
I’m not really sure what caused this. Perhaps it was a pet, a child, or critter, but regardless it patches up just like GOOAALL.
Enlarge the hole using a drywall saw to make it rectangular. Then create a California patch for that hole. The scratches in the wall will fill in with mud nicely.
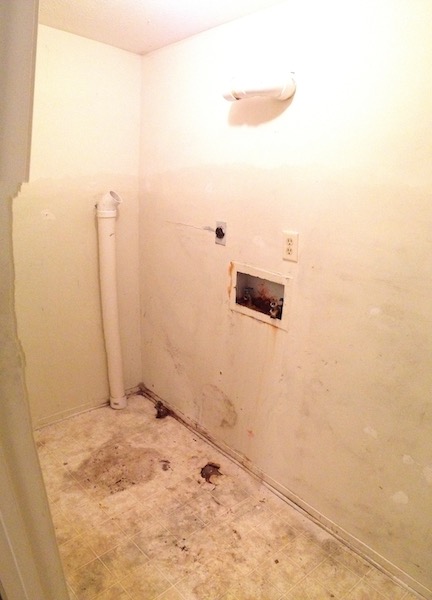
The Leaky Plumbing
Sometimes you have to make the hole in the wall to fix something else.
Patching drywall isn’t too difficult and it is quite cheap to boot. Of course, the best way to make drywall look nice is to not knock holes in it in the first place. Prevention, prevention, prevention!
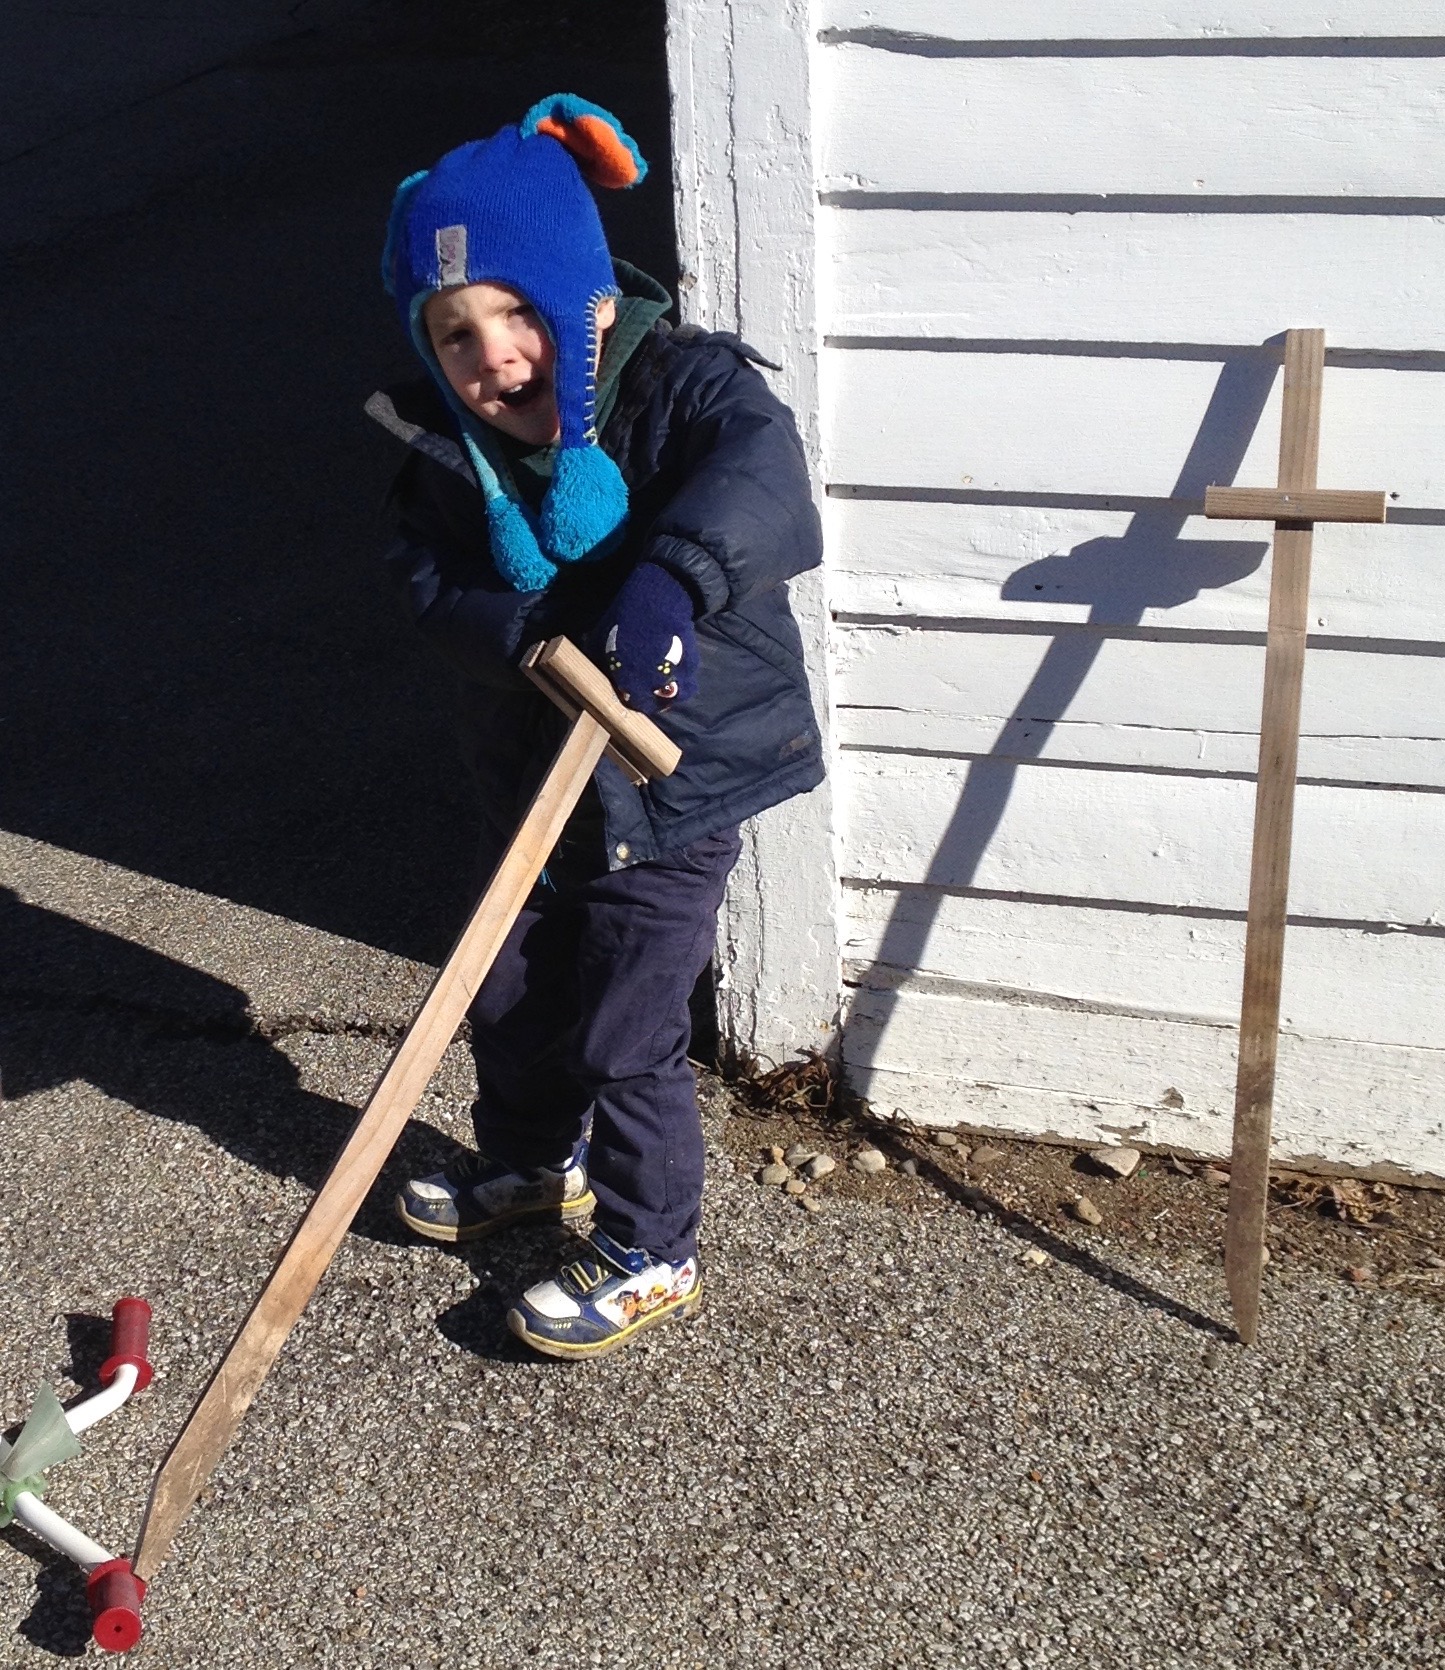
It was a sunny day yesterday, so I took Frugal Boy outside to get some of the wiggles out. It didn’t take him long to find a scrap piece of wood and come swaggering over with a big grin on his face.
“Let’s play swords daddy!”
I found my scrap piece of wood and we commenced playing swords. My knuckles got rapped a couple of times before I decided to upgrade my sword with a guard. Of course, as soon as Frugal Boy saw my superior sword, he wanted to be on equal footing, so I ended up making two. A few quick cuts on the miter saw and six nails later and we had a pair of excellent play swords.
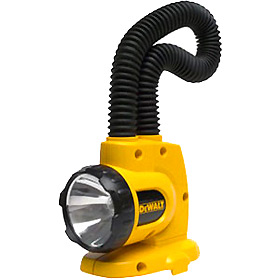
About four years ago I got a set of 18V Dewalt cordless power tools. One of the tools was a gooseneck work light (DW919) that looks like this:
The light comes with a xenon incandescent bulb that puts out 325 lumens of light, and quite a bit of heat as well. I have used the light over the years when working in dark conditions, basements, attics, car repairs, and electrical work. More recently, my father-in-law was down to help me with some projects and one of those projects was reconfiguring some drainage lines in a crawlspace.
I brought out the Dewalt light for the project and about halfway through the day, the bulb burned out. We managed to finish up the project with the remaining light sources that we had available to us including cellphone lights. Speaking of which, I caught this picture of FIL expertly holding two sections of pipe at just the right angle to direct the unexpected flow of water from upstream.
We only got a little wet, and thankfully the drain wasn’t for a toilet.
Anyway, back on point, today I looked up the replacement light bulb and found it on Amazon for $8.25. It is a 2 pack, but given that the first bulb lasted for four years, I doubt I would still know where the other bulb was after all that time. I was interested to see what other alternatives were out there for replacements, especially in the LED area. I found one drop in replacement that was around $12, 3 watts, and 50,000 life hours, but it only put out a puny 100 lumens of light. That is less than a third (1/3) of the OEM incandescent bulb. I wanted something brighter, so I kept looking and eventually I found the Fusion 48 LED replacement at a whopping 1600 lumens.
The LED array is expensive at $36. That is not too far off from the price of the bare tool itself. Still, the reported benefits seem worth the risk of trying it out. For starters, the claimed lumen output is almost 5x greater than the OEM bulb. LEDs are more efficient at converting electricity into light and they generate less heat waste, so the reported runtime on a battery is claimed to be twice as long. Finally, the life hours is claimed to be a whopping 20,000 hours. Take that all together and you end up with a super flashlight that is the equivalent of having five normal lights, while lasting twice as long per battery, and most likely outliving the tool itself.
It seemed that other DIY’ers had success with this particular replacement, and one person wrote up a nice bit about it on this forum. I’ll do an update if it ends up being a turd, but for an up charge of $28, it seems like a decent risk to try it out.