I will be the first to admit it. My children have WAY WAAYYY too many toys. The kicker is that most of them only get played with a few times before they are tossed aside and ignored for weeks, months, even years at a time. There is one toy though that has persistently been used time and time again by Frugal Boy. I used it as well when I was a kid. It costs nothing and takes up zero space. The more it is used the better it becomes. There are no batteries that need to be changed. It can be used anywhere at anytime. Every child in the world already has it. What toy could possibly check all of those boxes? Imagination. Imagination is the only toy any child needs.
Kids can use their wonderful imagination to keep themselves entertained wherever they may be. It is always with them, never gets dirty (that comes later in life), and is wonderfully adaptable. Here is Frugal Boy jumping off a tall cliff into the sea.
The ever popular, “Floor is Made of Lava” seems to be imprinted in human DNA.
A little bump in the topography is all that is needed to be King of the Mountain.
A small drainage stream is HOURS of entertainment for an active imagination to work with.
You can pretend that you are a famous person by putting your hands (or feet) into wet concrete.
A pile of busted up concrete provides a wealth of possibilities. Frugal Boy was happy to imagine himself as some big shot builder.
Toys that you buy at the store can help an imagination, but when that imagination has extracted everything it can from a particular toy, it gets tossed aside. That is why toys such as Lego, blocks, and dolls have such a long play time. They are good enablers of imagination letting the child play out a wide variety of scenarios. The more your child practices using their imagination, the better they will get and the fewer aids they will need.
Frugal Girl just had her 4 month checkup. Technically speaking, she is closer to 4 1/2 months old, but we rescheduled the appointment for later because I was out of town.
It is hard to believe that it has already been 4 months. It is equally hard to believe that it has only been 4 months. I don’t really remember life with just one child anymore. The human brain has a wonderful ability to rewire itself and adapt to changing environments.
Frugal Girl weighed in at 16 lbs 2 ozs (80%), 25″ tall (64%), and had a head circumference of 17″ (96%). She also received another round of vaccinations.
Andrew left Friday for a week-long adventure with his brothers and a couple of uncles up to his uncle’s lake house. This is his first kid-free trip in a long time and my first time watching both Frugal kids alone for an extended period. 🙂
Before he left Andrew put a load of laundry into the washer so it’d be ready for the dryer by the time I got home from work, getting a jump start on the weekend chores. I walked into the house that afternoon and was greeted by the chirping of the washer. Unfortunately it wasn’t the happy “I’m done” kind of chirping. Nope, it was the “Houston, we have a problem” variety. After getting Frugal Boy’s dinner ready and making sure Frugal Girl was content I headed down to the basement to see what the problem was. E01 F09. The LED panel blinked flashed the error code over and over. We occasionally see E01 F08 – water supply problem – due to the undersized supply lines in the house (can’t run anything else while the washer is trying to fill) but this was something else – a drainage issue. The error had appeared a few days earlier but canceling out the cycle and restarting seemed to work fine. No such luck this time. After a couple cancels and a couple attempted restarts I was resigned to pull out sopping wet laundry and bail out the remaining water the best I could with a bucket.
Still water left
As you may recall we use cloth diapers with Frugal Girl. One of the weekend tasks is to wash said diapers but a broken washer puts a damper on that job. What to do? My options were:
Call a repair person ($$$)
Leave the diapers sit, put Frugal Girl in disposables, wait for Andrew to get home in a week and have him fix it (no AC in the house means those diapers are going to get mighty stinky)
Drag the diapers to the nearest laundromat and sit for 2+ hours with a fidgety 3 year old and a four month old (did I mention Andrew took our only vehicle with him? We’re walking or hailing an Uber this week)
Beg to borrow a neighbor’s washer (regular clothes sure, diapers in the washer for whatever reason seems to make people squeamish)
Fix it myself
We’re going with the last one.
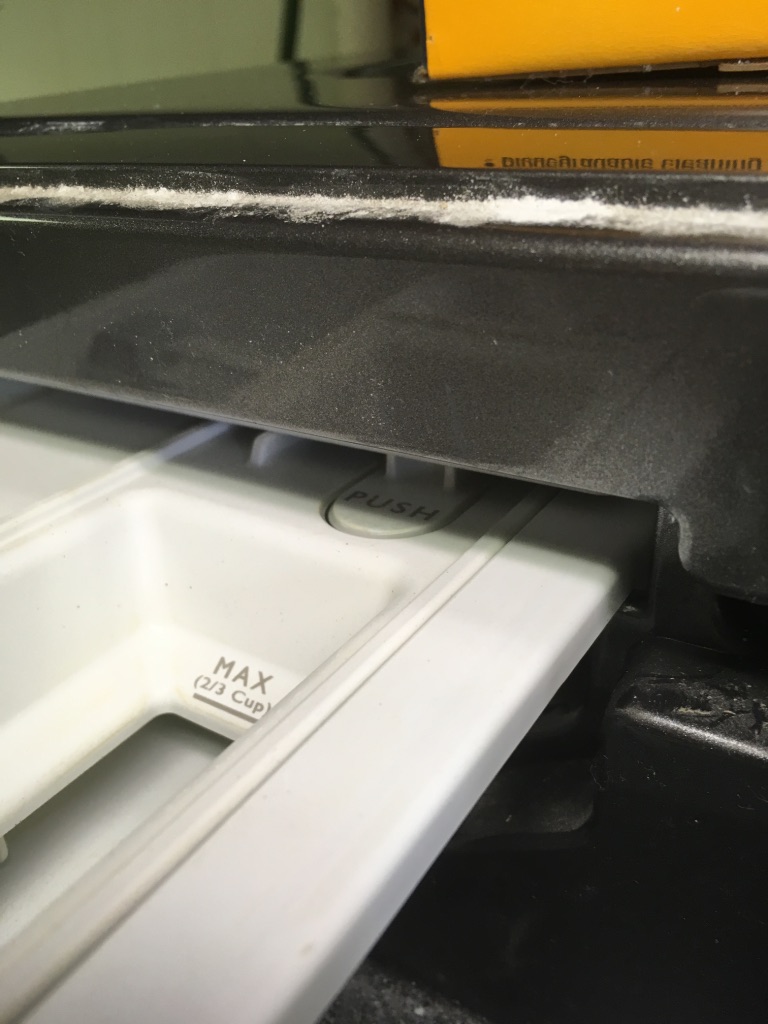
Google indicated that the most likely culprit was a clogged coin trap. Like the name implies, this handy part catches all the coins, bobby pins, screws etc. that you do not want traveling to and damaging the drain pump. Some machines are conveniently designed to have an access door right by the trap for regular cleaning. Our Maytag Maxima does not have this nice feature; you have to take off the whole front panel instead. Thanks Maytag. Well, those diapers aren’t getting any fresher so let’s get cracking.***
The first step in any appliance diagnostic and repair job is to unplug the machine. Might seem like common sense but as Grandpa would say “common sense is a gift not a given.” Once no more power is flowing it was time to remove the top panel of the washer. Yes, you read that right – the top panel has to come off before the front panel. I didn’t take any photos but on the back of the machine there are 3 screws along the top edge. Undoing those let me slide the top towards the back of the machine and reveal two screws for the electronics console panel. These are the same type of screw on either side of the machine in the corners. Once those are out don’t try to tug off the console just yet as you have to remove the dispenser and reveal even more screws.
Push the button and the dispenser will slide out.
Of course these two screws have completely different heads from before requiring a different tool.
7 screws down and more to go! I was able to very gently lift off the electronics panel at this point and set it on top of the machine. It’s still connected to the main machine via wires so you can’t just rip it off or you’ll have a much more costly problem on your hands.
With the top and electronics panels removed I could now start tackling the front panel removal. But of course it’s not going to be that easy. The center of the front panel is connected to the tub of the machine by a rubber gasket/boot. This is held in place by tension using a wire and spring. There’s a tool that professionals use to extend the spring but I don’t have that. I made do by sliding pliers into the loops (being careful not to rip a hole in the rubber) and pulling in opposite directions. This extended the spring and loosened the wire just enough to be slipped off the gasket. I then unhooked the gasket from the front panel and shoved it towards the inside of the machine and out of the way.
We’ll revisit this pain in the butt again later.
9 more screws to go. There were four screws along the bottom edge of the front panel. Most tutorials on the web had you tilt the machine back or lay on the floor to access them. Our machines are on a custom made pedestal and with a rachet extender I was able to take them out without having to try and move the heavy machine myself.
Thank goodness for small fingers
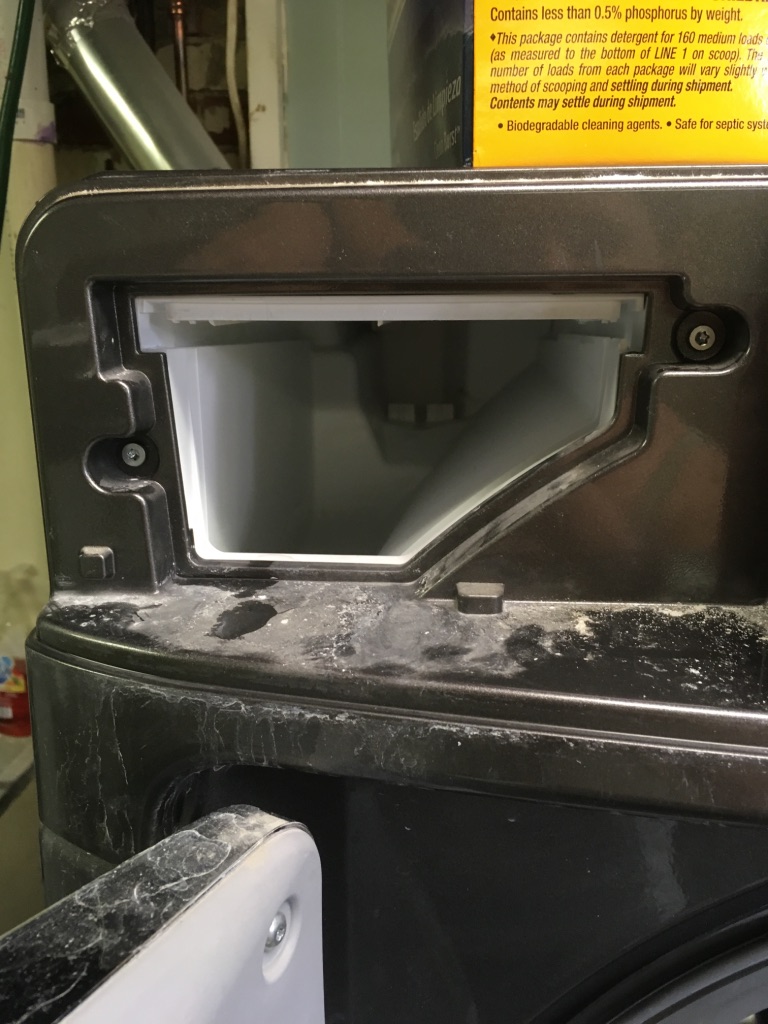
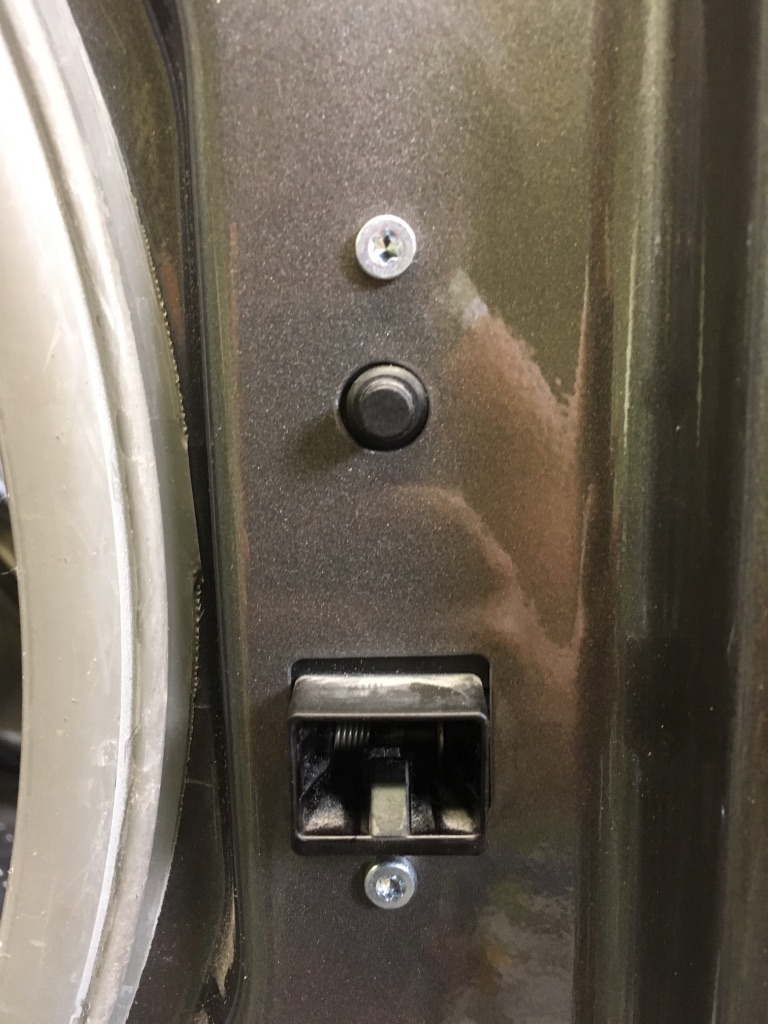
There were three more easily accessible screws along the top of the panel (with a different head from either of the two previous types) that came out and I was able to start lifting the panel up and off the hooks holding it in place. I got the panel clear of the pedestal when I was stopped by more wires attached to the door latch. Two more screws and the front panel was off.
The latch and sensor button stayed with the machine not the door panel.
Front panel gone!
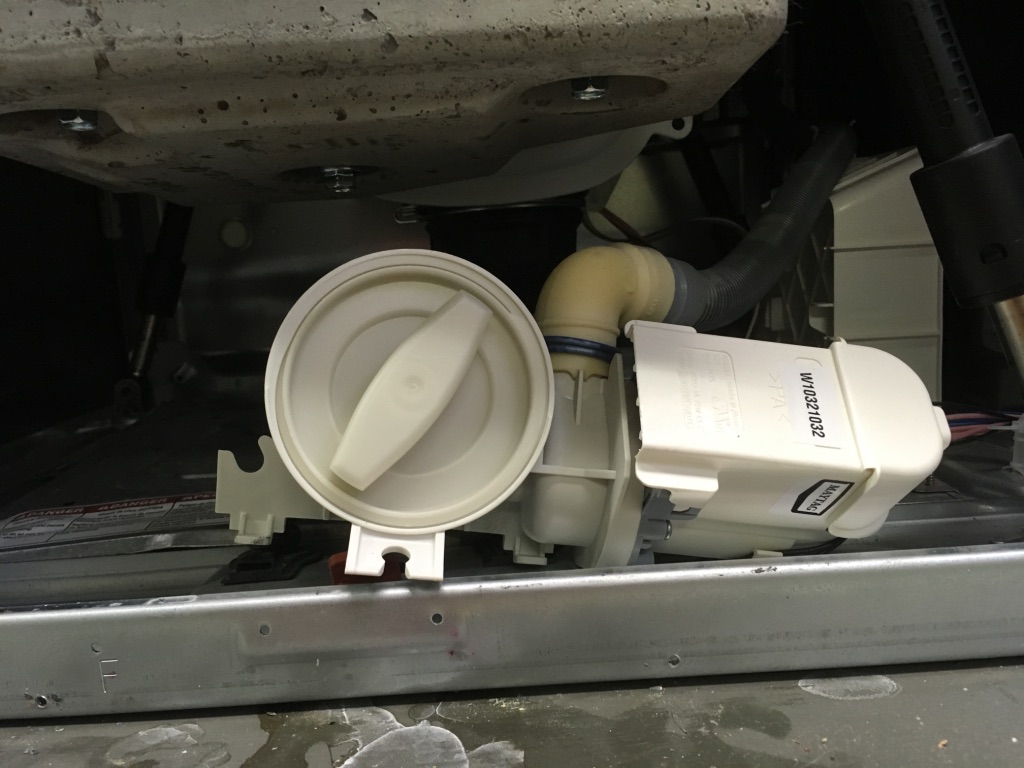
I was surprised how relatively empty it was inside. The white piece in the bottom center of the above photo is the coin trap and drain pump. Here’s a close up.
The parts are held in place by rubber feet that slipped into tabs. I removed the rubber feet to have more room to maneuver a bucket underneath the trap and started unscrewing the coin trap lid. Be happy that smells can’t be transmitted over the web yet as a gallon of foul smelling water poured out as well as the clogged trap.
Yes it was as gross as it looks.
Youtube and the like recommended sticking your finger into the drain pump and trying to spin impeller a bit to make sure there are no clogs there either. Ours was clear and I was free to clean out the trap and start putting the machine back together.
This is what it is supposed to look like.
The reassembly was pretty much the reverse of the above and smooth sailing with two exceptions – both rubber boots. I made the stupid mistake of taking off the rubber boot that leads from the outer tub down to the coin trap. I had felt something in there and turned out to be an intentional hard plastic ball. The tough tension combined with a restricted work space and an odd angle resulted in numerous attempts to get the darn thing back on. Once it was back on I poured a couple gallons of water into the drum to make sure we weren’t going to have any leaks (and subsequently have to take the machine apart again).
Seriously, don’t take this off unless you’re a masochist.
The other problem came when trying to reattached the door gasket to the front panel. Remember that wire and spring? It’s a hard thing to put back on. If you happen to have an extra set of hands to hold it in place it’d probably make the job a lot easier. The tension in spring kept forcing the wire off. I ended up having to hold the gasket top in place with my shoulder, pull the spring as hard as I could using a pliers in one hand, use a putty knife in the other hand to work the wire back into place, and send Frugal Boy to watch Paw Patrol in the other room so he wouldn’t learn new words. An hour later an the machine was back together and ready to be tested out.
So what was the culprit?
I did not heart the slime.
Those heart shaped pieces of fabric are washable nursing pads. I had lost them when I was nursing Frugal Boy…18+ months ago. I thought they were somewhere in the sea of baby clothes. I guess not. I was tempted for a second to bleach them for use but my senses got the better of me and they were thrown into the trash instead (like I said only a second). Three wash cycles later and I’m happy to report the machine is draining well and no signs of leakage yet. Start to finish it took me about 5 hours split between Friday evening (researching and starting to disassemble the machine) and Saturday morning (cleaning everything out, reassembling and testing). If this happens again the fix should go much faster. The kids pretty much let me work in peace. Frugal Boy was happily entertained by Saturday morning cartoons and Frugal Girl thought the back of her eyelids were more interesting than watching me work.
Obligatory photo for the grandparents. Also before you start worrying Grandma and Aunties, that towel is clean just stained.
Hopefully nothing else will break in the next few days until Andrew gets back. 🙂
***Note: I am not a professional appliance repair person. I am a software developer (aka professional googler). You follow what I did at your own risk. I am not responsible for any damage to your machine or you.
We bought a new furnace and air conditioner! As a bit of background, our 1905 house has a working furnace, but the AC is from 1984 and has never worked during our residency.
“Finally!” was the reaction that family members gave us when we told them the news. Then we informed them it wasn’t for our house but instead for a tenant’s apartment. Haha, silly goose you should know us better than that. 😛
The units that we were replacing were original to the 1975 building. You can usually decode the age of a unit by its model number. This Friedrich furnace, # GDA080NDB, starts with GDA. G = 1970s, D = Year 4, and A = January. So the manufacture date for this particular furnace was January of 1974, or more simply put, it was 43 years old.
The outside AC condenser was also original equipment.
Why Not Repair?
About a week and a half ago I got a call from the tenant saying that the AC wasn’t putting out cold air. I ran through a quick troubleshooting list and found no easy fixes. The thermostat was set to “cool”, the air handler blower was working and pushing air through the ductwork, the outside condenser had power and the fan was spinning, and the compressor was running. It was almost certainly a refrigerant leak. I knew that the former tenant who had lived there for seven years had rarely or never used the AC. This was likely a long term issue that had not just sprung up since the last season.
I called out an HVAC professional to give me an opinion and prices. These older AC systems use a refrigerant called R22, a nice ozone destroying cocktail that is being phased out of production in favor of a more environmentally friendly R410A. R22 and R410A are not compatible. As such, R22 refrigerant prices have skyrocketed. It is simple supply and demand. There are still a lot of old R22 systems that have working compressors, capacitors, and coils. They just need a top off of refrigerant.
The HVAC technician gave me a quote of $100/pound of R22 refrigerant. I asked how many pounds would be needed and he said “A lot”. At a minimum, I would guess five pounds to charge the system. That’s at least $500 right off the bat, plus you have to factor in the labor and the cost of fixing any leaks in the refrigerant lines. That is assuming that the leaks are in the lines and not somewhere in the condenser or the coil, both things that are not serviceable.
Repairing the system would have cost around $1,000 and at the end of the day, you still have equipment from the 1970s. So what does it cost to replace?
Replace
Replacement costs are going to vary WIDELY depending on what equipment you select, but more so on who you select to do the work. While replacing a gas furnace for another gas furnace is probably in the realm for an experienced DIYer, AC systems are definitely something that you are going to want a licensed and experienced person to come do for you.
I got a few bids from smaller mom and pop shops and individuals who work for bigger shops but also do moonlight work. While big companies are convenient with their dedicated salesmen, 24/7 phone hours, and flashy new trucks, you are also paying a surcharge on every job for dedicated salesmen, 24/7 phone hours, and flashy new trucks. The smaller the company, the smaller the overhead.
In the end, I found an individual who moonlights on the weekends. He had all of the expertise, but none of the heavy overhead. For the equipment, I selected the no bells and whistles, simplest models of Goodman furnace, condenser, and coil. Goodman gets crapped on a lot and there is no shortage of hate for it on the internet. Personally, I believe that all of the different brands are within a few percentage of quality to one another. The biggest separator in how long something lasts is how well it is installed. For example, if I installed a top of the line Trane or Carrier model AC system, it probably would last a quarter of the time as the most basic Goodman installed by a professional.
Another common misconception that consumers may run into is believing that they must buy the most efficient furnace or AC unit to save money.
First off, we don’t pay the utilities for the apartments, so there isn’t much to be saved by spending more on a flashier unit. Secondly, assuming that we did pay for the utilities, the payback time of a more efficient unit might be longer than the actual lifespan of the unit. Thirdly, the more bells and whistles on a unit means more things that can break. Service calls and parts can quickly erase any money saved by the higher efficiency.
Finally, simply upgrading from any 1970s unit to a basic 2017 unit will likely be a HUGE increase in efficiency. If I had to guess, the original AC equipment when it was installed was probably around a 6 or 7 SEER unit. After decades of use, it had probably degraded to a 4-5 SEER efficiency. By contrast, the new ‘least efficient’ unit that we installed is a 13 SEER unit. Likewise, the original furnace was probably a 65% efficiency unit when it was installed. It too had probably degraded and was operating in the 50-60% range. The one we just installed was a ‘least efficient’ 80% model.
While the big equipment gets a lot of attention, the quality and longevity of a new install can be greatly affected by the refrigerant lines that connect up the inside and outside.
Known as a line set, these two copper pipes carry the R410a between the outside condenser and inside evaporator coil. I chose to replace the old lines for three reasons.
They were undersized for the new equipment
They might have leaks in them
Residual R22 contaminants and oil might be lurking inside them that could poison the new system
Unlike the water supply pipes in your house that might also be copper, these refrigerant lines need to be brazed together. Brazing is a high temperature method of connecting copper pipe. In terms of heat, there is Soldering < Brazing < Welding. Brazed joints can withstand the 400 PSI of pressure that is put on refrigerant lines.
Here is a picture of the new evaporator coil hooked up to the new line set.
There is really nothing DIY about this except maybe the condensate drain in the lower left corner.
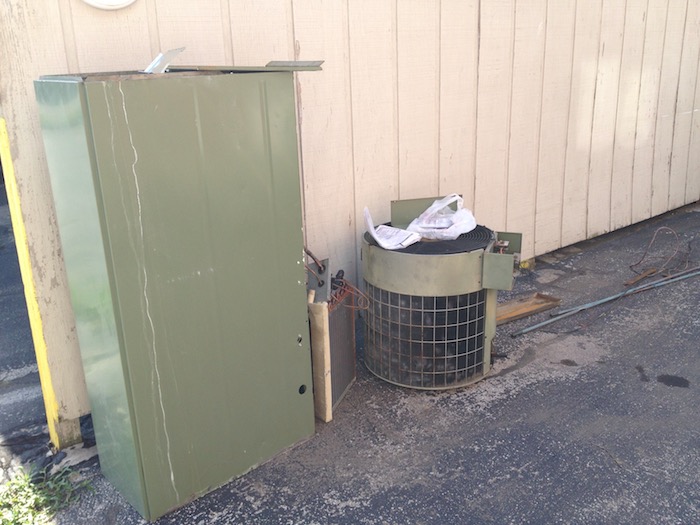
Here is the old equipment waiting for scrappers to come and recycle all of the metal.
The new furnace is quite a bit shorter than the old one, so the difference in height needs to be made up with some transition ductwork called a plenum.
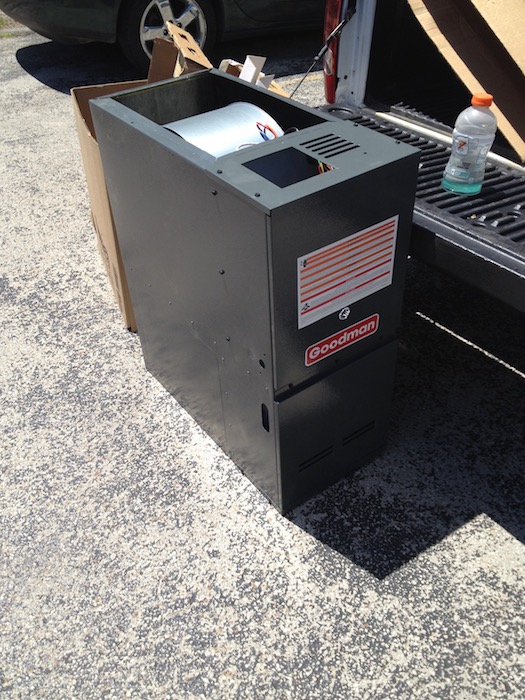
The inside of the furnace is dead simple.
The three black cylinders along the bottom are the burners. The two white electrical cables on the left that go to the cigarette looking thing is the hot surface ignitor (circled in purple). There is no pilot light to worry about, the hot surface ignitor just gets cherry red hot and lights the gas when it needs to. The other replaceable part is the flame sensor (circled in yellow) on the right side just above the burner.
Here is a picture of the AC system getting leak tested.
These outside condensers come pre-charged with refrigerant, but it is only enough to cover 12′ worth of copper lines. If your lines are longer than 12′ (hint, they probably are) you’ll have to top it off. Any HVAC pro worth their salt will fine tune the system anyway.
It took about 16 hours of work to replace all the components. The total cost, including labor, was about $3200 with the equipment being priced near or at cost. The nice thing about Goodman, is that you can actually see prices online. We saved $200 in labor by doing both the furnace and AC at the same time.
With any luck we’ll have no trouble out of this equipment for at least 10 years, hopefully 20. It is more environmentally friendly, reduces utility bills, and is quieter.
Now we have four more to do and you can guess which one will be done last. 🙂
Cord cutting is becoming more and more mainstream as consumers get fed up with the high cost of cable tv and incessant, interruptive advertising.
If you have been looking to cut the cable cord, or if you already have and are looking for some more sources of media, then your local library may have you covered!
Our library began advertising their partnership with Hoopla.Hoopla is an add-on service that your library may offer to you for free. Here is a bit more about Hoopla from their About page:
hoopla digital builds on that passion by providing public libraries of all sizes the ability to offer patrons an enormous selection of digital video (movies and TV shows), music, audiobooks, ebooks and comics to their patrons. For these libraries, we’ve pioneered a unique model that allows patrons to borrow content immediately, removing artificial availability constraints and maximizing the power of digital content and Internet distribution. Technologically, we focus on the latest browser, phone, tablet, and TV products to deliver the best possible experience to our user – our passion – the public library patron.
There are currently over 1,200 libraries in the USA and Canada that have partnered with them.The signup process took less than 2 minutes.
Each library sets its own Hoopla borrowing limit. For me, that means that I can borrow a total of five (5) items per month. I had to dig around the help quite a bit to find out that returning an item early does not increment your borrow quota for the month. So if I borrow five digital items today, I have to wait until the start of the next month before I can borrow anything else. Obviously this kind of stinks, but for the price (FREE) how picky can you be?
There does seem to be wide support for devices. It looks like both TV and chrome cast are both supported via mirroring from a phone or tablet.
Ok, what about the actual content available? It looks like they have Audiobooks, Movies, Music, Comics, Ebooks, and Television.While there are some bigger well known titles in the catalogue, there is also quite a bit of B and C roll material. You might get lucky and find just what you are looking for however to scratch that ear worm.
A thorough review is available here if you want to read more.
 The ever popular, “Floor is Made of Lava” seems to be imprinted in human DNA.
 You can pretend that you are a famous person by putting your hands (or feet) into wet concrete.


 You can usually decode the age of a unit by its


 The signup process took less than 2 minutes.