• About Me
  • Contact Me

Frugal Living

Indulging in life, financially responsible

Month: March 2017

How to Patch Drywall Holes – Explained By a Non Professional

March 31, 2017 by Andrew Leave a Comment

If you own a house chances are good that at some point you’ll be looking at a hole in the drywall where there shouldn’t be a hole.  If you own an apartment building, you’ll be looking at lots of holes in the drywall.  Thankfully with a few simple tools and a little confidence those holes are easy to patch up.

The Tools

There are probably 3 ‘specialty’  tools that you absolutely need to do drywall work.

  1. A drywall jab saw.  It looks like a big steak knife and makes short work of cutting drywall.
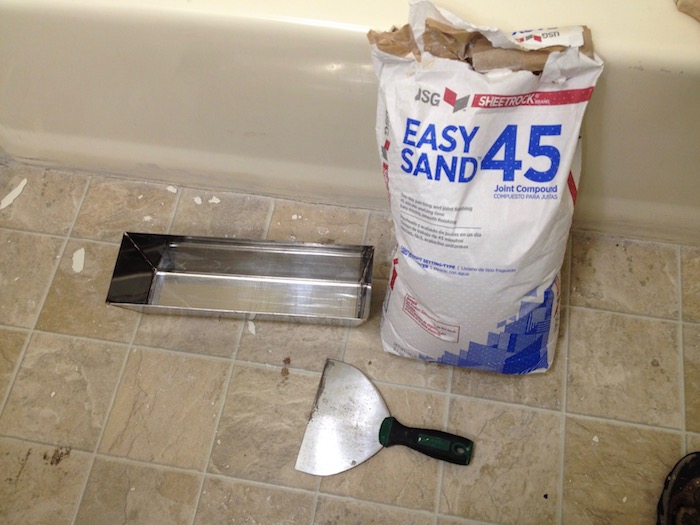
  2. A 5-6″ mudding knife (see picture below).  It doesn’t really look like a knife, but that’s what it is called.  It’s main job is to spread drywall mud around.
  3. A mud pan.  Usually these are stainless steel and come in a small size (what I have below) and bigger professional sizes.

Raw materials that you’ll likely need would be drywall screws, a dry mix joint compound.  Get something like Easy Sand 45.  The number is an approximate amount of work time that you have before it stiffens up and you have a mud pan full of rock.  The pros will use 5-20 minute, but I like to use 45.  You may also want to pick up a 5 gallon tub of premixed compound.  Get something with a blue top.  Those are easier to sand.

While it might be tempting to skip the dry powder stuff, hot mud, and just use the premixed, try not to.  The premixed mud is much weaker and will be more likely to crack if hot mud isn’t used first.  Premixed is the frosting, it’s just there to make it look pretty.

Finally you’ll need some drywall scrap sheets.  Every big box home improvement store that I have visited has had 2’x2′ or 2’x4′ panels of scrap drywall for $1-3 a piece.

Here are a few different holes and associated techniques that you may encounter or find useful.

The Emperor’s New Clothes

Do you see the holes?

What about now?

Yes.  Somebody decided that it would be easier and or look better to cover up these two gaping holes with ductwork vents.  Spoiler alert, there are no ducts in either of those cavities.

The correct fix probably costs less money.  For the big hole, add in some scrap wood to act as a backing.

Then cut your replacement to size using a utility knife to score and snap and/or use the drywall saw.

Then add screws straight into the backing material.  It’s important not to do the screws at an angle, and also not to break past the paper facing of the drywall.  With the screws in, use a fiber tape to bridge the gap between old and new material.  Try not to overlap the tape on top of itself.

For the ceiling patch, I chose to do the blocking a bit differently.  I cut two pieces of scrap wood that were longer than the hole.

Then screwed through the existing drywall to hold them in place.

Then the patch gets screwed and taped in place.

Now you’ll need to mix up your hot mud (dry powder) in your mud pan.  Add water to the pan first!  If you do powder then water it is going to be a PITA.  You only need a quarter inch of water.  Now add powder and mix until you get the consistency of soft serve ice cream.  It is important to have it well mixed and no ‘boogers’ in there.  Boogers, or technically clumps of dry powder, will smear across the work surface and make it really ugly.

Use the mud pan and the taping knife to spread the mixture across your patches.  The goal is to completely cover your tape so it isn’t poking through, while trying to avoid any huge humps, bumps, or ridges.  Experiment using different amounts of pressure and try feathering out the edges.  Don’t overthink it, this is just something that takes practice.  Your first patch won’t be a work of art.

This first rough coat will take a few hours to set up and harden.  Go watch some tv or take a nap while you wait.

We’re almost done.  Yay!  Now that the first rough coat has hardened, knock down any high ridges with your taping knife.  Ideally, you’ll go up a size or two in knives with each successive coat.  With the mud coat on, it’s time to break out the pre-mixed icing.  Slather it on just like the first round.

For the ceiling texture, I found that an old paint roller gave a pretty good result.

GOOAALL!!

The soccer hole is when you get really excited and kick a hole through the drywall.

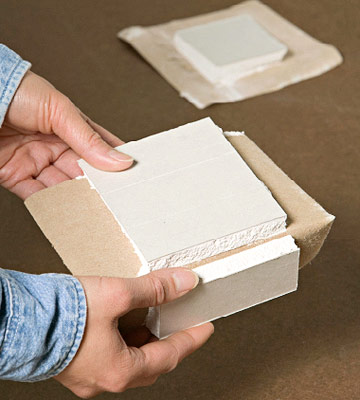
Another common variation is the doorknob punch where you throw open the door and the knob punches through the drywall.  For these types of holes, I like to use a ‘California Patch’.  What is nice about the California patch is that it requires zero screws or tape.  Use a drywall saw to square up the hole.  Yes, make the hole bigger.  Once you have a rectangular hole, use a utility knife to score a piece of replacement drywall that is 2 inches wider and longer than your hole.  You may also need to use the drywall saw to cut your replacement piece.  Now, carefully score the back side of the replacement piece with 1″ margins.  Then carefully peel away the margins.

photo credit DIYAdvice.com

With your patch with paper margins ready, smear up the backside of the margins with mud and place it into the hole.  Use your drywall knife like a squeegee and squeeze out all the excess mud from behind the paper.  Then use a bigger knife to apply a finish coat of ready mix mud to cover up the patch.  Wait for it to dry (24-48 hours) then sand smooth.

The Mouse Hole

I’m not really sure what caused this.  Perhaps it was a pet, a child, or critter, but regardless it patches up just like GOOAALL.

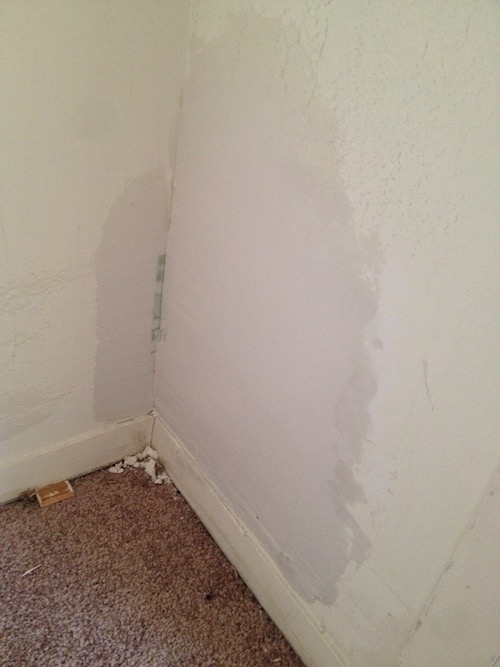
Enlarge the hole using a drywall saw to make it rectangular.  Then create a California patch for that hole.  The scratches in the wall will fill in with mud nicely.

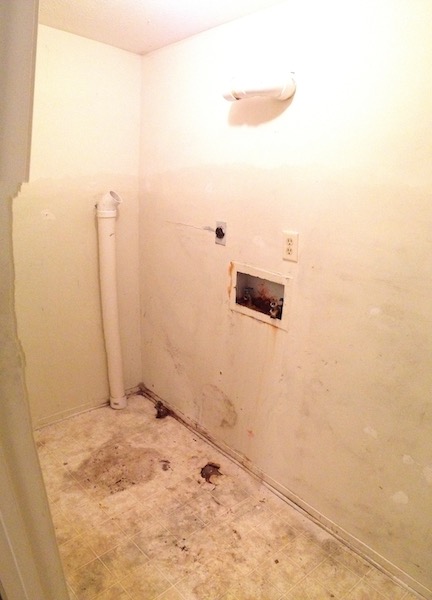
The Leaky Plumbing

Sometimes you have to make the hole in the wall to fix something else.

Patching drywall isn’t too difficult and it is quite cheap to boot.  Of course, the best way to make drywall look nice is to not knock holes in it in the first place.  Prevention, prevention, prevention!
Posted in: DIY Tagged: apartment

Whittling Down Our Paychecks to Save on Taxes

March 20, 2017 by Andrew Leave a Comment

Tis the season to file tax returns for 2016.  This is the first year we paid someone else to do it.

Taxes are the largest financial burden that you will shoulder throughout your life, even more so than buying a house or car.  You get the same amount of government services as your neighbor does regardless of who pays more, so I am in the firm mindset of paying as little as legally possible.

My tax idol is the Root Of Good blogger.  He had a great write up a couple of years ago about paying $150 of income tax on a $150,000 income.  I’ve linked to it before, but here it is again because it is a must read for anyone looking to downsize their tax burden.

2016 was the first year that we were able to ‘max out’ all of our tax sheltered retirement accounts.  I ran the numbers and thanks to that saver mindset we managed to avoid an enormous tax bill.

So how exactly did we do it?

Let’s run through the approximate numbers.
Our combined gross income from day jobs was about $133,000.  Shae contributed the employee maximum ($18,000) to her 401k plan.  I also contributed the maximum to my employee 401k plan.  As an added perk to being self employed, I also get to put on the hat of the employer and contributed another $8,000 to my 401k plan.

Shae has good benefits, and one of those is a flexible spending account for dependent care.  She was able to tuck away $5,000 into that account tax free.  Health and dental insurance also come out of the paycheck before taxes are applied, so that was another $3,100 and $350 respectively.

With all of those pre-tax deductions in place, our taxable salaries shrunk down to $80,550.  From there, we have to start adding back some side income.  We made $1600 of taxable interest by churning bank account bonuses.  Our brokerage account kicked off $800 worth of dividends from VTSAX (Vanguard Total Stock Market Mutual Fund).  $750 of those are qualified dividends and depending on your income level don’t get taxed.  We also had rental income for the first time thanks to the addition of our first apartment building.  We only owned it for 2.5 months in 2016, so it is just a glimpse.  While on paper the $150 profit seems paltry, that comes after the magic of depreciation write offs.  We were able to write off around $900 worth of depreciation for the building because in the eyes of the IRS, all buildings will be worth exactly $0 in 27.5 years.  The secondary ‘hidden’ profit that has not been realized yet is the $400 of mortgage principal that was paid off in 2016.

Rounding out the additions and subtractions, we had $2300 in long term capital gains from selling off a chunk of our VTSAX investment to put a down payment on the apartment building.  Like qualified dividends, if you can stay in the 15% tax bracket, you don’t have to pay taxes on LTCGs.  We also fully funded each of our IRA accounts, so that is another $5500 x 2.  Finally, I was able to deduct a portion of my self employment tax.  It sounds like a sweet deal, but self employed people still get royally screwed in taxes.  Normally you as the employee pay half of your Medicare and Social Security taxes and your employer pays the other half.  Self employed folks get to wear both hats and foot both bills so this deduction is a little way to partially offset that.

In the end we finally get to the Adjusted Gross Income, AGI, of about $71,400.

From there, we get to deduct the Standard Deduction and 3 Personal Exemptions.  With the addition of Frugal Girl in 2017 we should pay even less next year!

Taxable income comes in at $45,900 and the tax is about $5,600.  We get one last hurrah before the cash register dings and that is in the form of a $1,000 child tax credit.  Apparently the government wants us to have kids.

There you have it, $4,600 of income taxes on $133,000 gross income.

Now, the important question and why I bother getting onto this soapbox to ramble on about tax sheltering your hard earned money – How much would we have had to pay in taxes if we didn’t contribute to 401ks, IRAs, and Dependent Care accounts?  Let’s run the numbers again with those key differences highlighted.


The gross salaries stay the same, but now the 401k’s and dependent care go unfunded.  We really enjoy that big fat paycheck, but it isn’t as rosy as it may seem.  The tax man cometh.

In the hypothetical, we also ignore setting up and contributing to IRAs.  Our adjusted gross income has ballooned from $71,400 to $131,400.  This is bad.  We just moved from the nirvana 15% tax bracket where Uncle Sam is willing to give us a break to the 25% bracket where we need to ‘pay our share’.  Suddenly qualified dividends and long term capital gains are now taxable.  Working down the numbers we eventually come to the conclusion that the unsheltered strategy leaves us with a tax bill of $21,700.  By using tax advantaged accounts, we saved $17,100 in federal income taxes.  The effective tax rate jumps from 3.5% to 16%.  OUCH!

It is practically a “max out one 401k and get one free” kind of deal.  BOGOs on retirement plans.  I’ll take 7 please!

Even with our usage of tax sheltered accounts we still paid boatloads in Social Security and Medicare taxes.  At least with those you’ll likely see anywhere from 60-80% of it returned to you unless you die early.  I also like to pretend that those payments go directly to our parents.  It makes it a little easier to stomach when you think it is going to someone you know.

It took us years of concentrated effort to get to the point of maxing out retirement accounts, so don’t get discouraged if it seems a long way off or impossible.  Even contributing an extra 1 or 2% of your paycheck is a big help and often times the easiest way to ramp up is to tuck away any bonus or promotion money.

Anyway, I just wanted to show a real life example of the power of putting away money into tax advantaged retirement accounts.  We made a lot of mistakes on our way here and there is still a lot for us to learn.  I hope it is useful for someone and if you have any tax tips that I should have mentioned please leave a comment!

Posted in: Finance Tagged: Taxes

Introducing Frugal Girl

March 16, 2017 by Andrew Leave a Comment

There is a new addition in our house, Frugal Girl!

Her favorite activities include eating, sleeping, and pooping.  Big brother Frugal Boy is still adjusting to the new family member.

It is still a little too early to tell how much it cost to bring little Frugal Girl into the world.  Our preliminary estimate is about $5000 (insurance deductible of $2500 x 2 patients).  Of that, Shae’s employer, will cover about $4300, and we will be on the hook for the remaining $700 of the deductible.  We can use pre-tax dollars to cover our portion by using a Health Savings Account.  Anytime that you have a life changing event, you can change your benefits enrollment through your employer.  Having a baby counts as such.

Shae and I did not get Frugal Girl a special birthday gift.  Instead, she gets to start life with a jump started college savings account.  As soon as we learned that we had conceived, we opened a new 529 plan and started contributing to it every month just like we do for Frugal Boy.  Thanks to the bull market and those early contributions, Frugal Girl is already at $3,000.  If you figure that investments will naturally double every ten years, we’ve already managed to spare her from roughly $12k worth of student loans.

Relatives are already calling her a princess.  A princess would have to marry other royalty, so we might have to start saving up for a dowry.  ;-P

Posted in: Frugal Girl, Parenting Tagged: baby

Recent Posts

  • Min/Maxing Car Sale for Highest Value and Lowest Headache
  • Buying a Car with Data Driven Decision Making
  • Hot Lunch
  • Baking with Dad
  • Winter Nights

Financial Goals

Recent Comments

  • Olivier Schreier on Troubleshooting a Leaking Whirlpool Dishwasher [UPDATED]
  • John M on Fixing a Slow-Draining Maytag Maxima Washer
  • Jeff on Fixing a Slow-Draining Maytag Maxima Washer
  • Carrie Sandstrom on Hacking RockAuto Closeout Parts Sale
  • Anonymous on Building a Self Watering Raised Garden Bed

Archives

  • December 2020
  • December 2018
  • July 2018
  • May 2018
  • April 2018
  • March 2018
  • February 2018
  • January 2018
  • December 2017
  • November 2017
  • October 2017
  • September 2017
  • August 2017
  • July 2017
  • June 2017
  • May 2017
  • April 2017
  • March 2017
  • February 2017
  • January 2017
  • December 2016
  • November 2016
  • October 2016
  • September 2016
  • August 2016
  • July 2016
  • June 2016
  • May 2016
  • April 2016
  • March 2016
  • February 2016
  • January 2016
  • December 2015
  • November 2015
  • October 2015
  • September 2015
  • August 2015
  • July 2015
  • June 2015
  • May 2015
  • April 2015
  • March 2015
  • February 2015
  • January 2015
  • December 2014
  • November 2014
  • October 2014
  • September 2014
  • August 2014
  • July 2014
  • June 2014
  • May 2014
  • April 2014
  • March 2014
  • February 2014
  • January 2014
  • December 2013
  • November 2013
  • October 2013
  • September 2013
  • August 2013

Categories

  • Business
  • DIY
  • Finance
  • Frugal Boy
  • Frugal Girl
  • House
  • Misc.
  • Parenting
  • Reading
  • Recipes
  • Savings
  • Technology
  • Travel
  • Uncategorized

Meta

  • Log in
  • Entries feed
  • Comments feed
  • WordPress.org

Copyright © 2023 Frugal Living.

Omega WordPress Theme by ThemeHall