• About Me
  • Contact Me

Frugal Living

Indulging in life, financially responsible

Author: Andrew

Our $100 Vacation to Costa Rica – Part 2

June 7, 2016 by Andrew 1 Comment

Shae, her sister (Auntie), Frugal Boy, and myself just returned from an 8 day trip to Costa Rica.  We went horse back riding in the mountains, zip lined at 50 mph past a volcano, and forded a river in our 4×4.  The frosting on the cake, we did it all for just $100! *  Find out how at the end of this series.  See Part 1 here.

* Auntie paid some of her share of the trip and that isn’t included in our Out of Pocket total.

Day 3 – Exploring Monteverde

On our third day, we woke up early to the deafening sound of howler monkeys.  They sound a lot like dogs.  Speaking of dogs, there was a large population of mutts wandering about Costa Rica.  They were easy going and seemed fairly harmless, but it still surprised me a bit to see so many dogs just out and about.

Shae and I were eager to try out some local baked goods, so we hiked down the hill to Stella’s Bakery.  To our dismay, the panaderia section was quite small.  Instead it was more of a sit down restaurant.  You may have heard of “Island Time”, well in Costa Rica, it is “Tico Time”.  Tico time is the pace that things get done by the locals.  From when we ordered, to when the food came out, it was about an hour.  If you are going to travel abroad, get used to the idea that “XX Time” is a real thing and will likely affect your schedule.  I took Frugal Boy outside to play while we let Tico Time happen inside.

IMG_9419

We had #2 of our top 5 grossest moments at Stella’s Bakery when Frugal Boy lost the contents of his stomach on Shae’s breakfast platter.  Sometimes you just really wish you left the kids at home with grandma and grandpa.

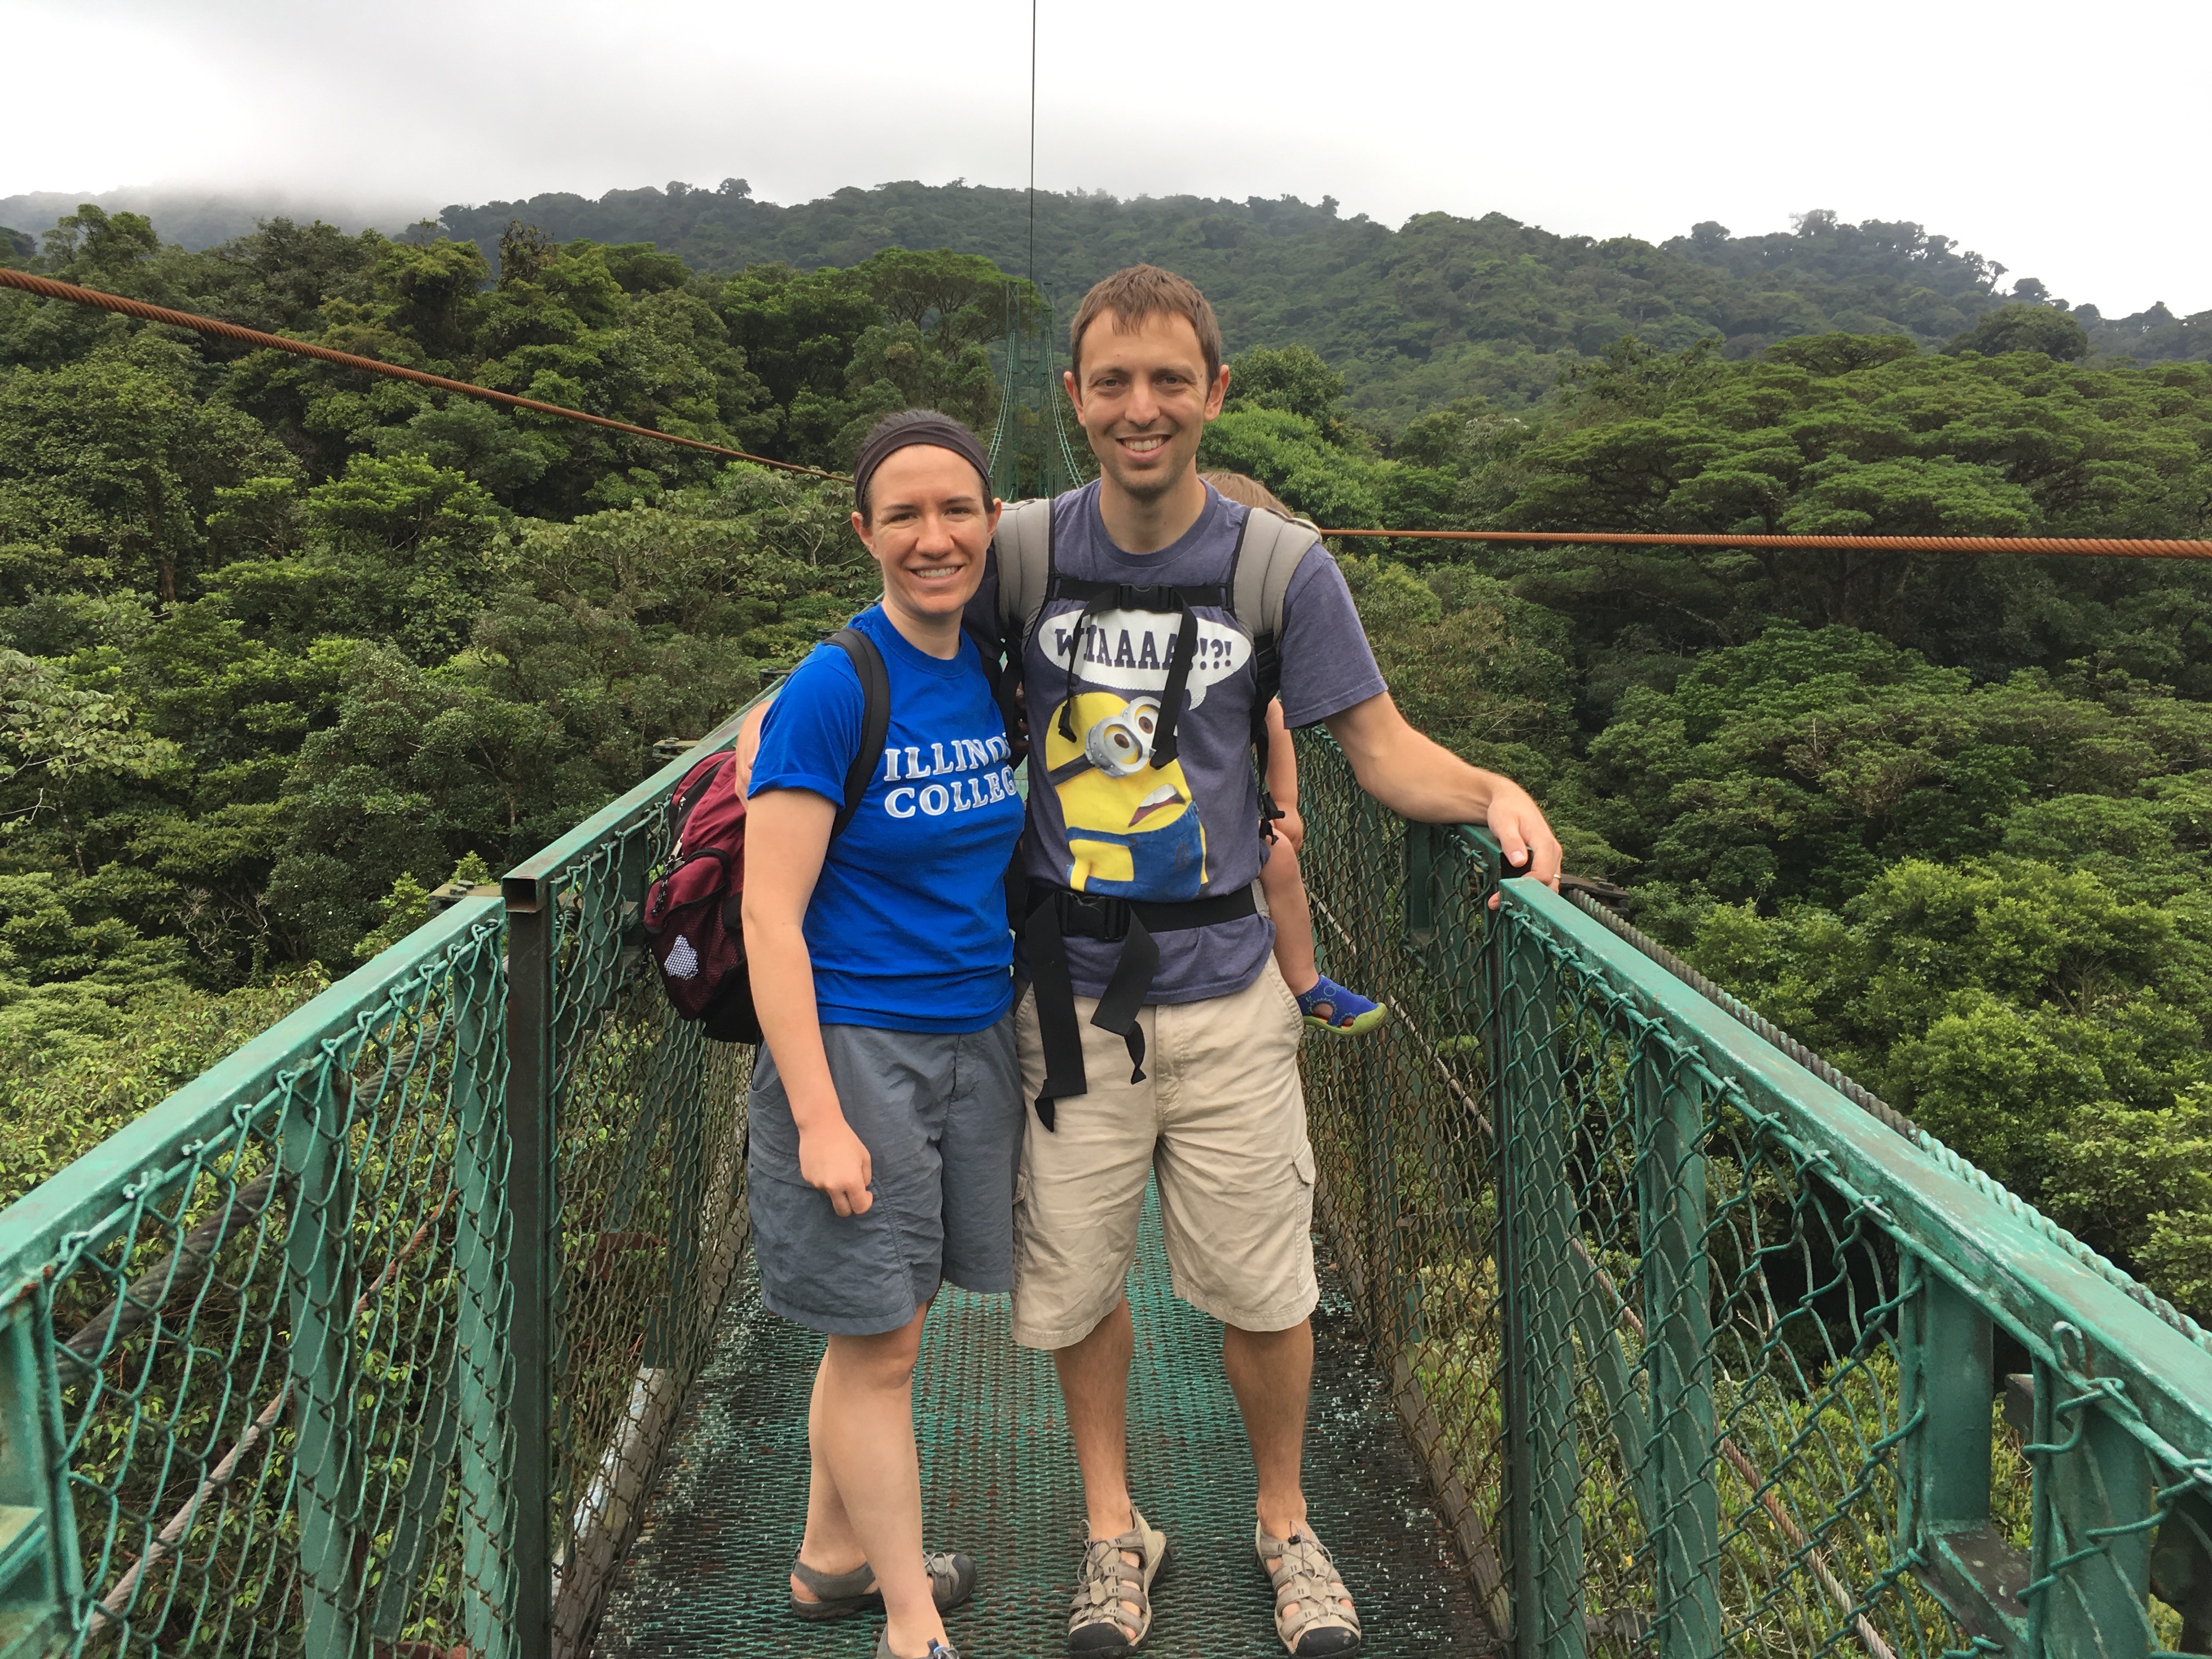
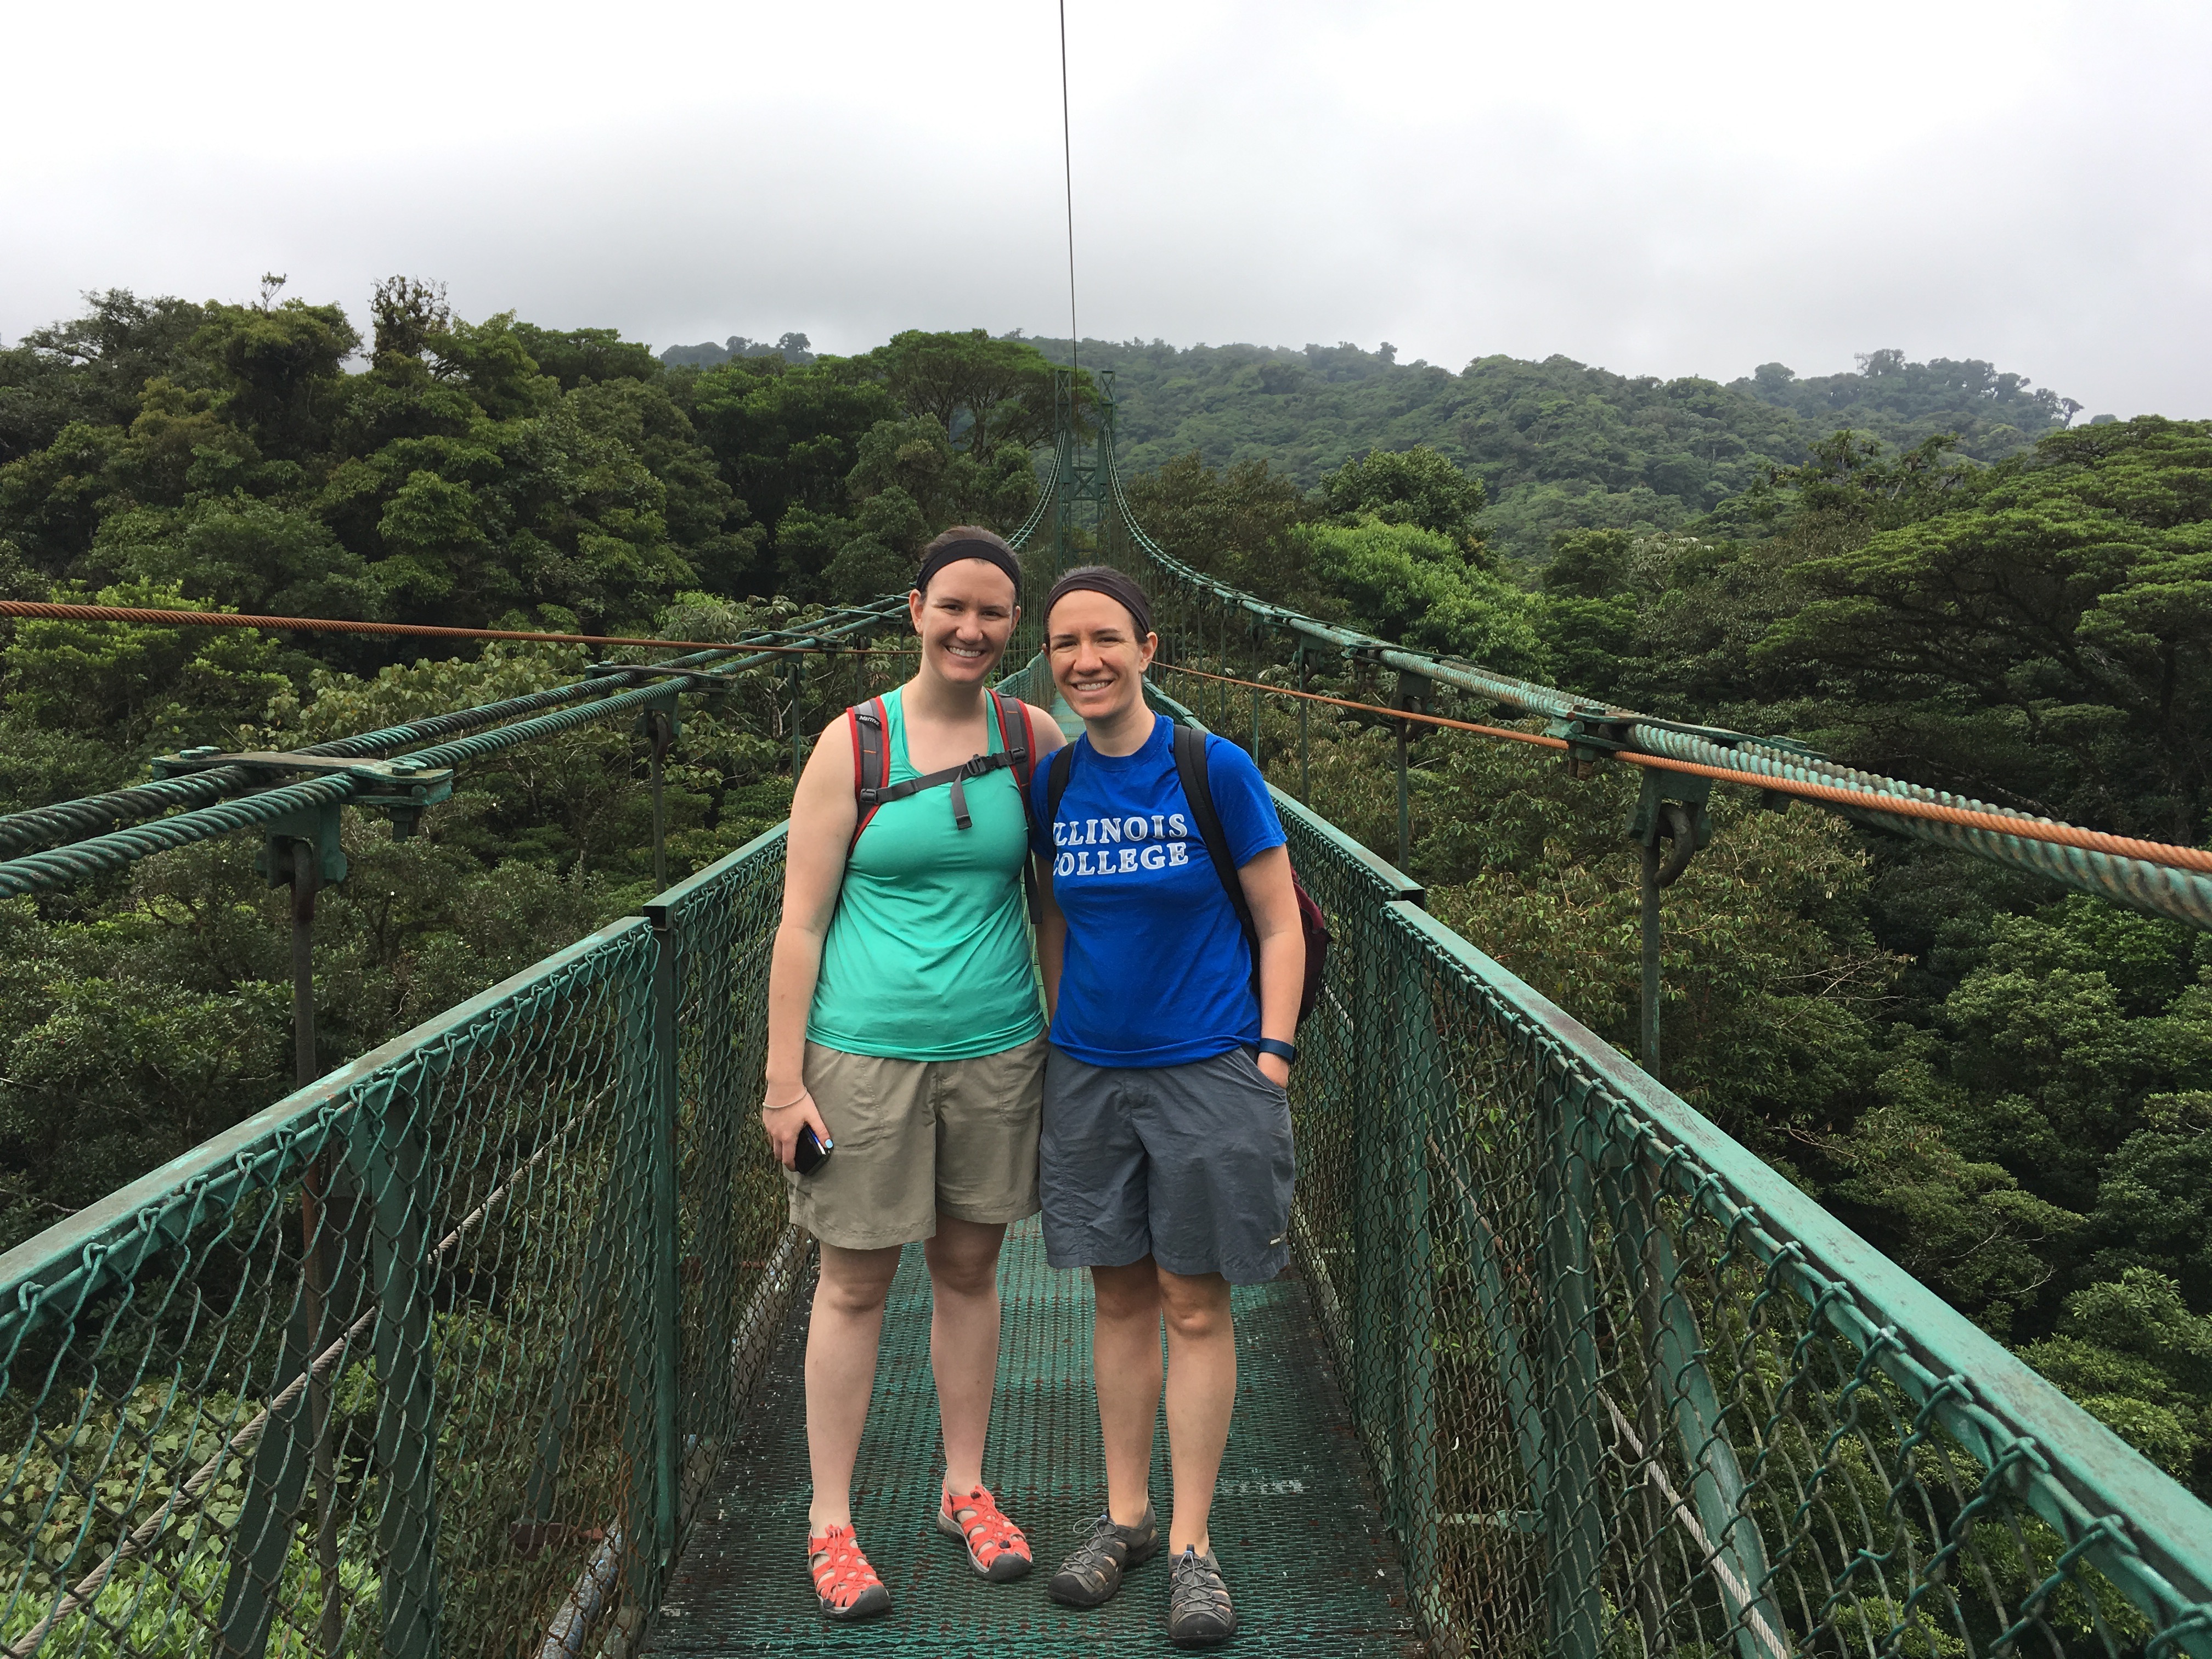
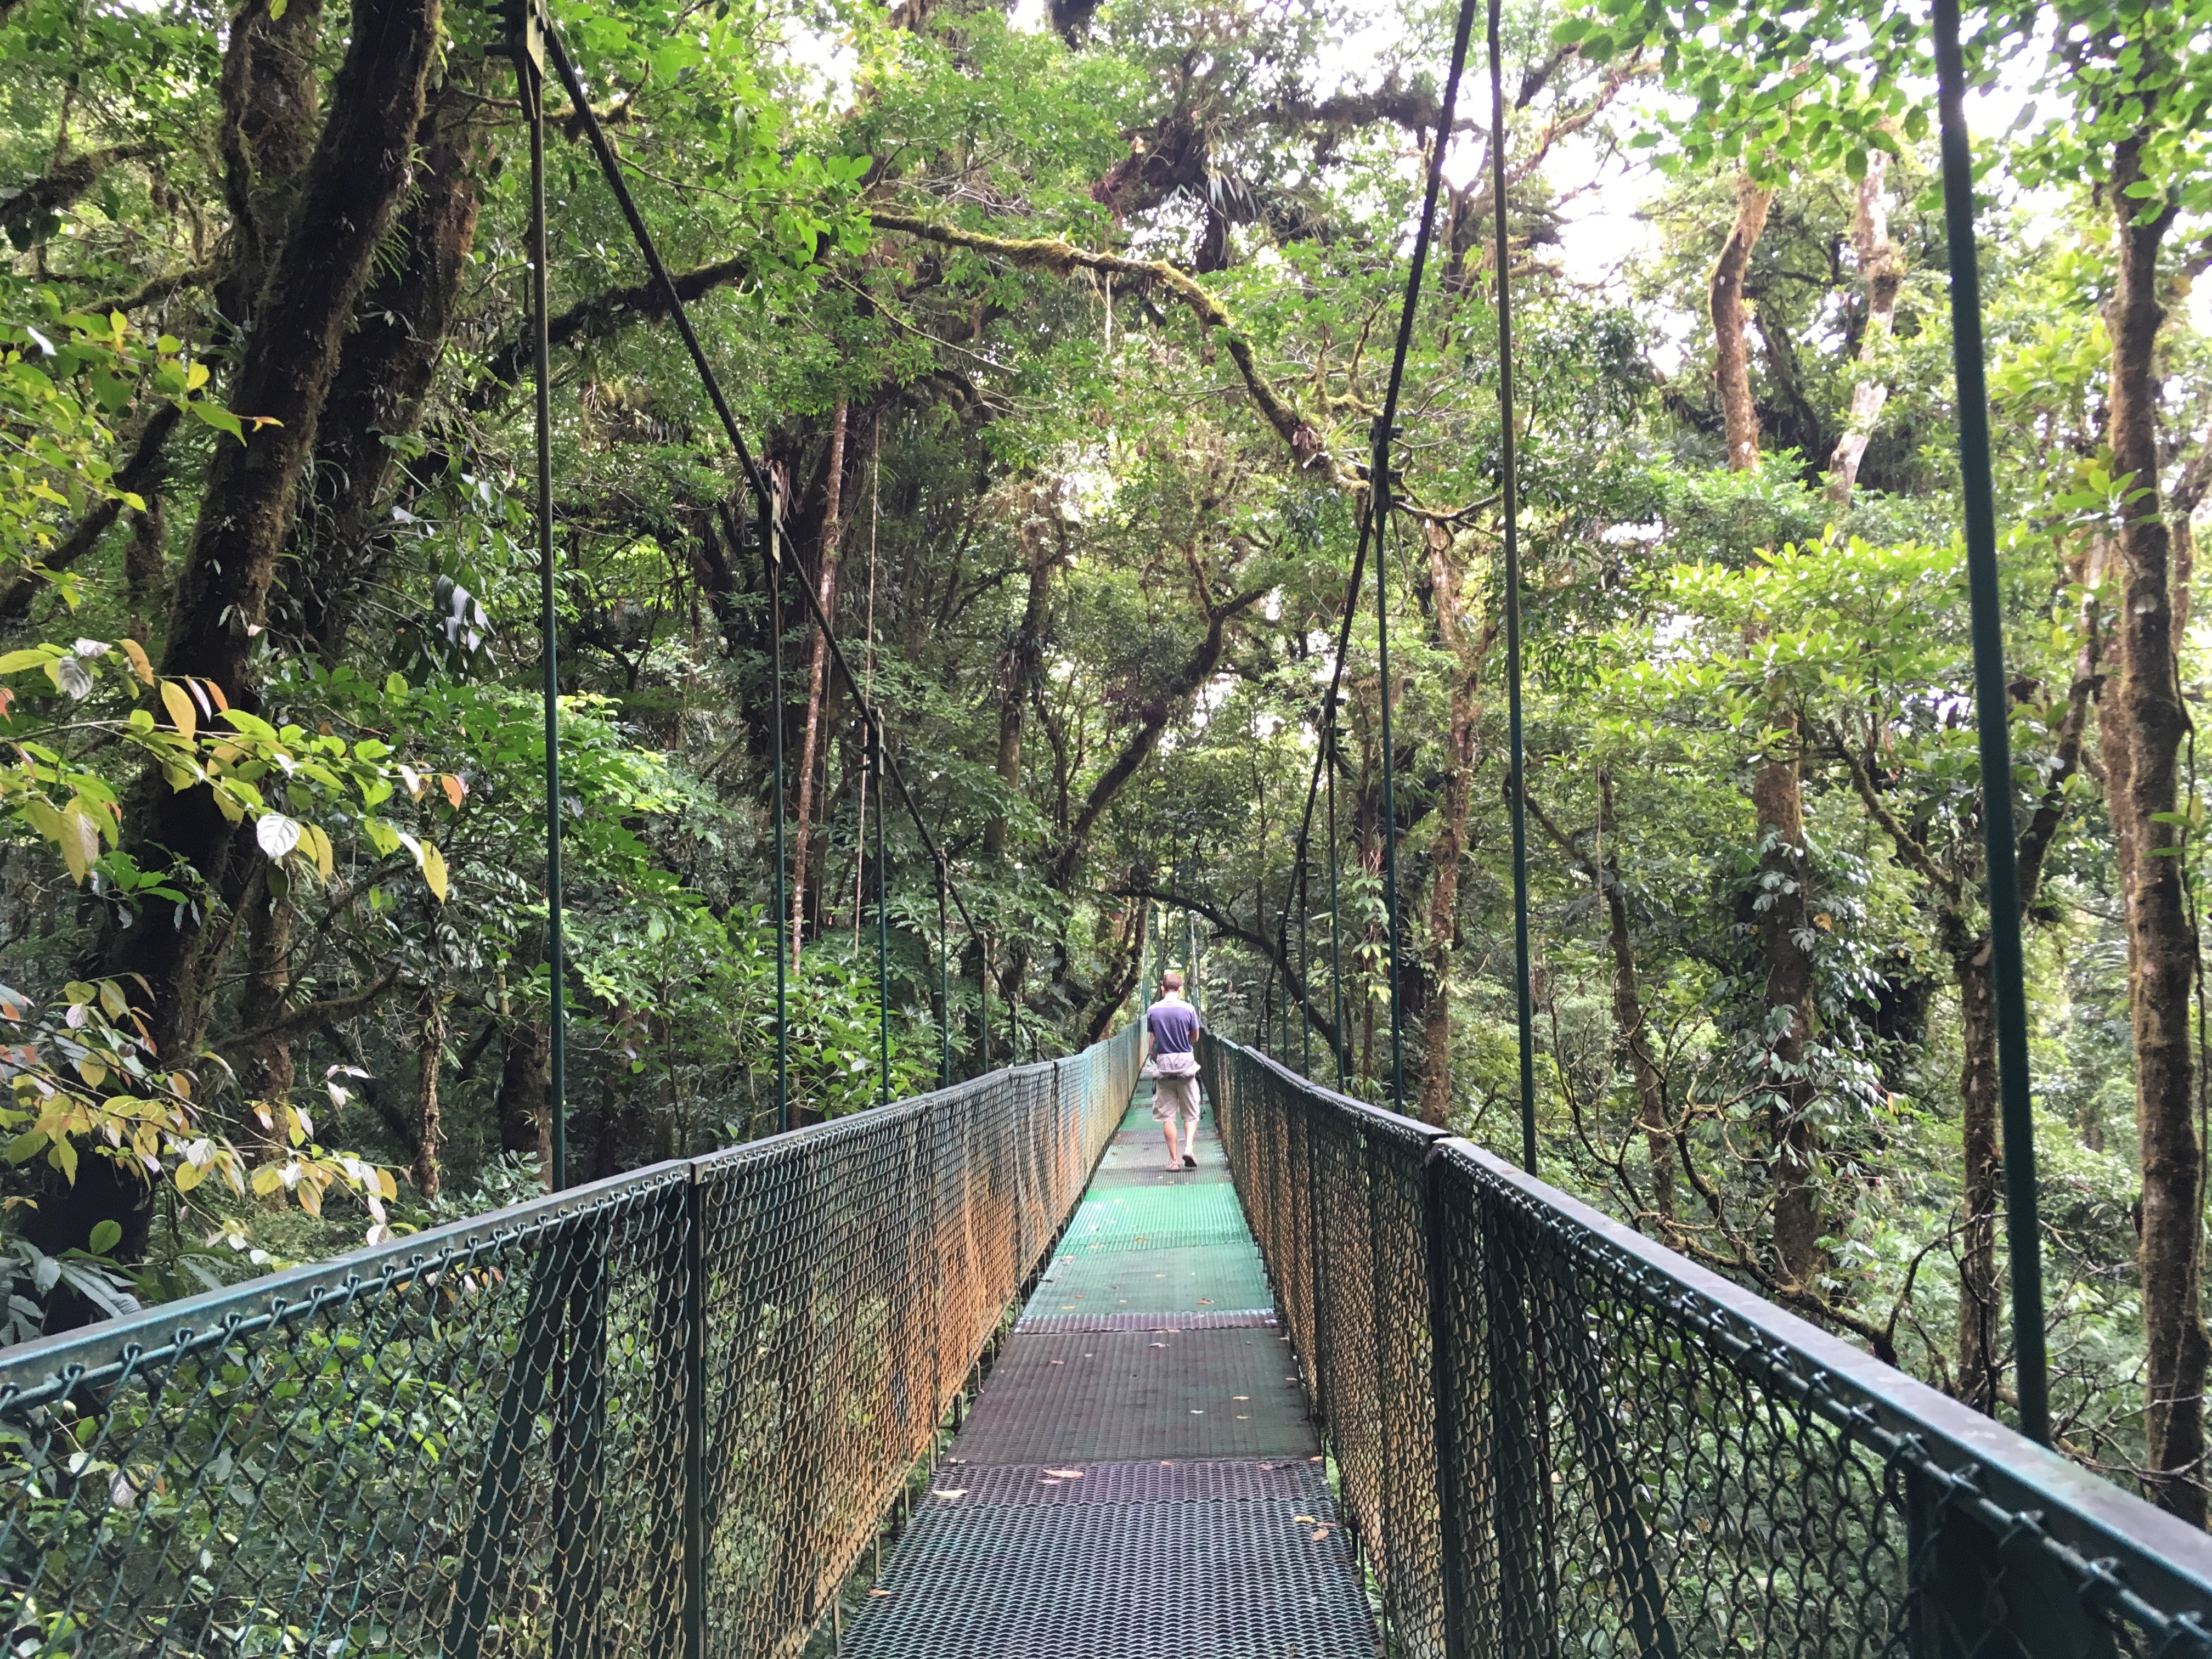
With half of our party fueled up and ready to go we made the short drive to Selvatura Park so we could walk on the hanging bridges and be among the canopy dwellers.

Screen Shot 2016-06-07 at 1.31.13 PM

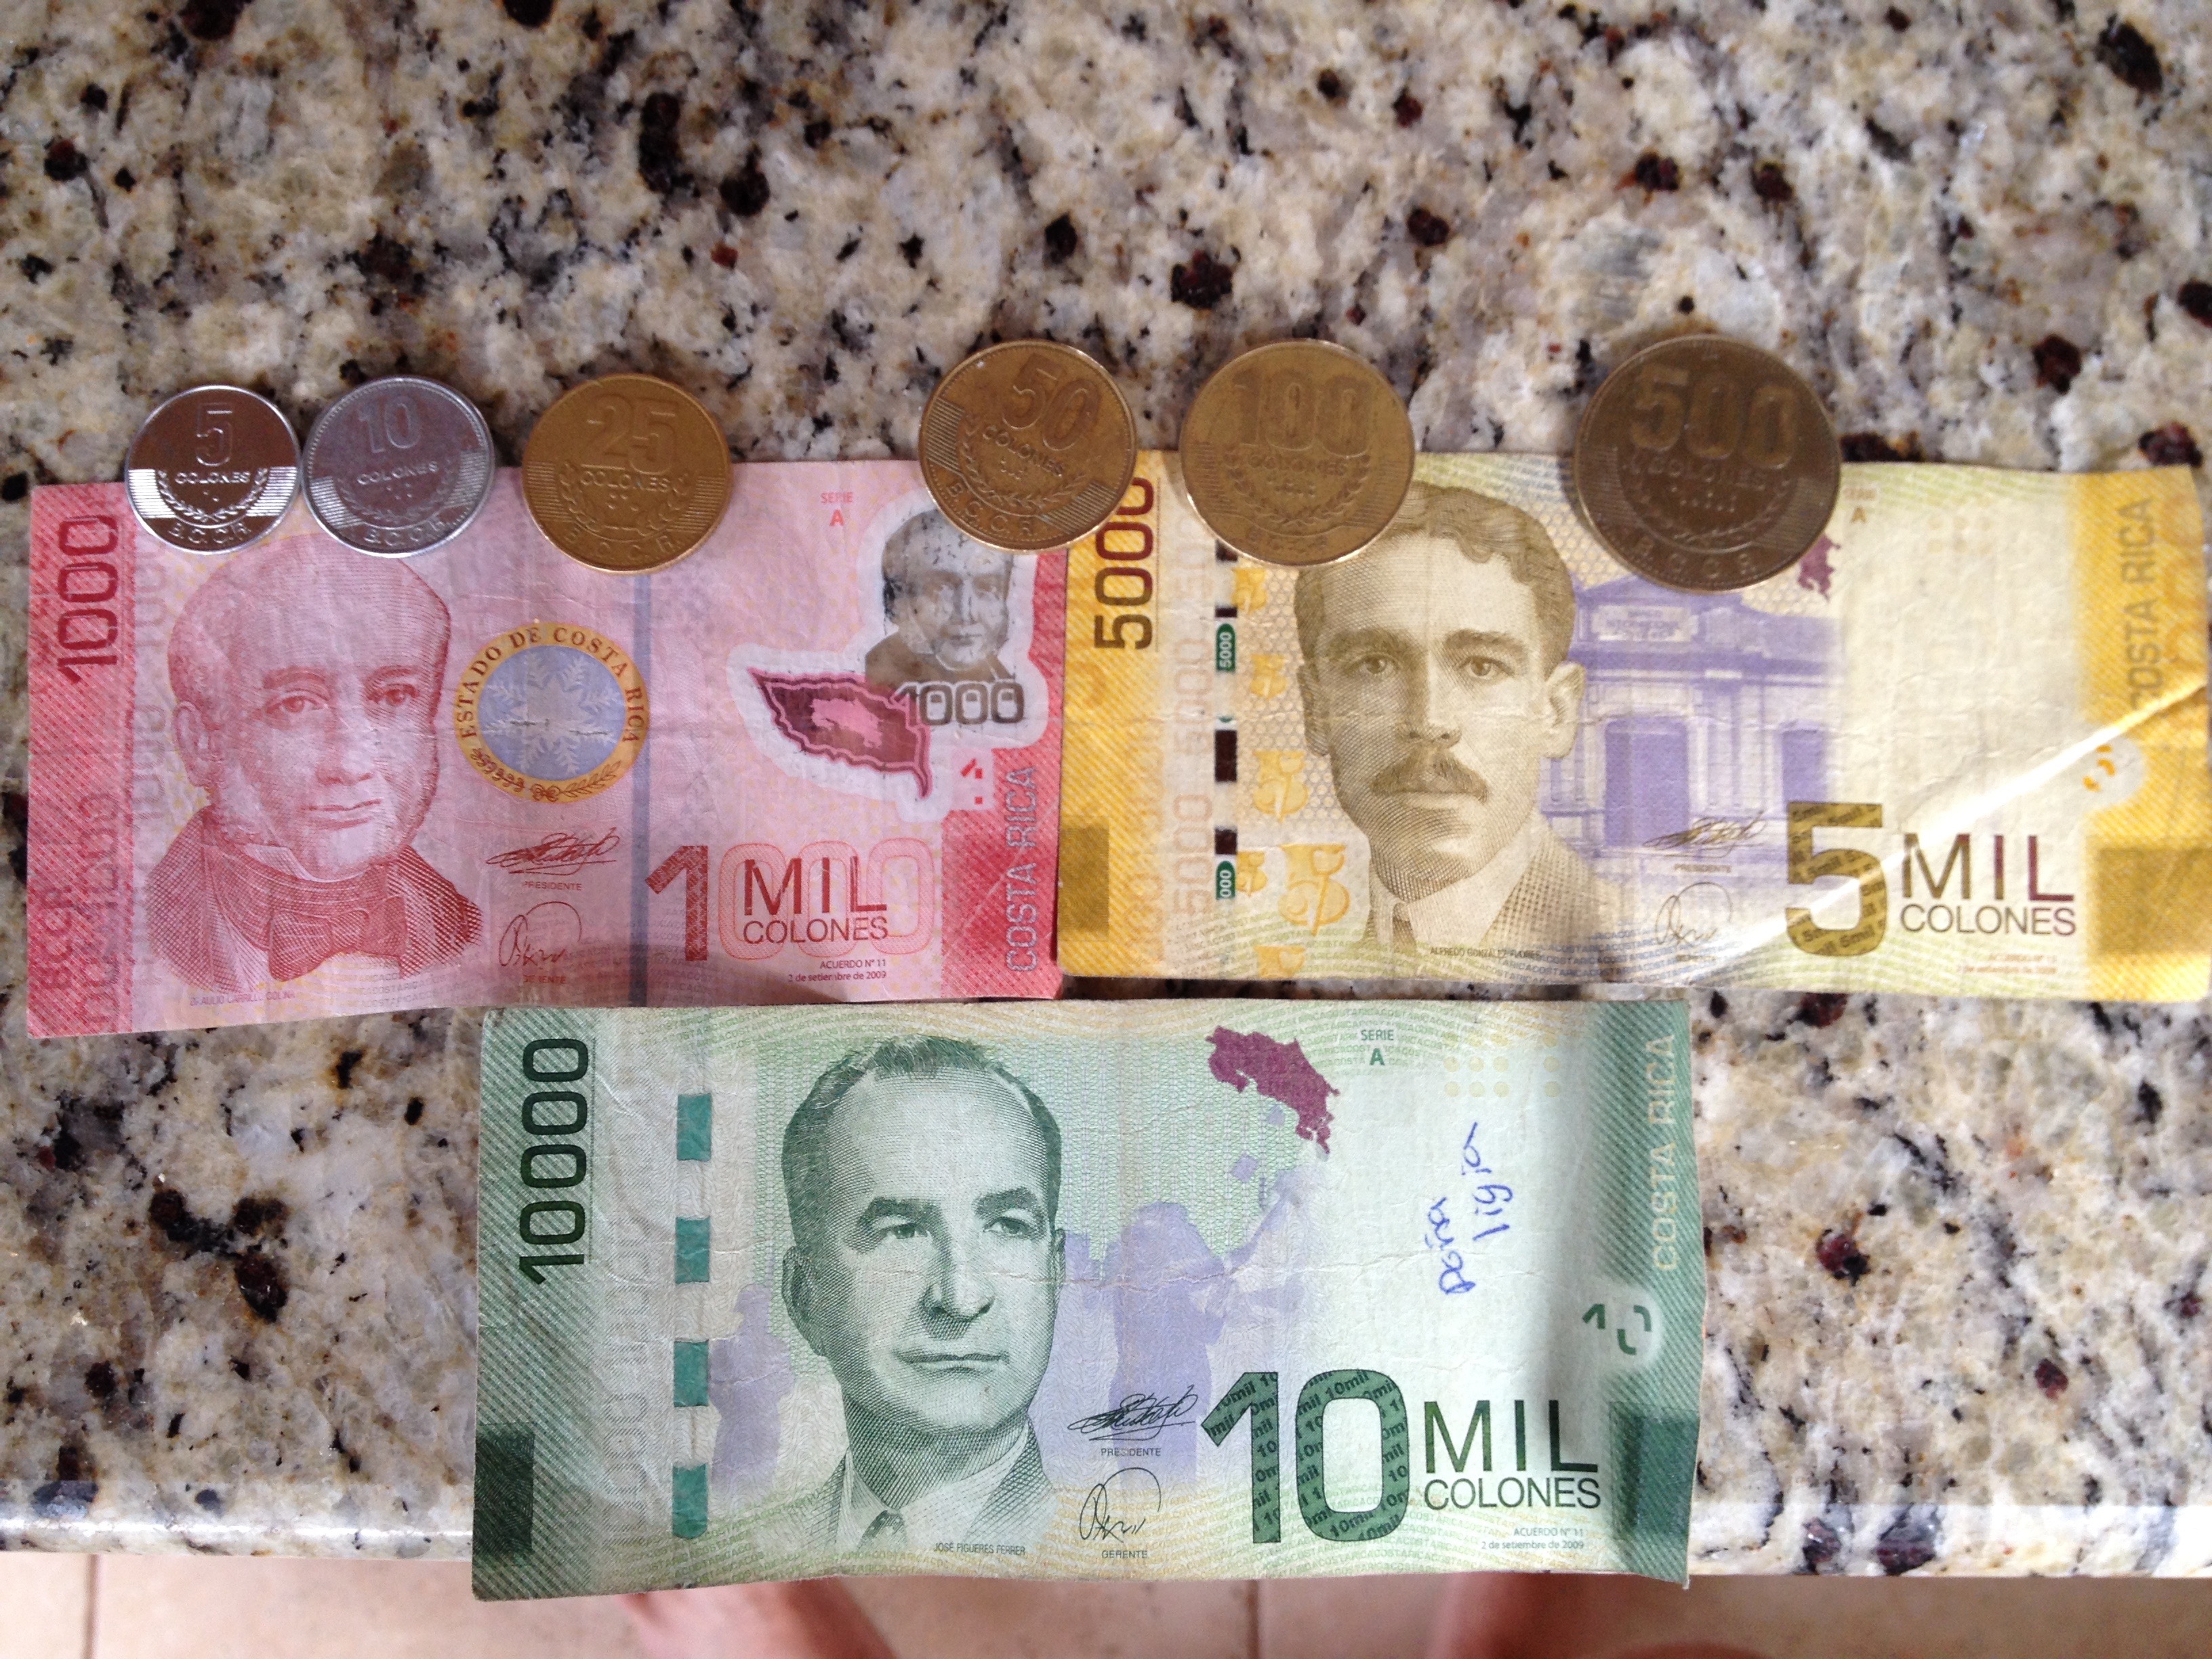
One of the big differences that Shae and I noticed on this trip from our Mexico trip was the handling of US dollars.  In Mexico, we paid for almost everything in the local Pesos, and by doing so we got a better deal.  In Costa Rica, prices were advertised in US dollars and paying by colones wasn’t advantageous.  A prime example was Selvatura Adventure Park.  The advertised rate for the hanging bridges admission was $30 per adult ($90 all together).  I paid in colones and was charged 49,000 CRC, or about $92.45.  After realizing there wasn’t much savings to be had by paying in the native currency, we used our IHG World MasterCards with 0% foreign transaction fees to cover most of the remaining tours.  We didn’t have these cards in Mexico and only had credit cards that charged foreign transaction fees, so it was nice to have a new option.  We did encounter some places that only took CRC, but they were few and far between.

The hanging bridges themselves were very cool.  It was a self guided 2 mile walk that included 7 or 8 suspension bridges that placed you either above or among the forest canopy.

IMG_9430

It was hard to capture on camera the full scope of your surroundings, but just think Jurassic Park and you’ll get an idea.

IMG_5484

IMG_9442

IMG_5561

IMG_5525

IMG_5538

IMG_5540

After completing our walk we ate some lunch back at the house and then moseyed down to the Monteverde Coop.  The Coop is a group of café (coffee in Spanish) farmers who are trying to grow and sell organic coffee.

There are a bunch of different coffee tours in the area, but this was the one recommended by our host so we went for it.

IMG_9453

After riding a shuttle out to the farm, we met our tour guide who gave us a brief history of coffee, how it relates to Costa Rica, and how plantations affect the rain forest.

I had never seen a coffee plant before.  They look like this:

IMG_9447

and the coffee beans grow on them like this:

IMG_5569

About 20 years ago, the Costa Rican government mandated that all coffee plantations switch over to an Arabica variety.  Arabica is associated with premium coffee, but it also has different growing requirements.

The farm was growing several different varieties of arabica coffee.  Every 7 years, the plants get too large to easily pick, so they chop them down to the ground and the root system sends up a new trunk.  There can be coffee bushes that are twenty or thirty years old with 5 or 6 trunks.

Different varieties are susceptible to different diseases and fungi.  The farm continually grows replacements onsite.

IMG_9445

Our tour guide talked about the evil cattle ranchers who were cutting down the rain forest, but didn’t seem to be bothered by other coffee farmers who cleared land for their crops.  The farm also was touting how environmentally savvy they were for switching over to manure based fertilizer to replace the chemicals.  They didn’t explain why chemicals were bad, it was just a dirty word.  Instead, the tons of manure required to fertilize the farm necessitated that Nicaraguans be bussed in and housed in small dormitories to provide the labor needed to ‘go organic’.  Obviously, you can tell that I am skeptical of the personal and environmental benefits of ‘organically grown’.

Moving on, we just finished walking through a field when we arrived at the roasting/tasting/gift shop building.  It was fortunate timing as well, because it had just started to rain.  Inside, a new guide explained the different drying processes for the picked beans.

IMG_9448

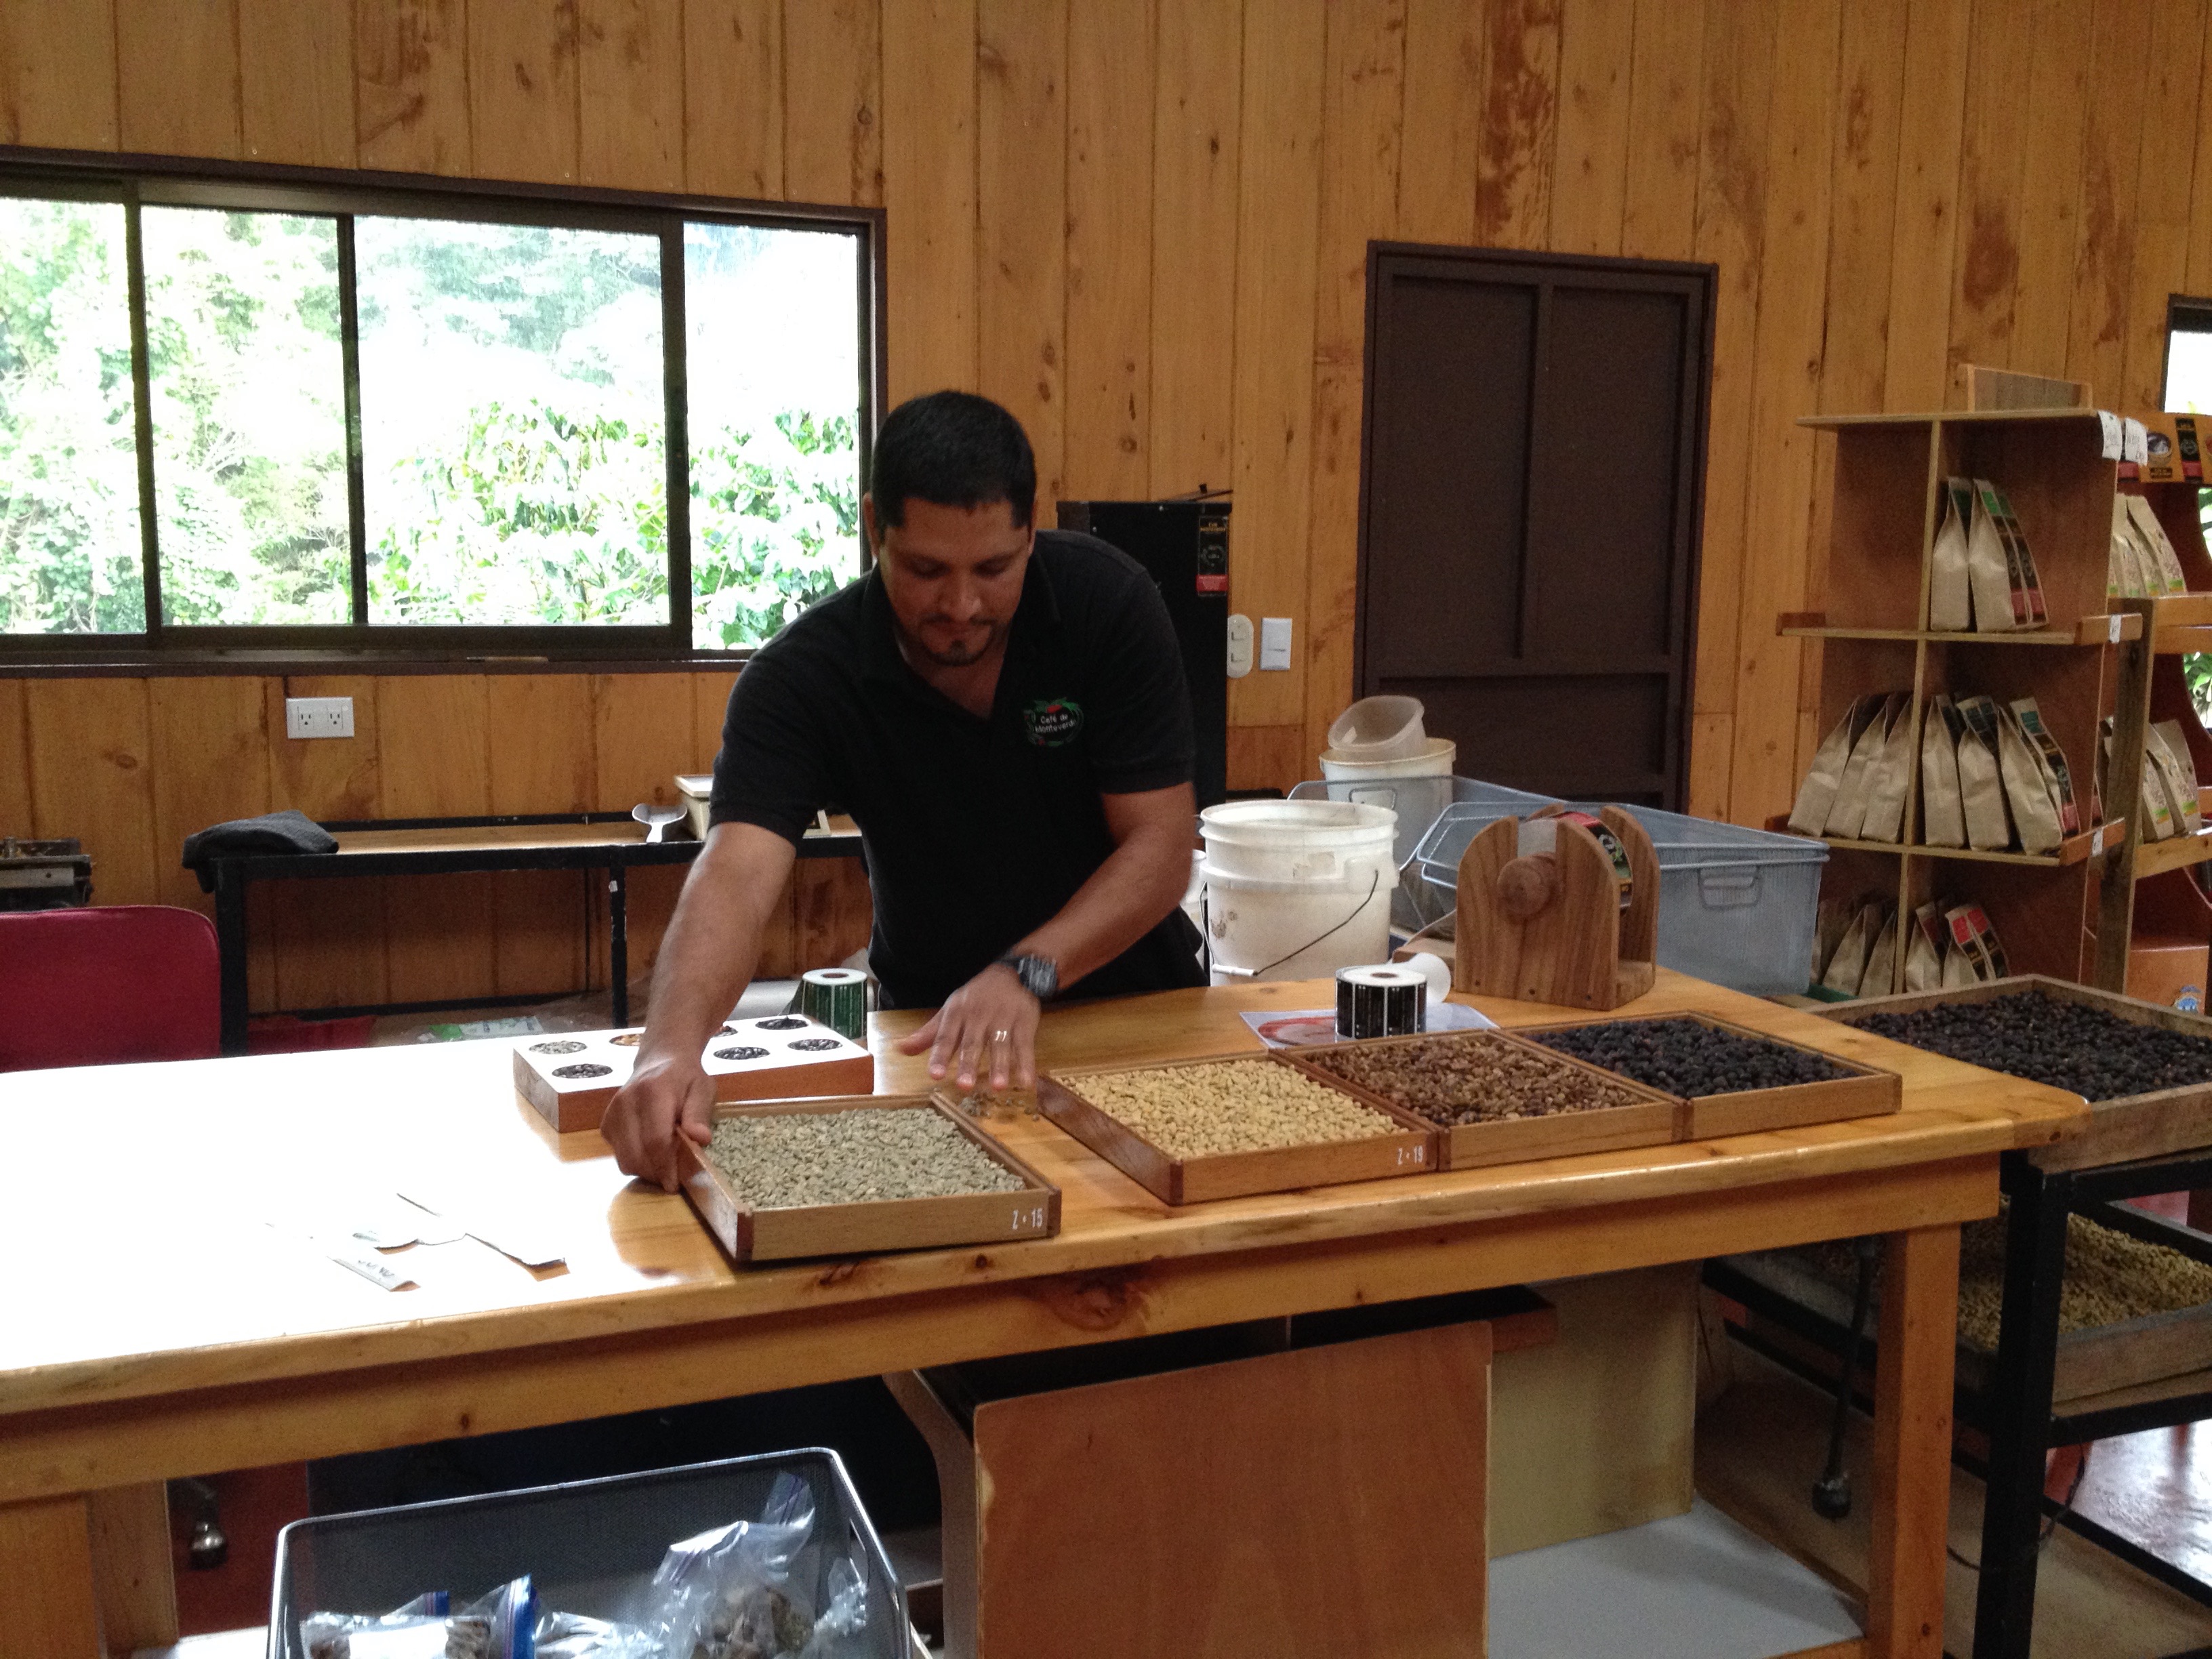
On the right hand side is the entire coffee cherry picked and dried.  To the left of that is the coffee bean with the outer husk removed.  Left of that is the same thing, except washed, and finally the left most box is the fully peeled coffee bean.  So each whole coffee cherry contains multiple beans inside and then there is a husk that can be removed and a pulp.  Think of it like peanuts.

IMG_5571

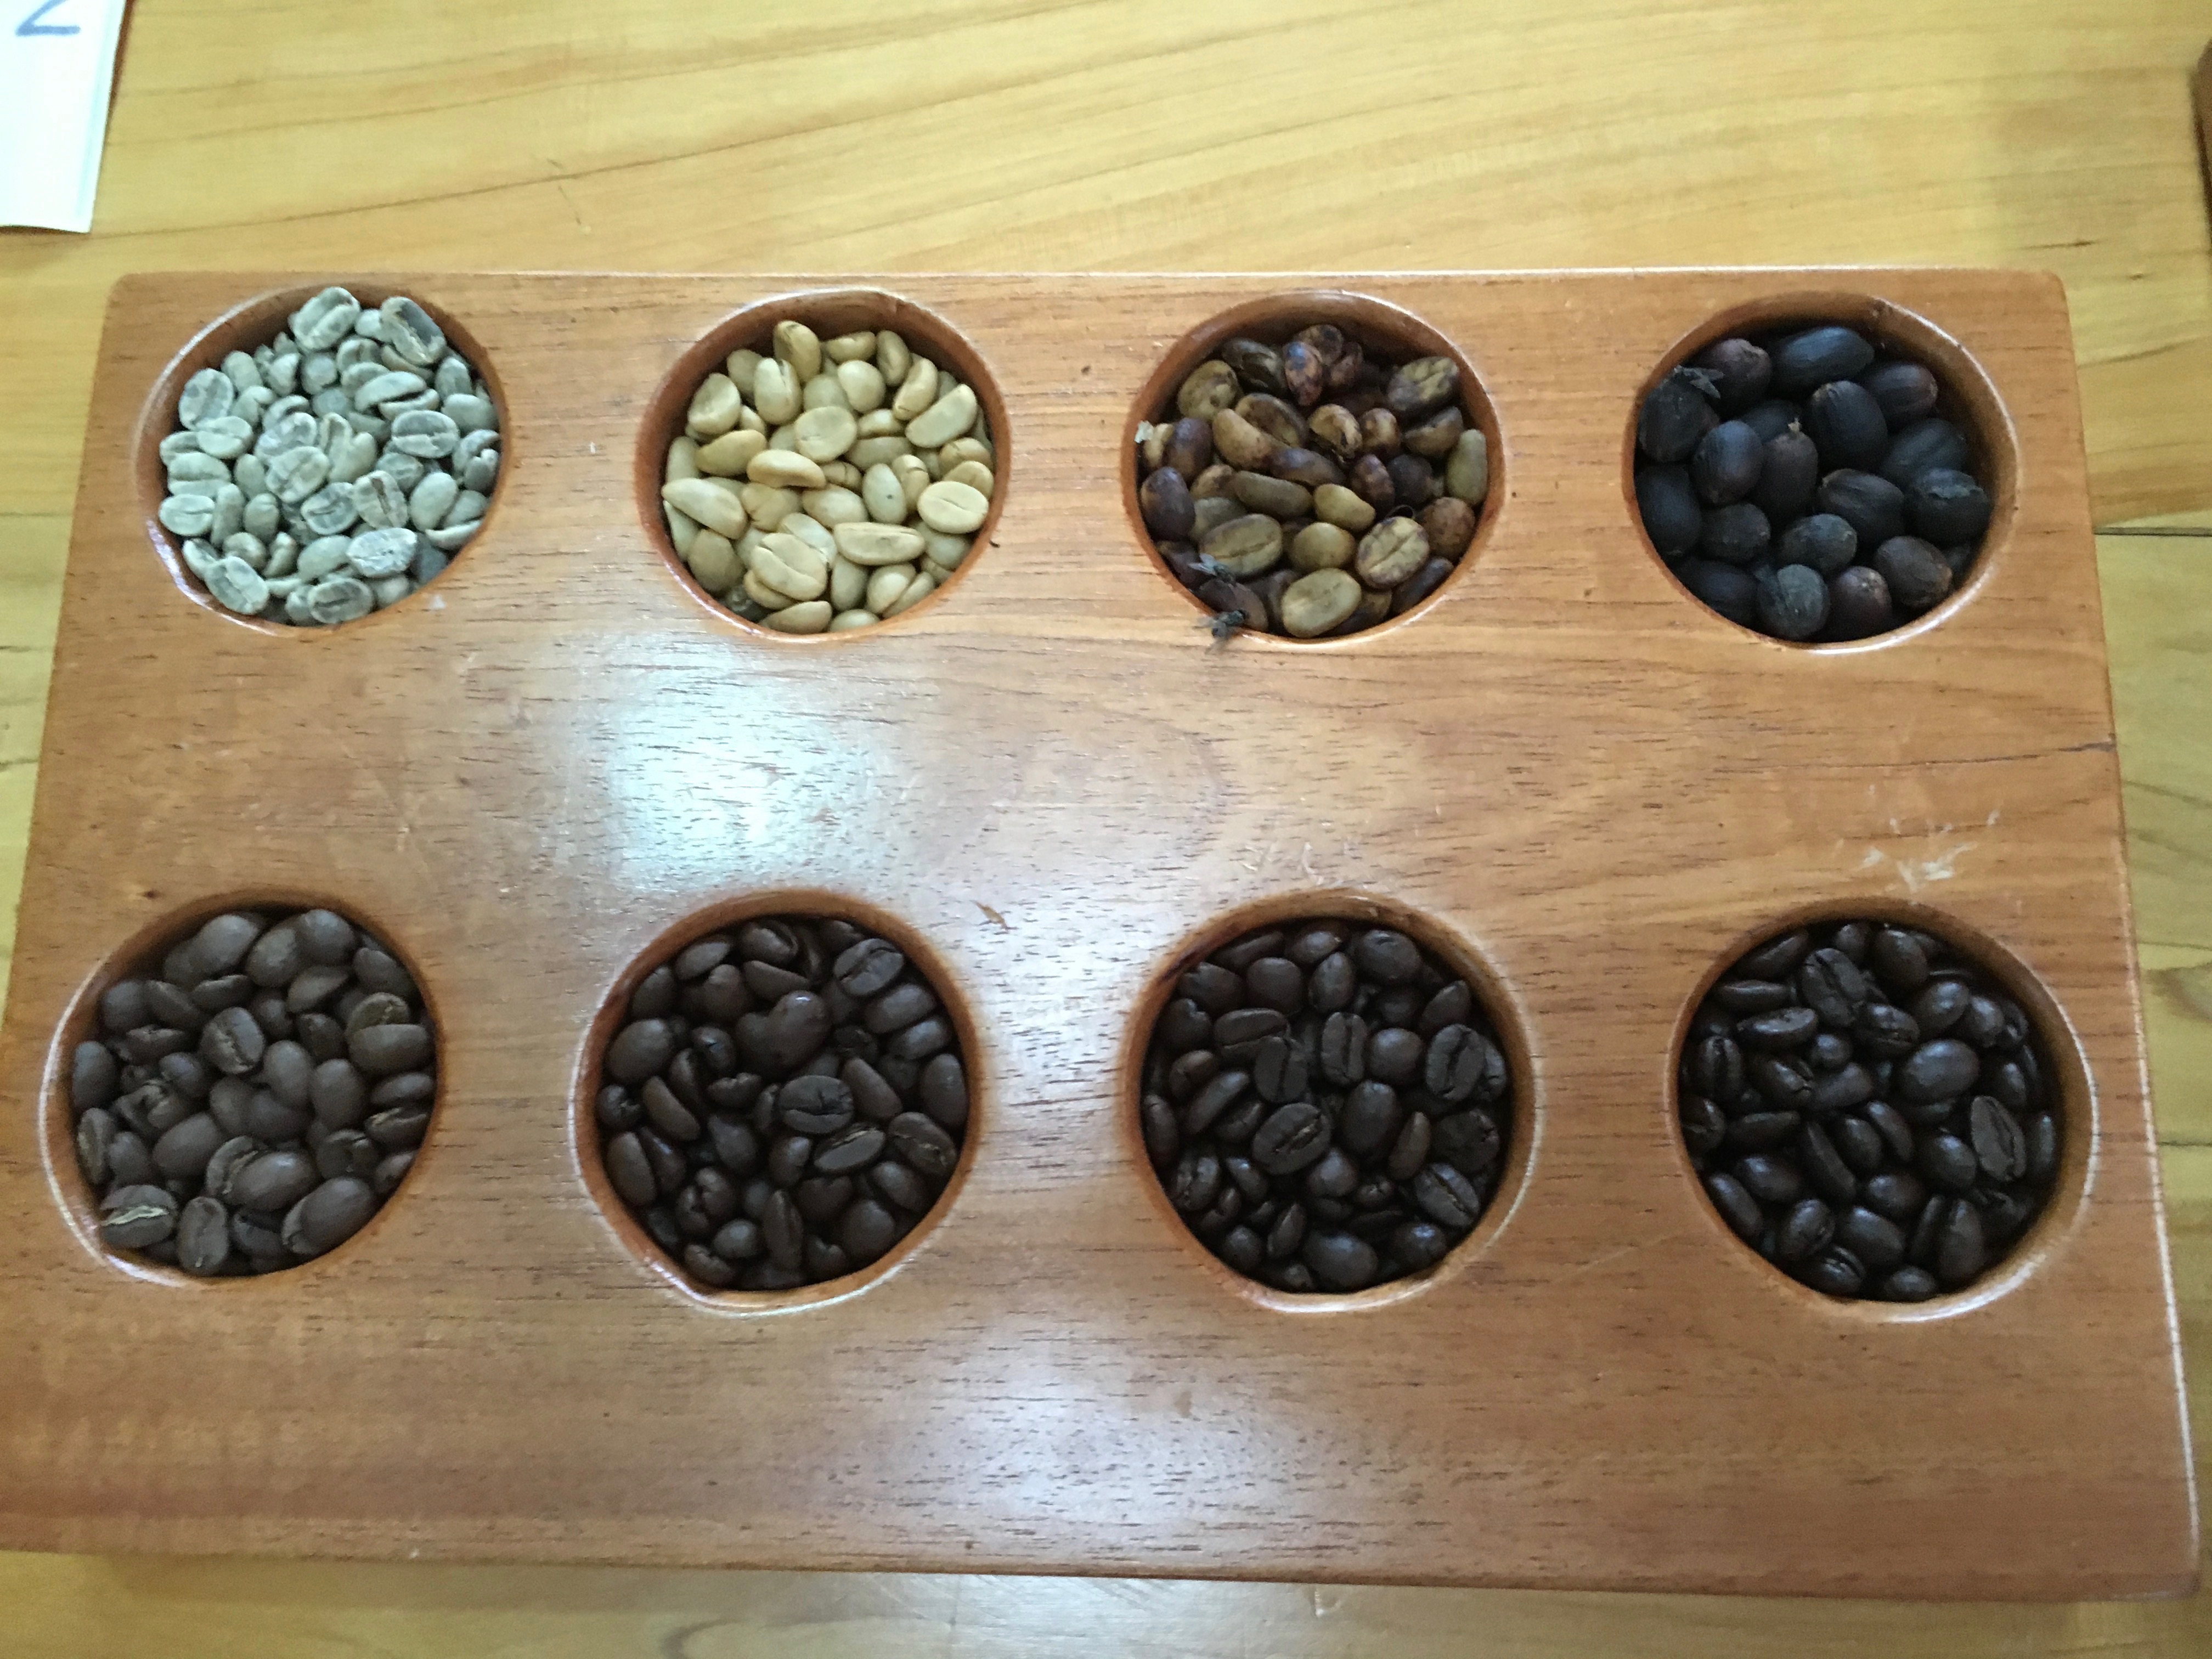
The top row are the raw un-roasted beans and cherries in their respective drying strategies.  The bottom row is just the corresponding beans after they are roasted.

Now that you are as confused as I was, it was ready for the taste test challenge.  Could we correctly identify light, medium, and dark roast?  Could we identify whole dried versus washed dried?

IMG_9450

I’ll prefix this with a, I am not a coffee drinker and probably never will be.  To me, it tasted like this:

Ugh

blah

meh

Ugh

meh

It turns out that I am not a light roast fan.  We learned that there is only a minute difference between light and dark roast coffee.

Of course at the end of the tour you could buy ground or whole bean coffee from their little shop.  We saw the exact same bags back at the Coop ticket booth for $4 less.  The best place to buy your coffee is where the Ticos buy theirs, the supermarket!  By the end of the trip, we had purchased 2.25 kg of genuine Costa Rican ground coffee to give to friends and family for a fraction of the cost.

IMG_5904

Cafe Britt is probably the best known coffee to Americans, but we chose to buy what the abuelas were snatching up in great big sacks.  Chances are good that it all comes from the same conglomerate of farms anyway!

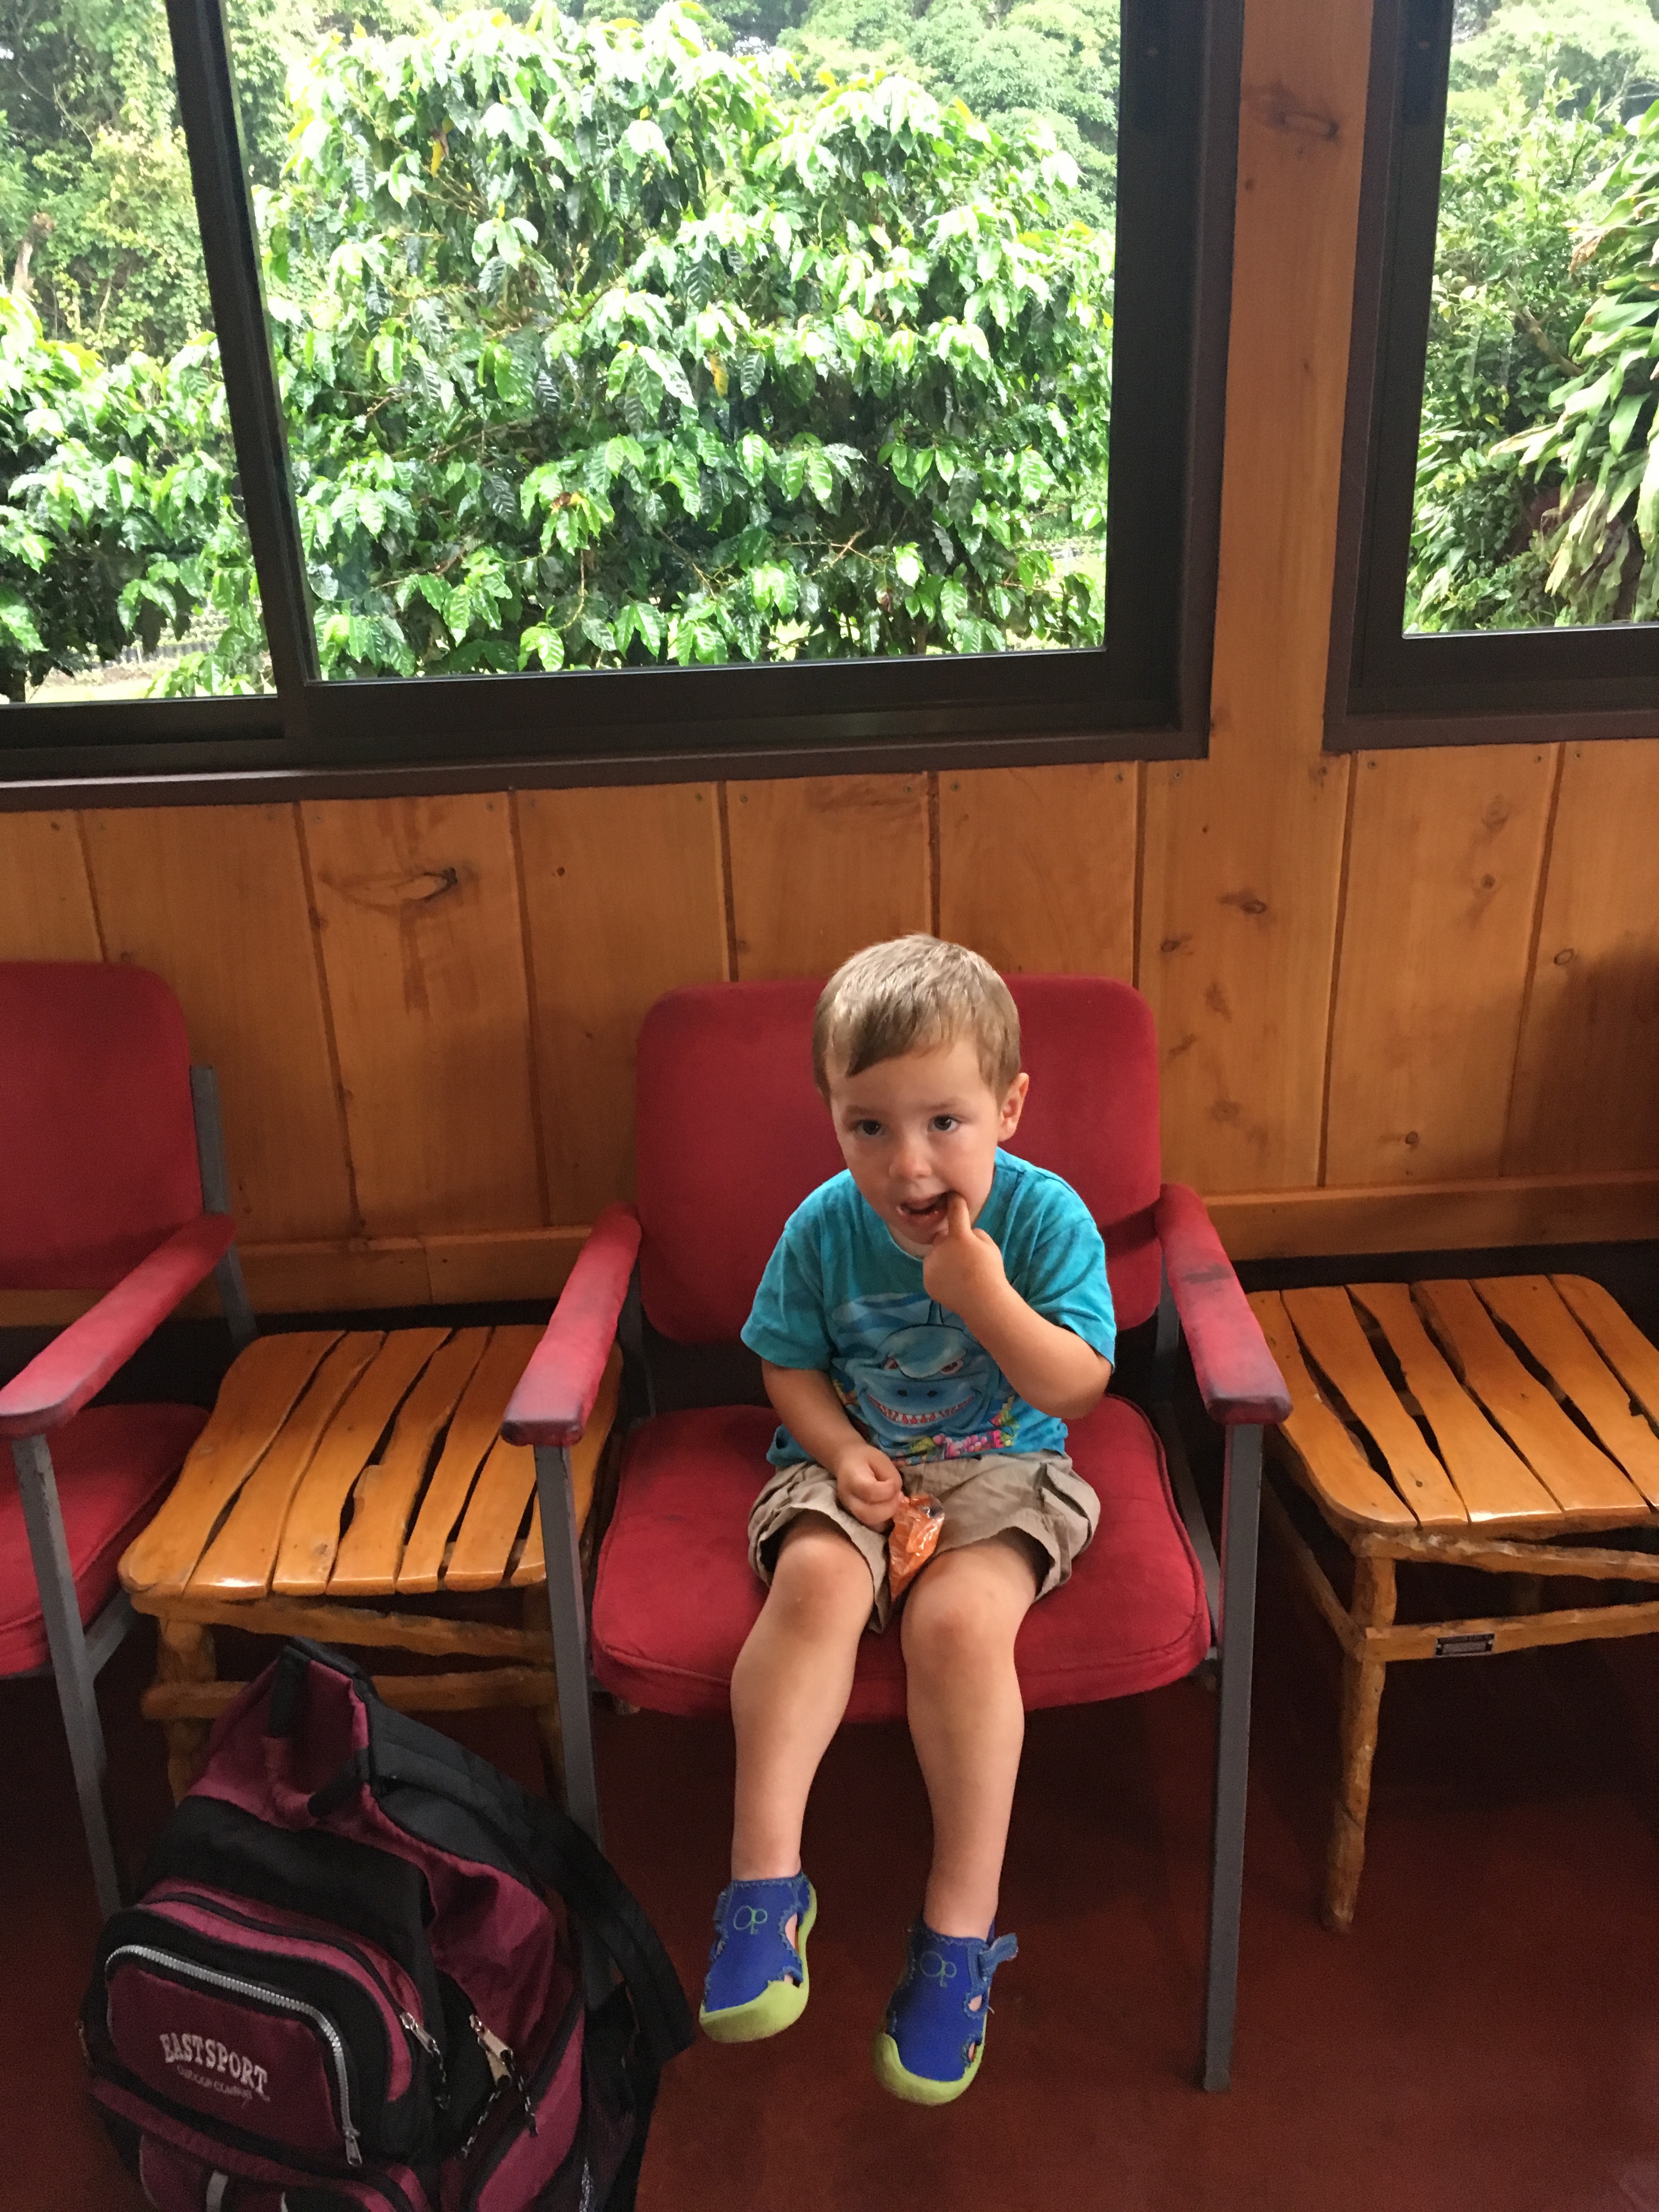
Frugal Boy really wanted to drink some coffee.  He settled for some dregs and fruit snacks.

IMG_5590

With our shuttle waiting to whisk us back we donned our rain gear and left the coffee plantation behind.

IMG_5608

That night we followed our other Host’s recommended eatery.  An upscale Argentinian place (Cabure) that was right next door.  I had a wonderful sea bass with almond topping for 8500 CRC.  It was a splurge, but it was also my favorite meal from the trip.

Continue reading part 3 here.

Posted in: Frugal Boy, Savings, Travel, Uncategorized Tagged: Costa Rica, summer, vacation

Our $100 Vacation to Costa Rica – Part 1

June 7, 2016 by Andrew 4 Comments

Shae, her sister (Auntie), Frugal Boy, and myself just returned from an 8 day trip to Costa Rica.  We went horse back riding in the mountains, zip lined at 50 mph past a volcano, and forded a river in our 4×4.  The frosting on the cake, we did it all for just $100! *  Find out how at the end of this series.

* Auntie paid some of her share of the trip and that isn’t included in our Out of Pocket total.

A Primer of Costa Rica

Screen Shot 2016-06-07 at 10.01.28 AM

Costa Rica is located in Central America, just north of Panama and south of Nicaragua.  The capitol is San José and there is a second international airport located just west of the city of Liberia in the northwestern province of Guanacaste.  An established republic, like the United States, Costa Rica is sparsely inhabited and has no standing army.  Ticos, a colloquial term used to describe the citizens, have their own currency called colones.  The USD -> CRC exchange rate was about 1:530.  So one US dollar would get you about 530 Costa Rican colones.  The official language is Spanish, although many Ticos have at least a transactional level of English proficiency.  The country has a thriving ecotourism industry, exports about 1% of the total coffee production in the world market, and is an attractive place for international companies to set up shop.

IMG_9463

Now that you have a working knowledge of Costa Rica, let’s go!  Or as the Ticos would say, ¡Vamos!

Day 1 – Getting There

We chose to fly into Liberia airport, not the capitol, because it was closer to the activities that we wanted to do and it was slightly cheaper.  Even so, flying from Chicago required about 7 hours of sitting on a plane.  We had a layover in Houston that added some more time to our travel day.  All-in-all, you can count on sacrificing an entire day just to getting there.  Expense wise, tickets were about $500 per person round trip.  Frugal Boy is over the cut off for ‘lap child’ so we had to pay for his very own seat.

He enjoyed watching Finding Nemo on the first flight, even without any sound.

IMG_9376

Other large expenses that we budgeted for included a meal at the airport, approximately $45, parking for a week ($82), and checking one piece of luggage roundtrip ($50). We saved money by bringing our own snacks from home, packing as lightly as possible to avoid more baggage fees, and booking our airfare well in advance.

IMG_5388

IMG_5393

An unexpected expense on day 1 was a $10 taxi fare from the airport to our hotel upon arrival.  We were expecting a complimentary shuttle to be available, but couldn’t find it and I was feeling extremely unwell at the time and didn’t want to deal with one more thing.

Day 2 – Hitting the Road of Adventure

The first goal of the day was to use the ATM in the lobby to get native colones.  Our primary bank refunds ATM fees, and you usually get the best exchange rate by using an ATM instead of a money exchange.  Shae withdrew 250,000 colones ($470.06).  The second goal of the day was to pickup our rental car.  I chose Dollar Rentals because they had some of the best pricing, were off airport (not subject to extra taxes), and had the most transparency about insurance and coverage on their website.  The morning’s challenge however was in getting over to their rental office which was about 2 miles away.  Both Auntie and I needed to go because we were both going to be drivers.  I asked for a ride from the hotel shuttle, and they said they only went to the airport.  I tried calling the rental office and no one picked up.  Thankfully, I saw a Hertz representative and he agreed to drop us off because their offices were right next door to one another.  Yay Hertz!

Once we got there, it was a very easy checkout process.  I don’t think I’ve had a checkout be so easy before.  I did have a moment of weakness and switched from bare insurance coverage to full coverage.  It was $90 more for the week, but after spending a night curled up to the porcelain throne, I wasn’t ready to take any more risks on this trip.  For $414.15 we had a 4 wheel drive SUV that comfortably seated all of us and our stuff.

IMG_9637

Back at the hotel, we loaded up all of said stuff and remaining passengers and hit the road for the city of Liberia to the East.  We made a quick stop to load up on groceries before traveling south on the Pan American highway #1.

IMG_9384

I had read about a local swimming hole that was just off the highway called Catarata Llanos de Cortes.

Screen Shot 2016-06-07 at 10.31.43 AM

It proved to be a wonderful stop and Frugal Boy was very excited to play in the water.

13392211_10204705999449792_14291775275979364_o

IMG_5409

It was 2000 CRC to park, and we made a donation of another 1000 CRC to two nice abuelas at the entrance who were collecting money for something or another.  Finding the local spots is a great way to see the country and save money.  We visited several other waterfalls during this trip and they were aimed more at the tourists and our wallets felt that in a big way.

After we had our fill of swimming, we decided to try and find a place to eat lunch in the nearby town of Bagaces.  Bagaces was not a tourist town, but I was on the hunt for a local eatery.  As Auntie drove farther into town and clutched the steering wheel harder, I spotted the Bar Renur Restaurant with several people inside (always a good sign).

IMG_9391

The three women behind the bar greeted us with typical Tico hospitality.  They especially loved Frugal Boy and even turned on some cartoons for him to watch while we ate.  They didn’t speak any English, but our Spanish has improved a bit from our January Mexico trip, so we were able to interact just fine.  Auntie and Shae both ordered lunch, I was still feeling a bit nauseous from the previous day so I just snacked on a banana.  The lunch bill was a very affordable 5800 CRC (about $5.50 a person).  One thing that surprised Shae and myself were the Costa Rican prices.  We had heard beforehand that Costa Rica was an expensive country to travel, but as we later learned first hand it really is on par with USA prices.  Really getting off the tourist path and eating like a local was still a pricey meal in comparison to our Mexico trip.  Costa Rica would not have much of a geographic arbitrage advantage for retirement purposes.

From lunch, we continued down highway 1 until our turnoff at Las Juntas so we could get to Monteverde in the mountains.

Screen Shot 2016-06-07 at 10.59.17 AM

On the drive up into the mountains there was a pull off that had a great view of where we had come from.  You can easily see the Nicoya gulf that connects up to the Pacific ocean.

IMG_5433

Finally, the winding, bumpy mountain roads delivered us to Monteverde, our first destination of our week long trip.

IMG_9402

Monteverde is world famous for being a cloud forest.  The elevation was around 5200 ft, making it pleasantly cool, and true to its name, enveloped in clouds more often than not.  The last bit of driving was up a very steep and rocky road.

IMG_9403

And then we were at our first Airbnb rental house!

IMG_9424

For $246 we had a two bedroom house all to ourselves for two nights just minutes away from some of the best attractions in the area.  I have yet to have a bad experience with Airbnb.  The hosts lived in a house on the same land and they had two energetic little boys that made Frugal Boy light up.

IMG_5447

I knew beforehand that the woman host was an ex-pat from the Boston area, so we brought a jar of pure maple syrup as a gift.  Of course we bought it at Aldi for $6.50.  She was ecstatic to get it and told us that pure maple syrup cost around $40 locally for a similar sized container.  We also found out that peanut butter was around $6.60 a pound in Costa Rica.

IMG_5612

If you were planning on eating peanut butter in Costa Rica, you might want to bring it from home!

Here is one more photo of our rental house in Monteverde.

IMG_9409

After settling in, our host helped us make a reservation for a guided night walk to try and see some of the wildlife.  The major tourist draw of this area is the biodiversity.

Standing in the parking lot of the Curi Cancha biological reserve, Shae told Frugal Boy to take a picture.  He happily obliged, camera need not apply.

IMG_5460

I don’t have any good photos from our night walk.  It was about 2 hours long and our guide Adrian tried to spot critters for us.  We heard plenty of birds, frogs, and bugs.  Highlights included seeing a giant tarantula, nectar drinking bats, a phosphorescent scorpion that shone under a black light, and a Keel-billed Toucan.  The latter of which, I learned is an omnivore instead of a herbivore and is not very popular with other animals because it will eat their young.

It’s worth noting that because Costa Rica is so close to the equator, they have 12 hour days year around.  That means that it is dark by 6pm.  This combined with the switch to mountain time, really screwed up our internal clocks.  Shae and I both learned that living near the equator, probably wasn’t for either of us.  We like having sunlight in the evening (at least until 8).

With the tour concluded, we were hungry (even me!) and decided to follow the recommendation of our host for an Italian place (Tramonti’s) just down the driveway.  We ordered a pizza (5000 CRC) para llevar and enjoyed it back at the house.

IMG_5462

Continue reading part 2 here.

Posted in: Frugal Boy, Parenting, Savings, Travel Tagged: Budget, Costa Rica, summer, vacation

Travel Tips for a Great Vacation

May 27, 2016 by Andrew Leave a Comment

Summer is here and the kiddos have had their last day of school.  That means that a lot of people will be hitting the roads and airports for vacations!

Planning a vacation takes a lot of work.  Planning an international vacation takes even more work.  Here are some of my travel tips that I have learned from experience.

Start with an Itinerary

Whether you are planning the trip yourself or have a travel agent, you’ll reduce your stress load with a good itinerary.  You can make it as detailed or vague as you like to suit your travel style.  I personally like to have where we are staying the night and a handful of local attractions/activities that sound interesting.  This gives us some flexibility and we don’t feel so rushed to get to the next thing.

Screen Shot 2016-05-27 at 6.50.54 PM

Print off a copy of the itinerary and give each member in your party a copy so they know what is going on.

Pack Your Bags Early

Don’t wait until the last moment to pack.  Set out a piece of paper and pen a week beforehand and write down packing items as you think of them.  Then two days before you leave, start gathering all of those items into a pile.  Try to pack your bags two days before so you aren’t rushing at the last minute.  Packing early will free up the night before to relax and take care of any other last minute details.

Organize Your Wallet

The last thing that any traveller wants is to lose their wallet or worse yet, have it stolen.  Save yourself some headache and strip your wallet at home.  Remove any cards that you won’t be using.  Trust me, your local gym membership card won’t be needed when traveling abroad.

Download Relevant Travel Apps

IMG_9369


Before leaving home, I like to download the apps for the companies that I have reservations with.  I can login at home and not have to fumble around quite so much when time is more sensitive.  Most websites are mobile friendly, so you may not have to download the specific app, but some sites are almost useless on your phone.  I have found that to be the case with TripAdvisor, so I went ahead and downloaded the native app.  Their competitor Yelp isn’t as useful outside of the USA.

Two other apps that I like for traveling abroad are Google Maps and (Google) Translate.  Both have offline modes where they will continue to work even without an internet connection, but you have to set them up beforehand when you have internet.

Backup Your Phone and Clear Off Space

Just as it would be a major inconvenience to lose your wallet on a trip, it would also be a PITA to lose your phone.  Take the time before you leave to backup your phone.  While you are thinking about that, it is also a good idea to clear off some hard drive space on it so you can take more photos and videos during your trip!

Tell Your Bank About Your Travel Plans

Log into your bank account and usually under Self Service or Customer Service there will be an option to tell your bank about travel plans.  Do this for any debit or credit card that you are going to bring with you, otherwise it might get shut down when you need it!

Stop Mail or Arrange For a Neighbor to Take it In

Nothing screams, “I’m not home” like an overflowing mailbox.  Either go to USPS.com and place a hold on your mail delivery or arrange to have a neighbor take it in.  In the same line of home security, be vague about your travel plans online (yes, I do see the hypocrisy of this blog post but then again I do arrange for our house to be watched before we go anywhere).

Try to Sleep

This one is the hardest of them all.  The night before your trip, try to get a good night’s sleep.  If you are anything like me, that’ll be next to impossible!


What are your tips for a great vacation?


Posted in: Technology, Travel Tagged: Costa Rica, summer, vacation

Repairing and Replacing Window Screens – A Small Science Experiment With Sun Guard 90

May 25, 2016 by Andrew Leave a Comment

When we bought our house three years ago, we also inherited a basement full of window screens in various states of disrepair.  Each Summer, I dutifully pull them out of storage and put them in place and each Summer there are more left in the basement needing repairs.  This year, I decided it was time to spend a day to fix them all.  If the temperature forecasts for this summer are at all accurate, we are in for a real scorcher season.

wsi_summer

Frequent readers of this blog know that our central AC has never worked.  The condenser outside is an ’84 Sears Kenmore unit.  You can imagine my excitement when I saw a screen material at the home improvement store that claimed to reduce temperatures by blocking sunlight and UV rays.

IMG_9349

Armed with a gift card, I started an experiment to see if this screen material lived up to the hype or not.

Hypothesis

Replacing existing aluminum screening material in a South or West facing window would reduce the temperature recorded inside that window.

Experimental Method

I gathered up the needed materials,

  • New York Wire Sun Guard Charcoal 90 Screening
  • .14 Spline
  • Spline tool
  • Existing South/West facing window
  • Scissors
  • Utility knife

IMG_9348

After removing the old spline and screen material, I rolled the new sun guard screen over the frame.

IMG_9350

Then I pressed new spline material into place and cut off the excess screening.  I learned the hard way that it is best to keep the screen material somewhat loose.  Over tightening the screening will bend the frame and it won’t fit right into the window opening.

IMG_9351

With the renovated screen in place for a hour, I then placed a thermometer on the window sill.

IMG_9354

You can see that there is a lot less sunlight behind the renovated screen.

After letting the thermometer settle for five minutes, I took a reading. I then moved the thermometer behind a regular window adjacent to the renovated one.  After five minutes to stabilize, I checked the thermometer again.

IMG_9358IMG_9361

Sun Guard screening recorded at 82° F.  The control window recorded at 90-91° F.

Conclusion

The Sun Guard screening does prevent sunlight from entering the house and helps keep the interior cooler than a regular window.  After seeing these results, I plan on replacing all of the South and West facing screens with this type of material to help keep our house cooler.  I suspect that this type of upgrade would also be beneficial for lowering AC utility bills if you had this type of setup:

outside hot – screens – windows – ac conditioned space.

Posted in: DIY, House Tagged: summer, Utilities, window

The Yearly Internet Bill Reset

May 19, 2016 by Andrew Leave a Comment

Every year our internet bill goes up when we roll off the promotional rate, so every year I call Comcast, our service provider, and find what new promo rate I can get us on.  See last year’s discussion here.

This year, we rolled off the 25 Mbps for $30/mo and went up to $50/mo.  I called in, and the only cheaper plan was a 3Mbps for $40.  I could however triple our speed for the same price.  So that’s what I did.  For the next 12 months, we’ll be paying $50/mo for 75Mbps.  We won’t come close to using that kind of bandwidth, but we might as well get more for the same amount of money.

5337948448

Call to Comcast, 15 minutes.

Next year, things should get more interesting because we’ll be going from two choices, Comcast and Frontier, to three.  Metronet, a fiber optic company, will start laying line this year.  While I don’t know their prices, I do suspect that the added competition will be good for consumers.

Posted in: Technology Tagged: Internet, Utilities
« Previous 1 … 19 20 21 … 69 Next »

Recent Posts

  • Min/Maxing Car Sale for Highest Value and Lowest Headache
  • Buying a Car with Data Driven Decision Making
  • Hot Lunch
  • Baking with Dad
  • Winter Nights

Financial Goals

Recent Comments

  • suwaidi online on Building a New Desktop Computer
  • James Spurr on Building a Self Watering Raised Garden Bed
  • suwaidi online on Total Cost of Ownership – Inkjet vs Laser Printers
  • bcimechanical on Troubleshooting a Gas Furnace
  • g on Troubleshooting a Leaking Whirlpool Dishwasher [UPDATED]

Archives

  • December 2020
  • December 2018
  • July 2018
  • May 2018
  • April 2018
  • March 2018
  • February 2018
  • January 2018
  • December 2017
  • November 2017
  • October 2017
  • September 2017
  • August 2017
  • July 2017
  • June 2017
  • May 2017
  • April 2017
  • March 2017
  • February 2017
  • January 2017
  • December 2016
  • November 2016
  • October 2016
  • September 2016
  • August 2016
  • July 2016
  • June 2016
  • May 2016
  • April 2016
  • March 2016
  • February 2016
  • January 2016
  • December 2015
  • November 2015
  • October 2015
  • September 2015
  • August 2015
  • July 2015
  • June 2015
  • May 2015
  • April 2015
  • March 2015
  • February 2015
  • January 2015
  • December 2014
  • November 2014
  • October 2014
  • September 2014
  • August 2014
  • July 2014
  • June 2014
  • May 2014
  • April 2014
  • March 2014
  • February 2014
  • January 2014
  • December 2013
  • November 2013
  • October 2013
  • September 2013
  • August 2013

Categories

  • Business
  • DIY
  • Finance
  • Frugal Boy
  • Frugal Girl
  • House
  • Misc.
  • Parenting
  • Reading
  • Recipes
  • Savings
  • Technology
  • Travel
  • Uncategorized

Meta

  • Log in
  • Entries feed
  • Comments feed
  • WordPress.org

Copyright © 2026 Frugal Living.

Omega WordPress Theme by ThemeHall