Lately I have been keeping Frugal Boy busy and more importantly, out of my hair, by engaging him in kindergarten worksheets. A great, and FREE, resource that I have found is kindergartenworksheets.net
Even though it says, “Kindergarten”, many of the worksheets are appropriate for a younger audience.
Here are some that Frugal Boy did yesterday and today. I can already tell he has his mother’s number aptitude. The math worksheets are finished a lot faster than the reading/writing ones!
At about half a penny for copy paper, this is a pretty cheap source of entertainment! Leave a comment to share your favorite resources.
If you have kids, you probably have a mountain of candy from trick or treating and Halloween parties. You could eat it all right now, or maybe you did last night, but that would be a tad gluttonous and bad for your health. So after you’ve picked out a few pieces, what do you do with the rest of it?
1. Dentist Buyback
This was the first year that I had heard of it, and it is genius! Simply find a participating dentist or company in your area that is offering a buyback. The idea is that the dentist buys candy from the kids to get some of that sugar off the street and the kid benefits by getting some sweet cash instead!
Frugal Boy brought in a pound and a half of candy and the dentist gave him $5 AND a fidget spinner. Honestly, they could have just given him the fidget spinner and he would have been tickled pink.
2. Take it to Work
I’m not a huge fan of this common practice but it is very effective in getting sugar out of your house. The reason why I’m not a fan of it is that you’re promoting bad health habits amongst your coworkers, ya know, the people you share health insurance with.
3. Freeze It
If you want to be really frugal, throw it in the freezer and dig it out next year to hand out to trick or treaters. If that idea is to scuzzy for you, then consider reusing it personally for easter egg hunts in the Spring.
4. Make Gingerbread Houses
The stores have been promoting Christmas since the beginning of October anyway, so why not get a head start on making gingerbread houses. You’ll have something pretty (or sentimental if little kids are participating) and you can simply toss the whole affair when you are tired of looking at it.
5. Chuck It
It is okay to throw out junk food. I give you my frugal permission to not feel bad about it. If you really want, you can make your own ‘buyback’ program to sell it to your kids and have them bring their candy to you and you supply the cash to them. Next year try to buy less and maybe call trick or treating over a bit earlier. You don’t really need to hit every house in the neighborhood. I try to limit how many houses we visit and usually stick to ones of people that we know. Even keeping the list short, we still end up with a surplus of candy, so use a combination of the above methods to keep the sugar intake to a minimal. We still have Thanksgiving and Christmas to get through so your body will thank you in the Spring if you practice some self restraint now.
Leave a comment with your favorite ways of using that mountain of Halloween candy.
Fall has arrived and the temperatures at night are starting to get uncomfortably chilly. If you haven’t already, now is the perfect time to do a checkup on your furnace to make sure it is ready for another cold winter.
One of the side effects of being a landlord, is that I now have 5 furnaces to maintain. Three of those furnaces are older than me, so breakdowns are a fact of life.
A couple of days ago I went to turn on the furnace at one of our vacant apartments. I was expecting some trouble because this same furnace acted up last winter and made a fool of me. Last year, I had to call a HVAC company to come in because I couldn’t figure out how to get the pilot light lit. In my defense, if I had the benefit of more time I could have figured it out. Alas it was mid December, the temperature in the apartment had already fallen to 50°, and I didn’t want to leave a tenant overnight without heat so I broke out the wallet and bought a life lesson to the tune of $110.
Ouch. Lesson learned. Always bring an extra long lighter that can reach into those nooks and crannies to light the pilot.
Fast forward to the present and I swaggered into the apartment with my extra long lighter. BAM, pilot light lit. I felt suave.
Then nothing else happened. The main burners didn’t fire up, the furnace did not make any heat, and my overconfidence was cut down where it stood. This was going to be more complicated than I thought.
It was time to run through the standard checklist.
Has the gas bill been paid? (Yes)
Do any other gas appliances work? (Yes, the hot water heater next to the furnace was working)
Is the electrical breaker on? (Yes)
Is the electrical shutoff switch set to On? (Yes, these look like light switches and are mounted near the furnace itself)
Is the thermostat set to Heat? (Yes)
Is the thermostat temperature set to higher than the room temperature? (Yes)
Is the pilot light on? (Yes)
Well fudge buckets. That exhausted my standard troubleshooting list. It was time to learn more about how gas furnaces work!
Here is what a 40+ year old furnace looks like with the front panel taken off.
They are pretty simple which is good for us DIYers. The black pipe that comes into the furnace cabinet from the right side is the gas pipe. You can follow it around until it runs into a big silver metal box with the red knob on it. That is the gas valve. The gas valve has two electrical connections to it, a small silver pilot gas line, a large black gas line that goes to the two main burners at the bottom, and a small copper tube that runs to a sensor. In the above picture, I have pulled that sensor out of its normal position.
Let’s talk more about that sensor.
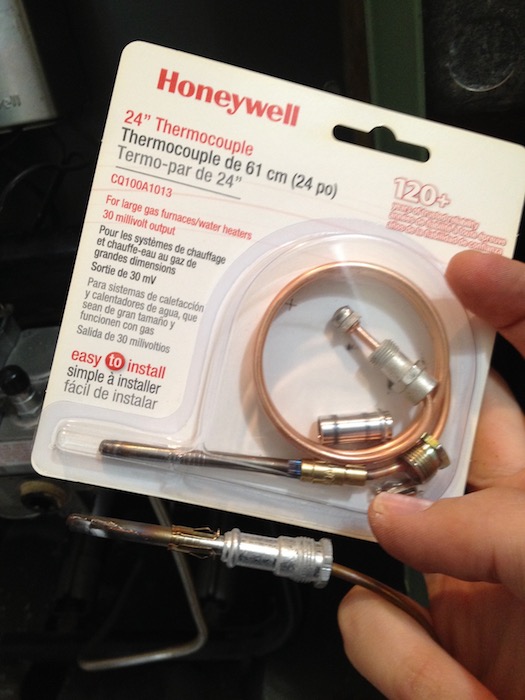
It is called a thermocouple.I bought a new one for $8. A thermocouple is an analog sensor that detects whether or not there is a lit pilot light. If the pilot light is off, then it tells the gas valve to close so your house doesn’t get flooded with gas and blow up. It works by generating a tiny electrical current when it is heated up by the pilot light. A working thermocouple generates between 25 and 35 millivolts. For reference, a AA battery generates 1500 millivolts. You can see that thermocouples produce a tiny amount of voltage. That voltage has to be strong enough to activate a solenoid (or in simple terms a door) within the gas valve. If the thermocouple is worn out or not positioned properly and getting bathed by the pilot light, then the gas valve will shut off the flow of gas to the pilot light and the main burners.
With the thermocouple replaced, I measured 27 mV of DC with my multimeter. The new thermocouple was operating within specifications, but the main burners STILL weren’t coming on.
The next thing to test is that the gas valve is getting the call to heat from the thermostat. On older gas valves, this is a piece of cake. Set your multimeter to VAC, volts AC, and put the test leads on the two electrical connections on the top of the gas valve like so.
We should expect to see 24 V on the multimeter when the thermostat calls for heat. It was showing 0.
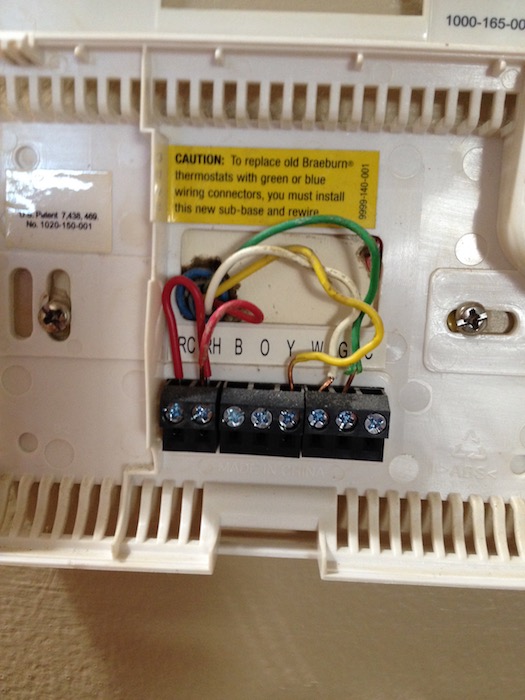
Let’s take a quick look at the thermostat on the wall. After removing the faceplate it looks something like this.
Thermostats are pretty darn simple. They take 24 volts AC from the red wire and send it to the yellow, white, or green wires.
Yellow = Cooling
White = Heating
Green = Fan
With the furnace power off, I simple connected the red to the white wires. Basically, I took the thermostat out of the equation. This is a constant signal to the furnace for more heat.
And would you believe it? I got 24 volts back at the gas valve!
The main burners came on now that the gas valve was energized. The problem was with the thermostat. Rather than try to troubleshoot the thermostat electronics, I simply replaced it with a spare one that I had laying around.
A multimeter is an extremely useful tool for troubleshooting furnaces.
There are many points of failure for a furnace, but there are also many points that you can quantifiably test. If there was still no volt reading after I jumped the red and white wires at the thermostat, I could have jumped red and white directly on the control board in the furnace cabinet. That would have ruled out any faulty cabling from the furnace to the thermostat. Sometimes, an overzealous picture hanger can put a nail right through the thermostat cable. 🙂
I’m glad that I was able to figure this one out. I was getting close to the end of DIYer troubleshooting and into paying big bucks for a professional to come out. The most important thing is to keep your confidence level up. You can do this! Think it through and use that magnificent brain of yours to solve the problem.
It has been one year (± a couple of weeks) since we became landlords. You can read the original post here. The goal a year ago and the goal today is to make money. So how did we do?
I am a bit disappointed in the results, Shae is more positive, and we both feel that the investment is in a much better position now than when we originally bought.
There were two deciding factors in the lackluster first year performance.
1. Large Periods of Vacancies
Vacancies kill your cashflow. The building has 4 units, so there are 48 rent checks to collect in a year. Sounds easy right?! We collected 34/48. At an average rental rate of $560, the uncollected rent due to either vacancy or squatters cost us $7,840 in lost revenues.
While the late, but paid with late fee might seem like a nice bonus to the bottom line, the amount of stress induced comes no where close to the monetary benefit of collecting an additional late fee (usually in the range of $25-50). In almost all cases, a late payment preceded a no payment and no payment means eviction.
Which brings me to the next bit. We had such high vacancies because we turned over 3/4 units. Two of those tenants we asked/insisted that they leave after they failed to pay and had fallen behind so far that it would take a miracle to catch up. Believe me, I take no satisfaction in kicking out a tenant. It is a major headache. You have to serve notice, usually to someone who is angry, then make sure that you have a copy of that notice notarized so the courts won’t throw your case out, then you have to hope that it doesn’t go to court and incur more expenses. It all takes time. Lots and lots of time where you are wondering if your place is getting trashed and destroyed. The onus to play by the legal rules is squarely on the landlord.
Could this have been avoided? Yes, Yes, and YES! I fully blame the previous property manager for not doing proper screening of tenants before signing leases. We have a very simple screening process, tools, and minimum requirements. It takes maybe an hour or two to go through the entire process of checking credit history, searching for past evictions, doing background checks, and verifying employment income. If a prospective tenant has a past eviction (or two or three as might be the case), DO NOT RENT TO THEM. If a prospective tenant has a crap credit score, and I am talking about well below 600, DO NOT RENT TO THEM. This is not rocket science folks. A teensy bit of work upfront can save you mountains of headache later.
While I make it sound like all doom and gloom, we did have one tenant leave of their own accord. They did everything right and we were sad to see them go. So being a landlord isn’t all horror stories.
2. Expensive Capital Improvements
We spent around $12,000 in capital improvements and repairs in the past twelve months. Some of that we had planned for and were expecting when we bought the building, such as the $1500 back stairs replacement and the $600 in vinyl repair work. Other expenditures caught us off guard like the $900 chain link fence we erected to slow down the flow of trespassers using our property as a shortcut and the $3,200 furnace/AC replacement that we thought we could kick down the road a few more years.
Each of those three apartment turnovers cost us approximately $2,000. It wasn’t that we did anything terribly fancy renovation wise, they were just so run down and beaten up that in order to attract a decent tenant we had to spend a large amount of money just to get them presentable. We’ve laid about 1500 sqft of click lock laminate flooring, spread about 20 gallons of paint, and hung up more mini blinds and closet doors than I’d care to thing about.
Slowing down the turnovers were the long overdue maintenance items that needed to be addressed in different apartments, such as leaky washer outlet boxes, dryer vents that terminated in bad places, and ancient garbage disposals that needed to come out.
I anticipate that moving forward, apartment turnovers will require a fraction of the labor and money because we have ‘a’ screening process in place and many of the longstanding defects have been corrected.
Wrapping Up
A few more numbers and observations to put a wrap on this roundup. The tenants paid off about $2,000 worth of equity by making mortgage payments for us. That 2k is factored into our $0 profit/loss for the first twelve months, so really we are at about -$2,000 liquidity. In the next 12 months, the amount of equity earned will accelerate to $2,300. Hurray for a fixed rate mortgage! We managed to increase monthly rental income for the building entirety by at least $95. That translates to an additional $1,140/year in revenue. In capital improvements, we still have 3 x $3,200 HVAC replacements lurking in the woods. We’ll take care of those as they become issues. We also have about $2,500 in concrete work that needs to be done probably in 2018. I put in the paperwork to appeal the property tax assessment value. If things go my way, and I am confident that they will, our 2019 (and onwards) property tax payment will be almost $500 less.
As a short term investment, real estate sucks. We could have easily done better by sticking to index funds.
Frugal Girl had her six month checkup today and another round of life saving vaccinations.
She is daintier than her brother, but she has it were it counts! 27″ tall (83%), 17lbs 5oz (67%), 17.5″ head circumference (93%). In a few weeks she will likely be crawling.


 At about half a penny for copy paper, this is a pretty cheap source of entertainment! Leave a comment to share your favorite resources.