I gave Shae a new Fitbit Charge HR for Christmas last year. By this summer,the band was already starting to delaminate. She wrote to their customer support asking how to fix it, and their response was, “throw the old one away, here is a brand new replacement”. It seemed like a waste to throw away a mostly working product, so I started using the old delaminating product. Over the next several months, the band delaminated more and more until one day it completely fell off.
I didn’t have much to lose, so I found some old super glue gel I had laying around the junk drawer and proceeded to clean off the fitbit module surface and band surface as best as I could. Then I carefully applied a bead of super glue to the module, refit the band to it, and left it to cure for a couple of hours. Later that day, the fitbit was fixed. I have been using it for about two weeks now and there are no signs of bubbling or peeling. I am not sure if this factory adhesive failure was isolated to this unit or if it affected a larger batch of production. The fix is incredibly easy however.
Shae and I have kicked around the idea of buying investment real estate for several years. Today, we finally pulled the trigger. In all truthfulness, the moment came several months ago when we submitted a bid on an apartment building. It has just taken until today to finalize all of the legalese. Buying real estate isn’t for the faint of heart!
So what is so special about real estate as an investment tool. In one simple word, ‘leverage’. Putting someone else’s money to work for yourself is relatively easy in the world of real estate. Mortgages are advertised by virtually every bank, credit union, and even insurance salesmen! Right now, we are living in an almost unprecedented environment of cheap borrowing. The prime mortgage rate for a 30 year fixed rate loan is hovering around 3.5%. In fact, that is the rate we secured. I remember when I was a kid and you could have a savings account earn more than that.
We have talked together for years about what type of property we would want, why that would best achieve our goals, and how we would want to operate it. For us, residential housing, aka apartments, with a buy and hold strategy was a natural fit. Earlier this year, we got serious again about getting out of the armchair and into the field. We ran numbers on dozens of different properties for sale. I adapted a simple back-of-the-napkin model from BiggerPockets.com and used that to get a better idea of how different properties sized up to one another. Eventually, we started to get a feel for our local market. There were some abysmal numbers out there, a lot of mediocre ones, and some that seemed too good to be true. We started calling realtors and visiting places in person. Sometimes the numbers lined up with what we saw in person. For example, one place had an amazing rate of return on paper, but in person it was obvious that it was a high turnover, hard to collect rent type of place. When the tenants have smashed holes in the drywall, you run the other way as fast as your legs can carry you!
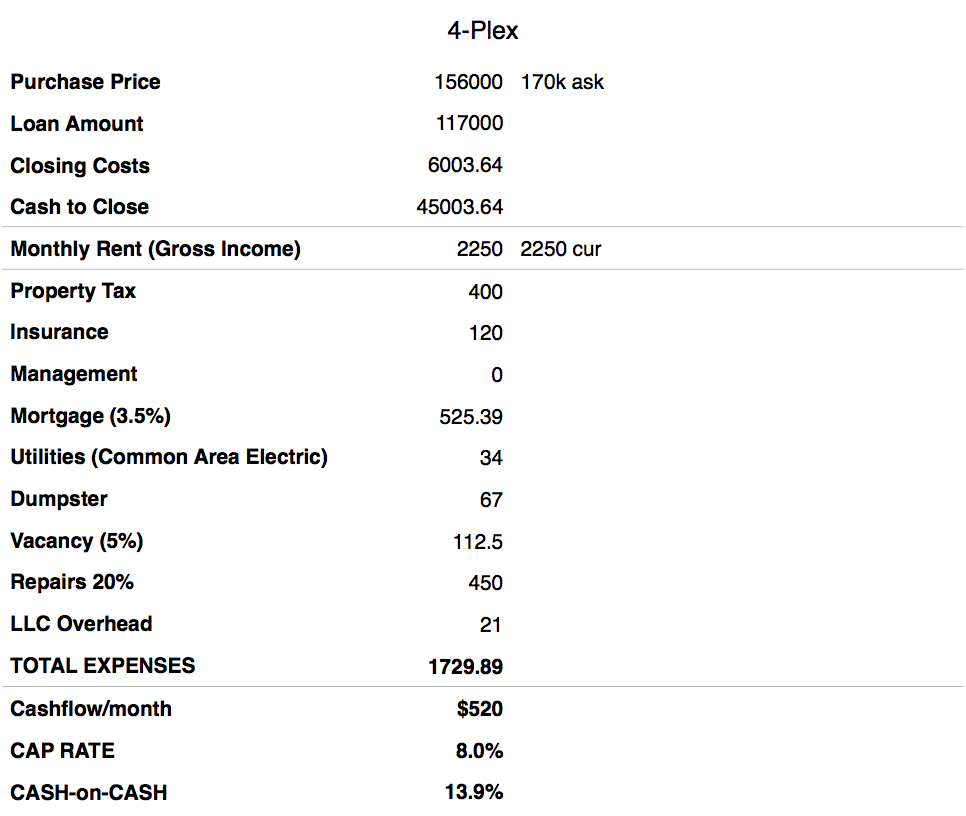
Eventually, we spotted an attractive looking quadplex that ticked off all our checkboxes. It had a simple geometry, was purpose built for apartments, good neighborhood, and was taken care of by a respectable owner. The ask price was 170k. We offered 151k. Other buyers put in bids, counteroffers ensued, and we eventually won with an offer of 156k. Below you can see our napkin investment math.
Monthly Rent through Total Expenses are on a monthly basis. The CAP RATE, or capitalization rate, would be the investments rate of return. Leverage is what makes the work worth it though. CASH-on-CASH is the rate of return that we are forecasting for the profit, cashflow/year divided by the cash to close. In essence, we made an investment of 45k dollars and expect to make 6k a year in profit. Of course, only time will tell how well it actually performs, but at some point you just have to jump in and start swimming. The other huge benefit of real estate is depreciation, but I’ll get into that closer to tax season.
For the past couple of days when Shae or I walked in the back door we noticed an unpleasant odor. We checked the half bath adjacent to the door, the entranceway closet, and underneath the kitchen sink. Taking the garbage and compost out did not seem to solve the problem and everyday the odor would come and go.
Yesterday, I finally figured out the source when I went to unload the dishwasher. I smelled that all too familiar smell of something died and saw a little glimmer of water at the base of the washer. Uh oh.
Removing the kick panel revealed a grisly scene of stagnant sludge water pooling under the dishwasher. My first thought was, “Yay, I found the problem.”, quickly followed by, “oh damn”.
Pulling the dishwasher out from underneath the cabinet isn’t too difficult of a task. Flip the breaker(s) at the electrical panel to kill power to the unit, find and turn off the water supply valve, and undo any screws attaching it to the cabinetry.
After mopping up the mess and hosing it down with a liberal amount of bleach, I set to work trying to figure out the source of the leak. My first inclination was the drain hose. The pooled water was not clean, and a leak from the supply line would have flooded the whole room, so I ruled that option out. That left the drain hose or the dishwasher itself.
Fast forward an hour and a half and I had a new drain hose installed and with Shae’s help we did a test run with the dishwasher pulled out from underneath the cabinetry. This way, we could easily see if anything was leaking. Right away, water started gushing out from a port at the bottom of the unit. Well, so much for my hypothesis that it was the drain line.
I looked up the part number online and found out it was the diverter motor. #12 in the diagram below.
Removing the motor was a simple task, it just had two electrical connectors and two screws holding it in place. Upon closer inspection, I could not deduce any water sealing feature on the #12 part. The fault must lie further upstream.
I opened the door to the dishwasher and started removing parts. The first to go were the filter screens, #2 and #6. Next was the sprayer arm, #7. A quarter turn was all it took to unlatch it. Then part #1 was liberated with another quarter turn. Below that is the diverter disk, part #4. It attaches onto the post of the diverter motor, #12, where we saw the water coming out of. Yay, progress!
In the above picture, you can see the white diverter motor post sticking up through the bottom of the dishwasher. Water was getting through that black gasket/grommet/seal. With a little digging around the internet, I found the replacement Sump Assembly part, #3 for $56. I don’t need the whole assembly, I just need the grommet. Thankfully, I found it as part #WPW10195677 (alternative part AP6016787). $6 plus shipping. [Update 4/4/2018] The previously linked part is no longer in stock. Here are some alternatives. from SearsDirect.com, or avxseals.com (hat tip to David Olson for finding a suitable replacement part).
With any luck, the replacement grommet will fix the problem, at least for the next 3 years. The total cost so far is $10 for a new drain hose, $14 for a new grommet.
$24 plus some sweat equity sure beats paying a technician to come in and bill $200-$400. It also beats paying $150 for an extended warranty.
The grommet seems to be compatible with Whirlpool, Kenmore, and KitchenAide dishwashers. I suspect all three brands suffer from this same problem. Our next dishwasher will not be one of these three brands.
[UPDATE]
The part arrived today and I was able to pop the old grommet out very easily.
The new grommet slid into place just as easily. This would be a much easier repair if you did not have to remove the diverter motor underneath the machine. Perhaps a more skilled person could, but since I already had the machine pulled out it wasn’t too much extra work.
A quick test of the system revealed no leaks! Huzzah!
As a final step and with the benefit of hindsight, I added a 1/2″ thick sheet of rigid board insulation in the cavity. On sub zero nights, the drain line would freeze. Hopefully, this will save us some future headache.
Here is a Youtube video that shows the entire procedure.
Autumn is imminent and that means that squash type plants are coming into season. We have a couple of butternut squash vines in our garden that have produced. Eating in season is both healthy and frugal!
Shae had picked up a new kitchen gadget called a spiralizer from Sears for $2. It was originally $12 and then Sears gave her a $10 credit to lure her back to the store.
After you peel the squash, you can cut off the long cylindrical part and attach it to the spiralizer.
Cranking the gadget yields long flowing ‘noodles’ of golden orange squash.
From here you can cook the noodles in any number of different ways. I decided to put them in a mixing bowl with some olive oil, toss to coat, and then lay out on a baking tray.
With the addition of garlic, Italian seasoning, and onion powder, the noodles were then roasted in the oven at 400° for 10-15 minutes or desired tenderness.
To wrap up the meal, we paired the noodles with a sun dried tomato alfredo sauce and pan fried chicken. It was delicious, cheap, and healthy! We’ll be making these again.
An Autumn chill has crept into the nights and we have closed up most of the windows in the house to keep the warm daytime air in. The cooler weather is a welcome respite from the heat and humidity that has dogged us for the majority of the summer. On Sunday, after we waved goodbye to the grandparents, a tale for a different day, Shae and I set to work on planting fall perennials and spring bulbs around the house. Frugal Boy moped inside, he had a serious case of the blues and missed Grandma and Grandpa.
Before we rebuilt the porch, it was surrounded by perennial mums. A year and a half of construction had killed off the majority of the plantings surrounding the porch, so we picked up almost 100 bulbs plus 16 quart sized yellow garden mums from Menards. The home improvement store was running an 11% off sale that made the mums an attractive $1.11/ea. Tulip bulbs were 19¢ a piece and giant alliums were 20¢ each.
We spent a couple of hours relocating two dozen hostas from the front of the house to fill in other areas. Then we laid out a two row pattern of hyacinths and tulips for the flower bed in front.
Next Spring we’ll probably need to add in some Summer and Fall color to this flower bed.
Next, we dug a trench around the southern and eastern porch edges to plant giant alliums, tulips, hyacinths, and yellow mums. Mums are a fall perennial so my hope is that as one plant dies off or loses appeal, another will take its place. Experienced gardeners call this layering and know what they are doing. I took a more spray and pray attitude.
With any luck, everything that we planted will come back for years to come.