I am sitting at the mechanics garage right now waiting for a transmission fluid change to be finished. This ‘once every 100,000 miles’ maintenance ticket is becoming less DIY friendly because of how infrequently it needs to be done. In fact, our car does not even have a transmission dipstick or drain plug!
There are other preventative maintenance jobs that are in reach of even the most novice DIYer, such as furnace filter changes.
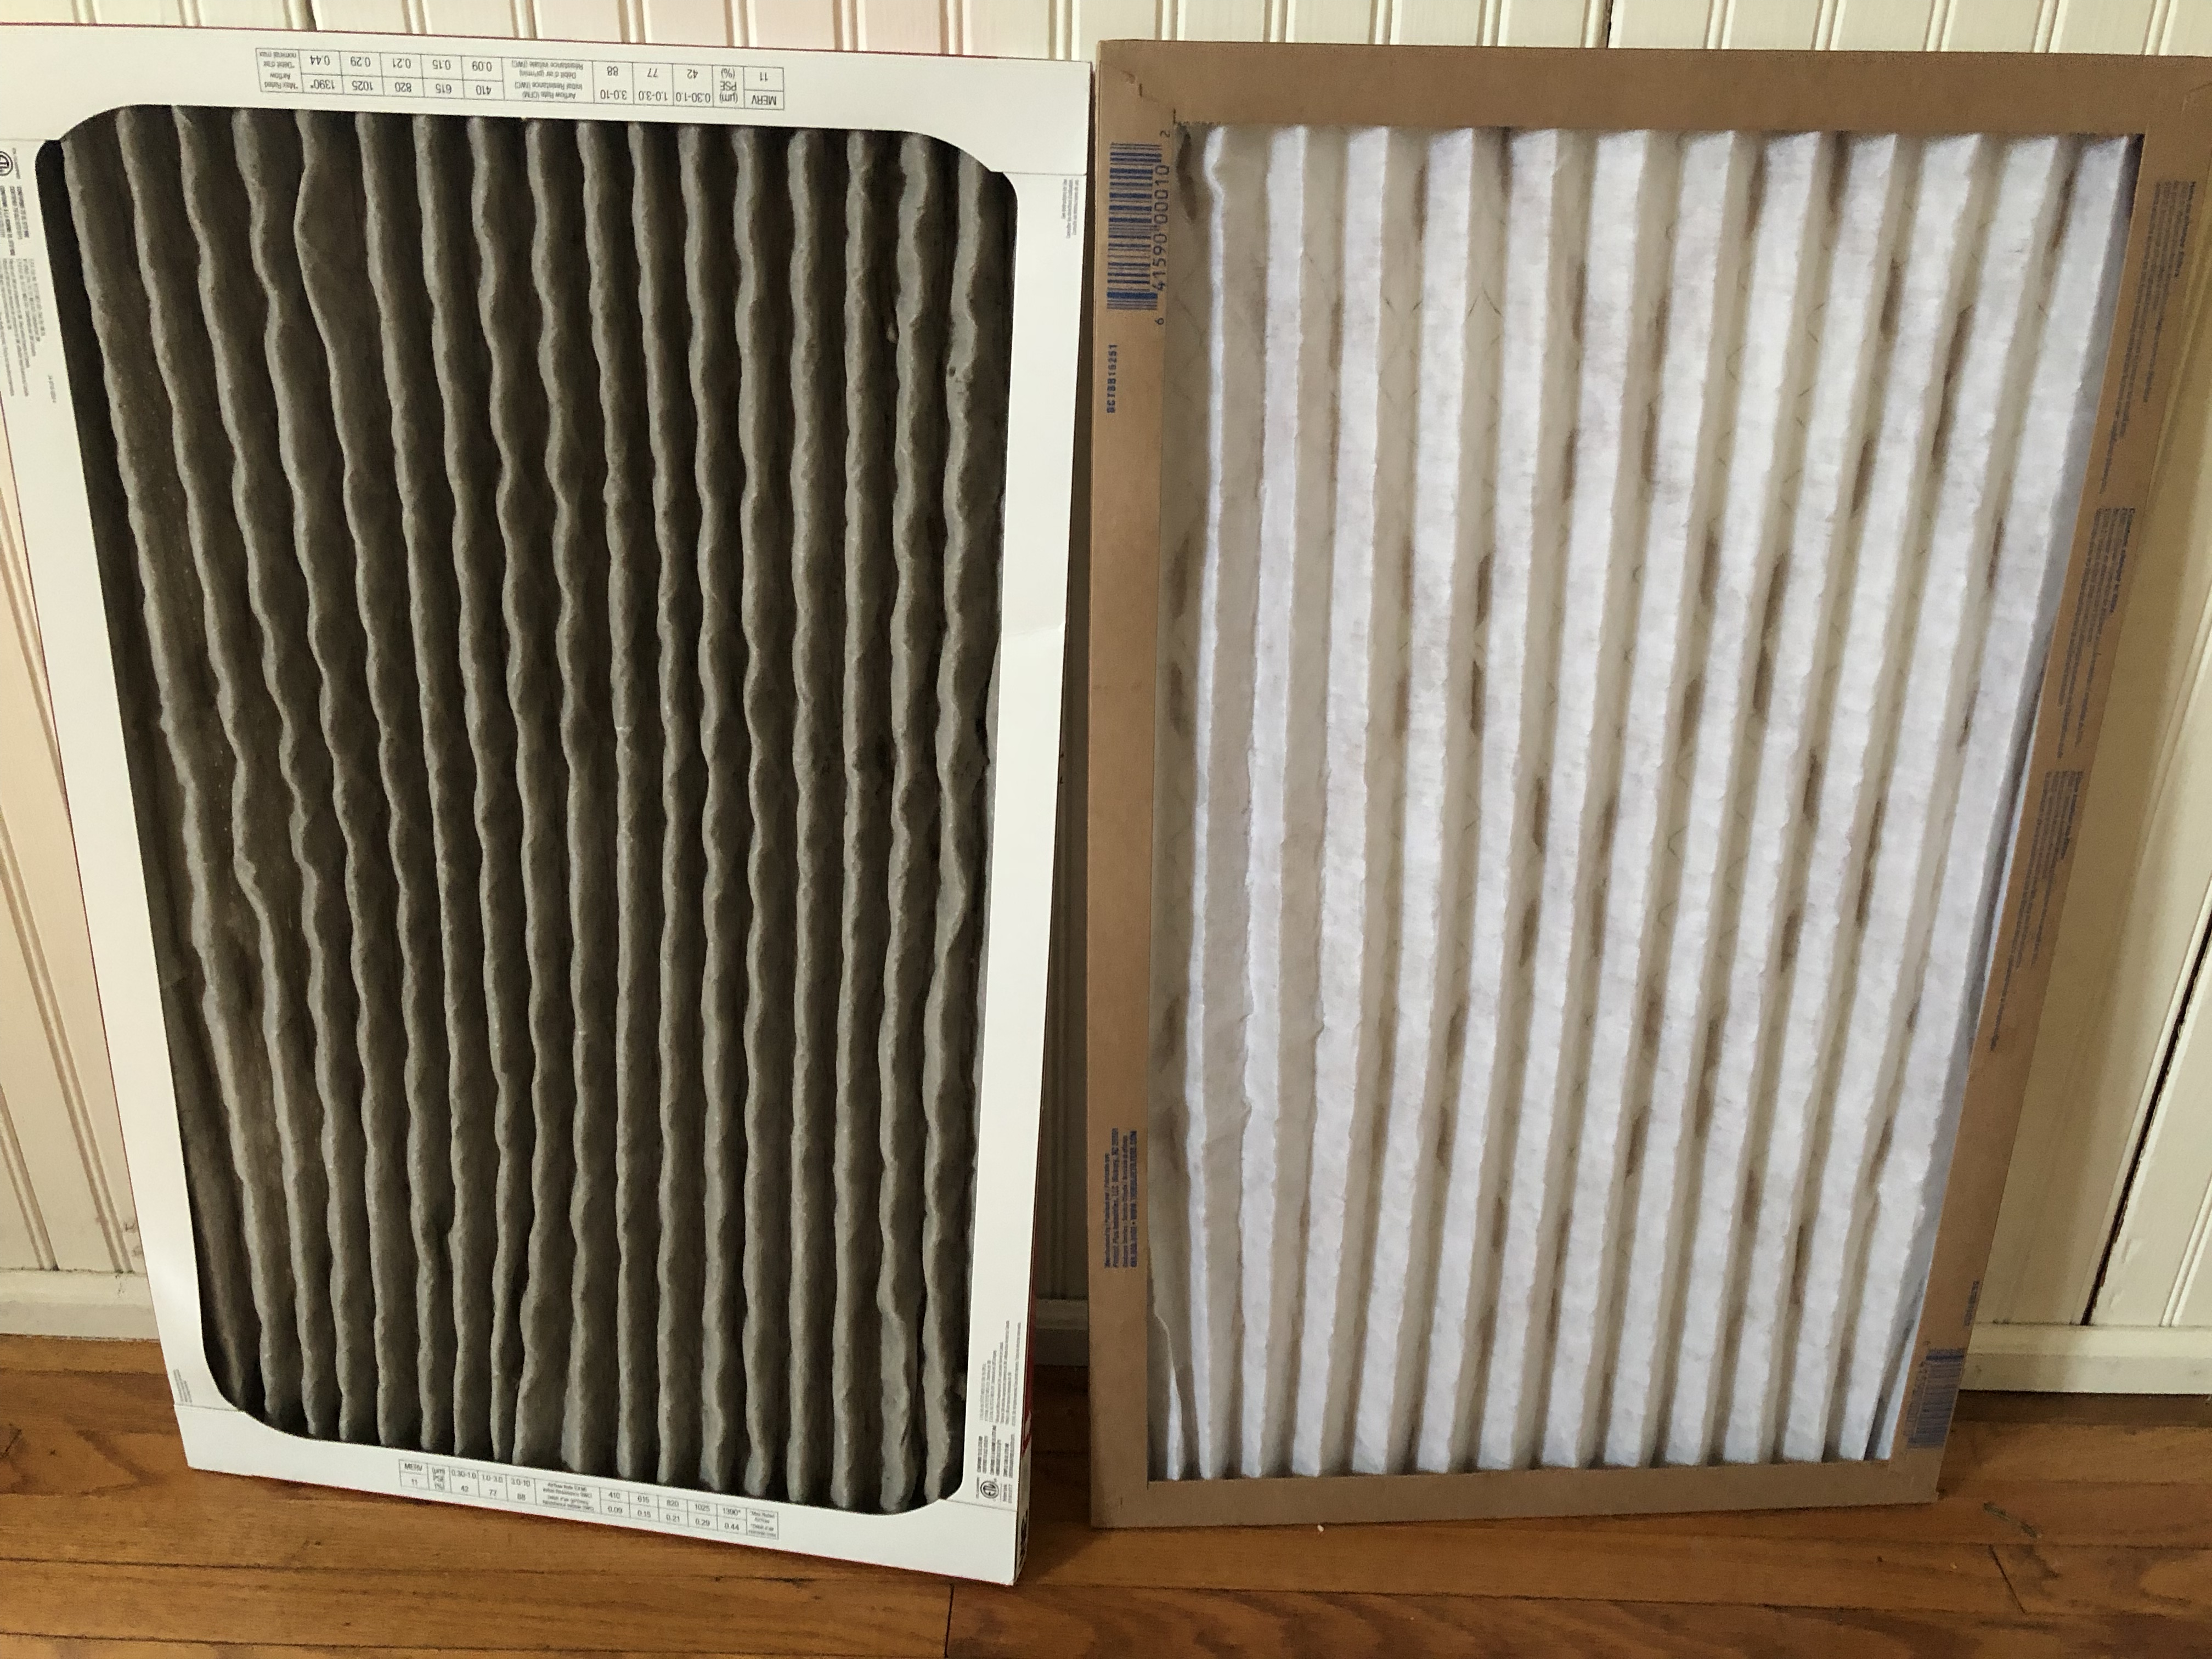
Your homes furnace filter should be changed every 1-3 months. Here you can see our 2 month old filter next to a brand new one.
I am replacing an expensive MERV 11 filter ($9.99) with a cheapo MERV 7 ($2.33). The answer I cannot readily find is which filter is better for my HVAC equipment.
Your furnace and central AC is like a lung. It sucks air in and that air passes through a filter. It then blows air out to the rest of your house. If the filter is too restrictive, the furnace has a hard time ‘breathing’ and the equipment has to work harder. If the filter is not restrictive enough, then dust and dirt can build up on the equipment and clog it up making it work harder. Somewhere there is a perfect balance, and it will be different for each setup.
The nice thing about the expensive filter, is that it lists the technical specs right on the filter. Details such as static pressure drop, initial resistance, and airflow are all printed right on the filter.
I could not find that information for the cheap filter anywhere. The expensive filter has 17 pleats to the 12 of the cheap filter. In theory, more pleats in the same rectangle means a bigger surface area. A bigger surface area means more ways for air to pass through. Without hard numbers however, it is impossible to draw any decisive conclusions.
Of course the decision on expensive or cheap filters might come down to health and comfort. The MERV 11 filters out mold spores and the MERV 7 does not. Keeping your body healthy might be the most important preventative maintenance you do!
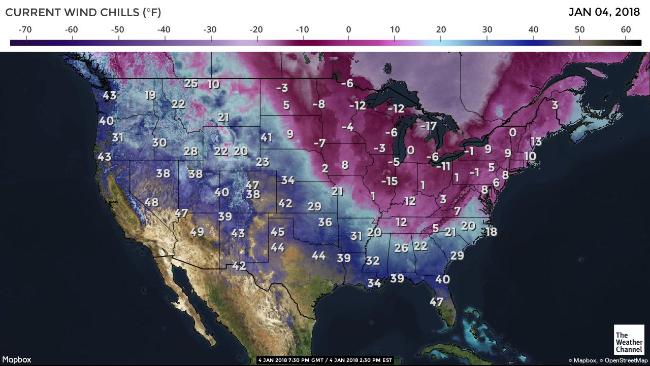
2018 is here and so is a blast of subfreezing arctic air.
With so many new low record temperatures set in the past few days, it is no surprise that pipes are freezing.
Burst Dishwasher Water Inlet Valve
One such victim of the cold weather was my Whirlpool WDT790SAYW2 Gold Series dishwasher. After a particularly frigid night my wife went to unload the dishwasher and discovered that it had not run over night as intended. I figured that the waste line had frozen again despite my previous attempts (see here) at insulating the wall. We opened the cabinets to let warm air circulate and removed the bottom access panel of the dishwasher.
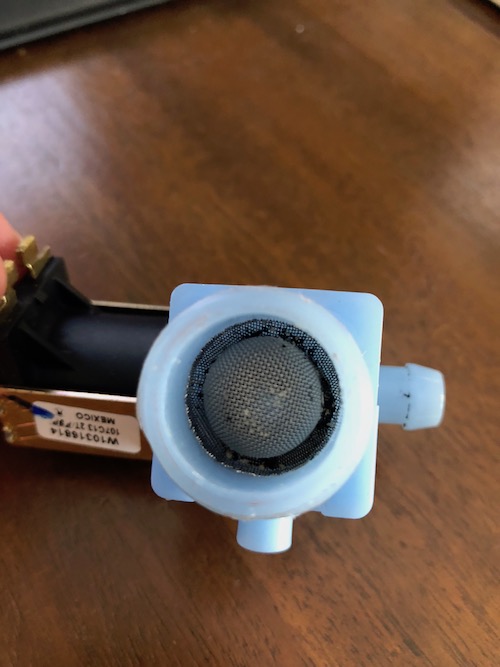
Later in the morning as I was washing some dishes in the sink I heard water start to run below the dishwasher. I quickly turned the water supply line off, and it was a good thing that I was there. The ice had melted and the culprit was quickly discovered when I pulled the dishwasher out from under the cabinetry. The water inlet valve had burst.
Whirlpool W10327249
Removing the part is simple.
Turn off the electrical breakers feeding the dishwasher
Turn off the water supply line
Unthread the water supply line
Unscrew the single mounting screw holding the part in place.
Disconnect the electrical harness connected to the solenoid.
Use pliers to loosen the clamp on the black outlet hose and remove the hose.
Part # W10316814
There is an inlet filter screen that you should check if your dishwasher is not getting sufficient water. The filter might be clogged.
Installation is the reverse and takes about 5 minutes. The part is about $25 and requires needle nose pliers and a flat head screwdriver.
This part seems to be compatible with certain Kitchenaid dishwashers as well because Whirlpool and Kitchenaid belong to the same umbrella of companies.
Frozen Pipes
I also checked in on the vacant apartment that I manage and discovered that it had some frozen pipes.
The first thing to do is open up the cabinets to let air circulate.
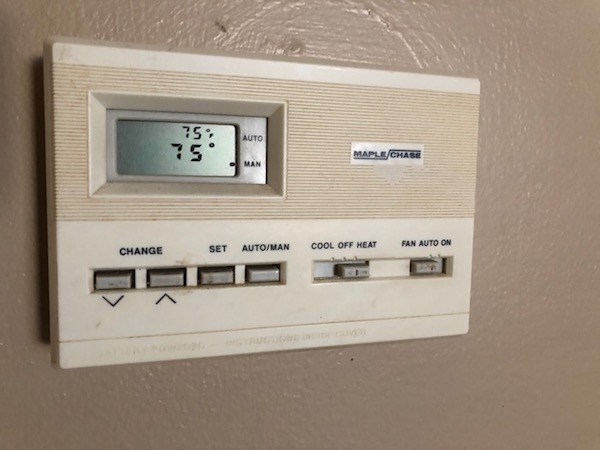
In this case, the cold water pipe was frozen, but the hot water pipe was still open. I cranked the apartment thermostat up from 62 to 75.
Turning on the still working hot water pipe also helps warm up the blockage. After about an hour, the ice had melted and the water was flowing again. No permanent damage was done.
The other frozen pipe was located in the crawlspace. I am a firm believer in fixing the underlying problem, so I crawled down there to take a look at what was going on.
While most of the crawlspace was warm, the perimeter had some issues. Above you can see the frozen pipe on the left. You can also see ice forming on the framing around an AC coolant line that exits to the outside.
Using a can of spray foam, I did my best to plug the hole.
I suspect when the temperatures rise later this week the demand for plumbers is going to skyrocket as pipes thaw out and problems become more apparent. The real damage of a frozen pipe is the thousands of gallons that can spill out and flood a house. If you can catch it early while it is still frozen, you can save yourself a lot of headache.
Fall has arrived and the temperatures at night are starting to get uncomfortably chilly. If you haven’t already, now is the perfect time to do a checkup on your furnace to make sure it is ready for another cold winter.
One of the side effects of being a landlord, is that I now have 5 furnaces to maintain. Three of those furnaces are older than me, so breakdowns are a fact of life.
A couple of days ago I went to turn on the furnace at one of our vacant apartments. I was expecting some trouble because this same furnace acted up last winter and made a fool of me. Last year, I had to call a HVAC company to come in because I couldn’t figure out how to get the pilot light lit. In my defense, if I had the benefit of more time I could have figured it out. Alas it was mid December, the temperature in the apartment had already fallen to 50°, and I didn’t want to leave a tenant overnight without heat so I broke out the wallet and bought a life lesson to the tune of $110.
Ouch. Lesson learned. Always bring an extra long lighter that can reach into those nooks and crannies to light the pilot.
Fast forward to the present and I swaggered into the apartment with my extra long lighter. BAM, pilot light lit. I felt suave.
Then nothing else happened. The main burners didn’t fire up, the furnace did not make any heat, and my overconfidence was cut down where it stood. This was going to be more complicated than I thought.
It was time to run through the standard checklist.
Has the gas bill been paid? (Yes)
Do any other gas appliances work? (Yes, the hot water heater next to the furnace was working)
Is the electrical breaker on? (Yes)
Is the electrical shutoff switch set to On? (Yes, these look like light switches and are mounted near the furnace itself)
Is the thermostat set to Heat? (Yes)
Is the thermostat temperature set to higher than the room temperature? (Yes)
Is the pilot light on? (Yes)
Well fudge buckets. That exhausted my standard troubleshooting list. It was time to learn more about how gas furnaces work!
Here is what a 40+ year old furnace looks like with the front panel taken off.
They are pretty simple which is good for us DIYers. The black pipe that comes into the furnace cabinet from the right side is the gas pipe. You can follow it around until it runs into a big silver metal box with the red knob on it. That is the gas valve. The gas valve has two electrical connections to it, a small silver pilot gas line, a large black gas line that goes to the two main burners at the bottom, and a small copper tube that runs to a sensor. In the above picture, I have pulled that sensor out of its normal position.
Let’s talk more about that sensor.
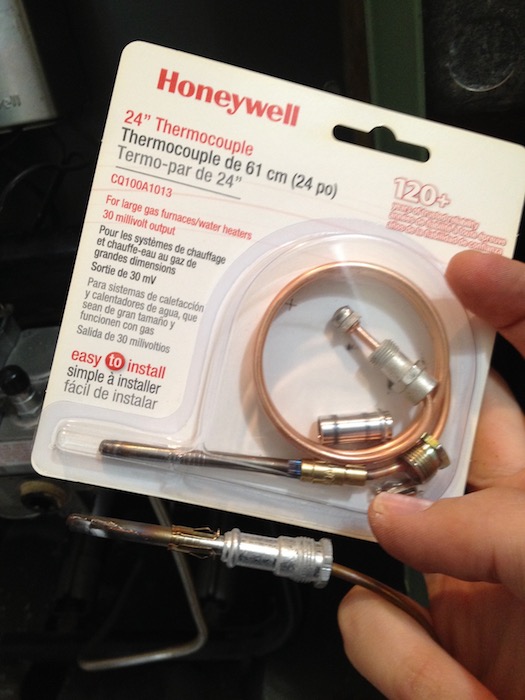
It is called a thermocouple.I bought a new one for $8. A thermocouple is an analog sensor that detects whether or not there is a lit pilot light. If the pilot light is off, then it tells the gas valve to close so your house doesn’t get flooded with gas and blow up. It works by generating a tiny electrical current when it is heated up by the pilot light. A working thermocouple generates between 25 and 35 millivolts. For reference, a AA battery generates 1500 millivolts. You can see that thermocouples produce a tiny amount of voltage. That voltage has to be strong enough to activate a solenoid (or in simple terms a door) within the gas valve. If the thermocouple is worn out or not positioned properly and getting bathed by the pilot light, then the gas valve will shut off the flow of gas to the pilot light and the main burners.
With the thermocouple replaced, I measured 27 mV of DC with my multimeter. The new thermocouple was operating within specifications, but the main burners STILL weren’t coming on.
The next thing to test is that the gas valve is getting the call to heat from the thermostat. On older gas valves, this is a piece of cake. Set your multimeter to VAC, volts AC, and put the test leads on the two electrical connections on the top of the gas valve like so.
We should expect to see 24 V on the multimeter when the thermostat calls for heat. It was showing 0.
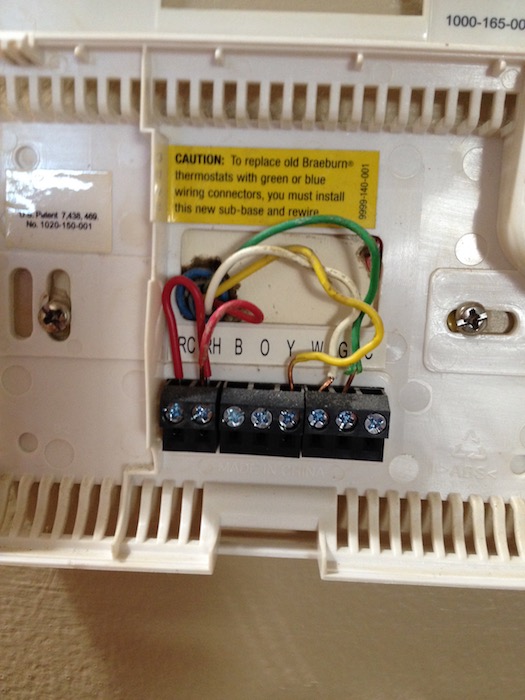
Let’s take a quick look at the thermostat on the wall. After removing the faceplate it looks something like this.
Thermostats are pretty darn simple. They take 24 volts AC from the red wire and send it to the yellow, white, or green wires.
Yellow = Cooling
White = Heating
Green = Fan
With the furnace power off, I simple connected the red to the white wires. Basically, I took the thermostat out of the equation. This is a constant signal to the furnace for more heat.
And would you believe it? I got 24 volts back at the gas valve!
The main burners came on now that the gas valve was energized. The problem was with the thermostat. Rather than try to troubleshoot the thermostat electronics, I simply replaced it with a spare one that I had laying around.
A multimeter is an extremely useful tool for troubleshooting furnaces.
There are many points of failure for a furnace, but there are also many points that you can quantifiably test. If there was still no volt reading after I jumped the red and white wires at the thermostat, I could have jumped red and white directly on the control board in the furnace cabinet. That would have ruled out any faulty cabling from the furnace to the thermostat. Sometimes, an overzealous picture hanger can put a nail right through the thermostat cable. 🙂
I’m glad that I was able to figure this one out. I was getting close to the end of DIYer troubleshooting and into paying big bucks for a professional to come out. The most important thing is to keep your confidence level up. You can do this! Think it through and use that magnificent brain of yours to solve the problem.
This 4 part series shows some of the decisions and work done to economically upgrade a forced air furnace and ac system. The goal is to reduce the overall cost while improving the finished quality by taking on some of the smaller jobs as DIY instead of bundling the work with the HVAC contractor.
The primary objective of this project was to replace the nonfunctioning 1984 Sear Kenmore air conditioner with a modern, high efficiency, and most importantly, working, air conditioner. The natural gas furnace was also showing its age. The blower had a yellow sticker showing the manufacture date of August 5th, 1994.While the furnace worked and kept the house warm in winter time it wasn’t the most efficient unit. If I had to guess it was probably a 90% efficient model and it most definitely had an old style PSC blower motor. PSC motors work in either ON or OFF. So the air in your ductwork is either blowing at full force or not at all. The more efficient blower motor is an ECM. These electronically controlled motors can usually work at at 50% or 100% or some of the fancier ones can run at anything between 0-100%. Not only do they save on electricity costs but they also improve comfort by constantly circulating and filtering air throughout the house.
The first order of business is in sizing some new equipment. There are three main pieces of equipment in your standard forced air system, the gas furnace, AC condenser, and the AC evaporator coil. Furnaces come in three different airflow configurations, upflow, downflow, and horizontal. In an upflow furnace, the unconditioned air starts at the bottom of the furnace and travels upwards while being heated before exiting out the top. The AC evaporator coil sits on the conditioned side of the furnace. So in an upflow furnace, the evaporator coil would sit on top of the furnace.
As for sizing each piece, furnaces are sized by their output BTU, or British Thermal Unit. Typically, furnaces come in 40k, 60k, 80k, 100k, and 120k BTUs. AC condensers are sized by tons. One ton is equivalent of 12k BTUs of heat that can be removed from a house in one hour. Typical tonnages are 1.5, 2, 2.5, 3, 3.5, 4, 4.5, and 5. Evaporator coils are sized the same or larger than the condenser. There are a lot of different rules of thumbs for sizing both furnaces and AC systems. It is important to get the size correct. You may be tempted just to get a really big system, but that would cause its own set of problems. HVAC equipment is designed to operate best when it is given enough time to run. Short cycling, or the process where a furnace or AC kicks on and too quickly reaches its desired temperature and shuts off again can lead to decreased comfort and energy savings. If a system is sized too small, then the equipment just runs and runs without ever reaching the desired temperature.
The proper way to size equipment is to perform a Manual J calculation. You’ll need to gather a lot of information about your house. http://www.loadcalc.net
In my case, I had already gathered bids from three reputable HVAC contractors. Each of those contractors gave three separate equipment bids for a total of nine different equipment configurations. I simply threw out the lowest and highest sizing outliers and went with the median. For my house that ended up being a 100k BTU furnace and a 3.5 ton AC condenser.
Then I went to my preferred HVAC contractor and asked them to provide me with an estimate for both the equipment and labor. His equipment bid was $1400 more than what I could buy the exact same model numbers for online. The differences were that his bid
Came with a warranty
Equipment in stock at local supply house, meaning sooner installation
Less hassle for me in scheduling lift gate delivery
3.5 Ton 16 SEER Goodman Air Conditioner Condenser $1,151
4 to 5 Ton 21″ Width Goodman Cased Evaporator Coil with TXV $536 (this was actually substituted by the factory for an in stock model)
A new condensate pump
The total was $3,250. Saving $1400 in lieu of a warranty seemed like the best option for us. If you are less risk tolerant then perhaps you would want the peace of mind that a warranty gives. I figure that if we do have problems with one or more pieces then that $1400 would go a long way to resolving them.
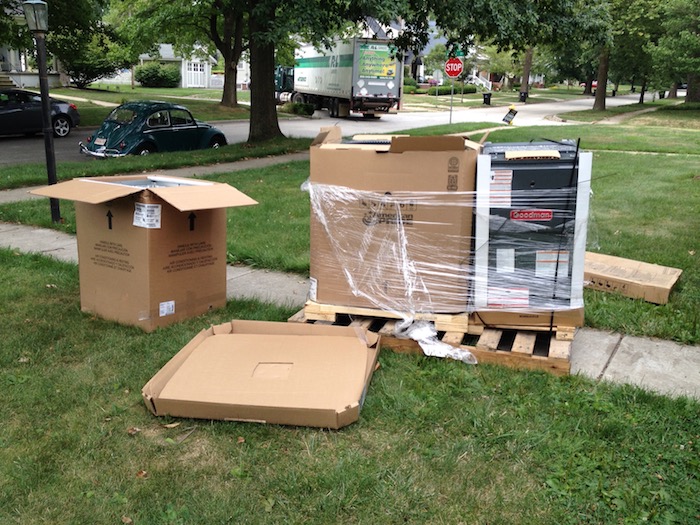
Within a few days I received a phone call from the truck driver telling me he was on his way. I paid an extra $35 for lift gate service. All that means is that the semi truck driver will use a little elevator on the back of the truck to get the pallet of equipment down onto the street level. He also had a pallet jack to move it off the street and into our front yard. That was it, the rest of the work of moving the new equipment would be my responsibility.
Before signing off on the delivery, it is crucial that you inspect all boxes and equipment. Any damages should be returned immediately. Both the AC condenser and evaporator coil shipped with a charge from the factory. The condenser comes pre-charged with refrigerant and the evaporator comes charged with inert nitrogen gas. The condenser is the most fragile unit, and it is also the heaviest weighing in at around 200 pounds. If there is any damage it would likely show as either crushed fins or oil pooling at the bottom of the box.
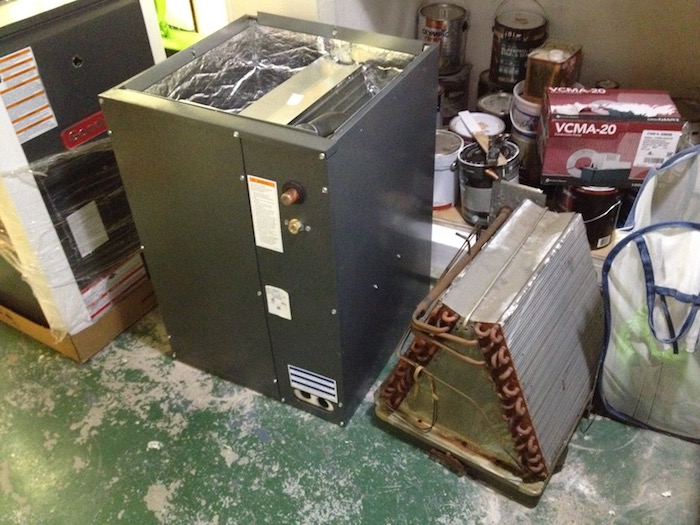
I was a bit surprised that the new equipment had arrived so promptly. I thought I would have more time to remove the old stuff. Thankfully, the furnace is fairly easy to remove. In the process of removing it, I discovered a sizable crack in the secondary heat exchanger. I guess that is another good reason to replace with new equipment.
Meanwhile, Frugal Boy was enjoying his new toy.
There was a slight size difference between the old evaporator coil and the new one.
With all of the old equipment torn out and the new stuff ready to be installed it was time to call the contractor and let him take it from there. Once he was finished there were just a few loose ends to tie up.
This 4 part series shows some of the decisions and work done to economically upgrade a forced air furnace and ac system. The goal is to reduce the overall cost while improving the finished quality by taking on some of the smaller jobs as DIY instead of bundling the work with the HVAC contractor.
Replacing a furnace or an air conditioner is usually the sole realm of licensed contractors, but that one BIG job is composed of many little jobs. A lot of those little jobs are in the realm of an experienced DIYer.
To save some money on the replacement of our furnace and air conditioner, I did some of those little jobs myself.
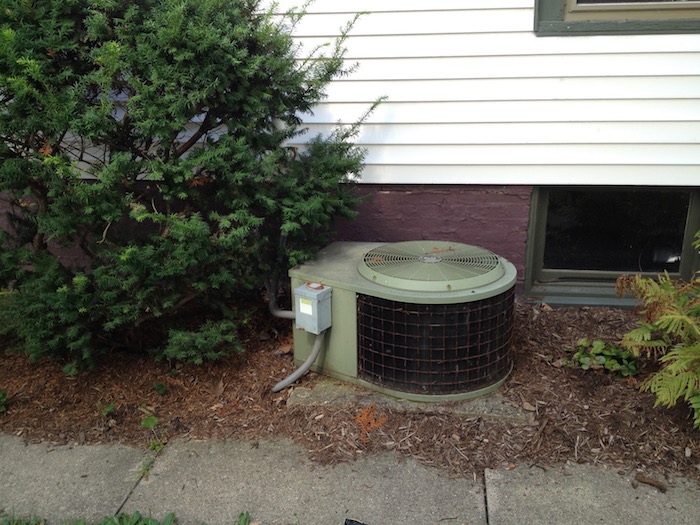
Here is a picture of our old AC condenser.
The bush is overgrown and needs to be trimmed back. That doesn’t take any special skills or training. Also, the electrical disconnect box is mounted on the condenser itself which is against building codes. It should be mounted on the house. If you have done other electrical projects in the past that is certainly a project for an intrepid homeowner. Physically removing the condenser isn’t difficult once the old refrigerant has been removed. If you don’t know how to properly remove the refrigerant have a professional come and do it.With the old unit removed and the concrete pad exposed we can make further progress. This concrete base was too small so I tore it out as well. You might think that concrete would be hard to remove, but if you can get something under it like a 2×4 it will break up very easily.
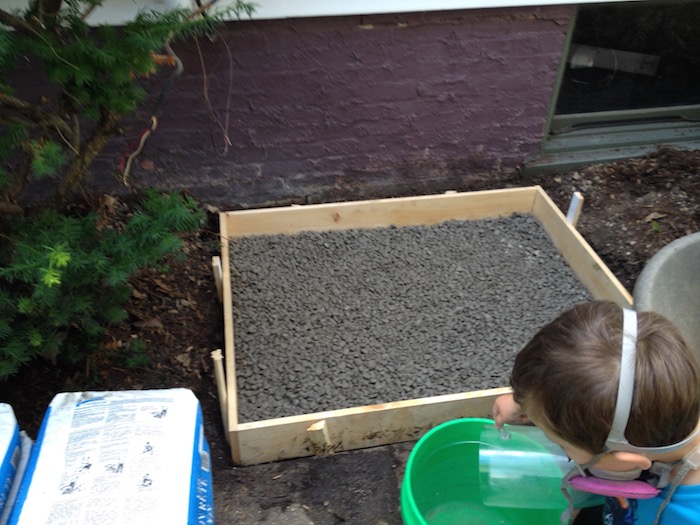
I made a new concrete form and did some excavating.
A layer of gravel went in first and some bracing stakes went in around the perimeter.
With Frugal Boys help, I mixed up a bag of concrete at a time in a wheelbarrow I found in the trash.
Using a sacrificial 2×4 as a make shift screed, I leveled off the top of the concrete so it sat flush with the form.
After it had set up a bit, Frugal Boy and Frugal Girl both left their marks. Make sure you wash off any concrete from skin as it can cause a nasty chemical burn if left on.
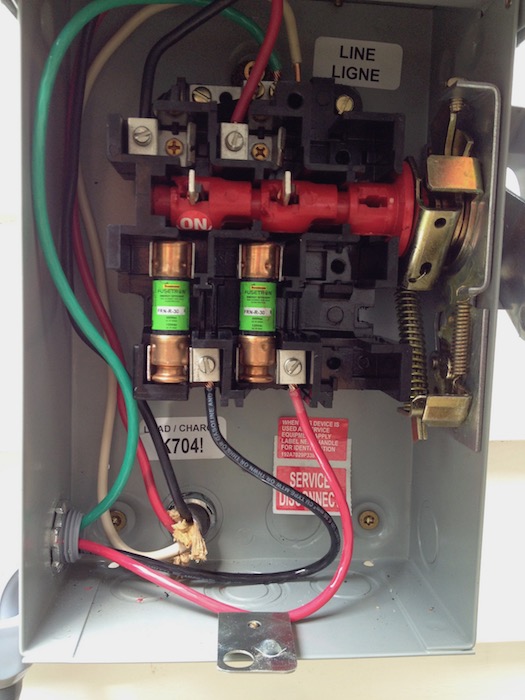
While I could have reused the old electrical disconnect box, I bought a newer one and hooked it up.
It isn’t too terribly difficult, but there is a lack of instructions that come with the products.
To finish up the project, I added some hardscaping around the new pad. The idea is that
It will keep down on vegetation growing too close.
The service man will have a cleaner workspace. Instead of sitting in mud and tracking that into your house, they can keep clean.